Creating a Payable in entrée

Contents
entrée version 3 and V4 SQL offer the ability to create a payable or vendor bill at the time a purchase order is received in the entrée system. After receiving product from a purchase order the operator will be prompted to close the purchase order. The process is the same in either version of entrée.
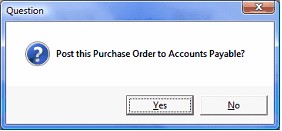
If Yes is chosen and the purchase order is closed.
The Question dialog box will open and ask Post the purchase order to Accounts Payable.
By selecting Yes the "Post payable to external accounting" dialog will be displayed. |
|
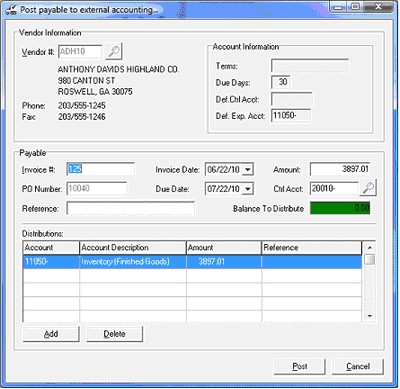
When the Post payable to external accounting dialog box displays key information will already be populated using data from the purchase order.
•The vendor information will be displayed along the top of the dialog and cannot be modified.
•The PO number field, in the Payable section, will also be filled in and is not able to be edited.
•Finally the Amount field will be pre-populated with the purchase order total. This value however can be edited if required.
Post payable to external accounting screen details
Invoice # - The first thing the operator must provide is the invoice number from the vendor. This is keyed into the Invoice # field. Once that value is provided, more fields will be initialized, such as the due date, the control account, and a single distribution to the vendors default expense account.
Invoice Date - Enter the date of the vendors invoice in this field. The date can be selected from the calendar control by clicking the down arrow of the Invoice Date control or by pressing the down arrow key on the keyboard when the cursor is in the Invoice Date field.
 When the Invoice Date value is changed, the Due Date will be automatically updated based on the number of days between the invoice date and the due date.
Due Date - Enter the date that payment should be remitted to the vendor by in this field. The date can be selected from the calendar control by clicking the down arrow of the Invoice Date control or by pressing the down arrow key on the keyboard when the cursor is in the Invoice Date field.
entrée V3
entrée V4 SQL
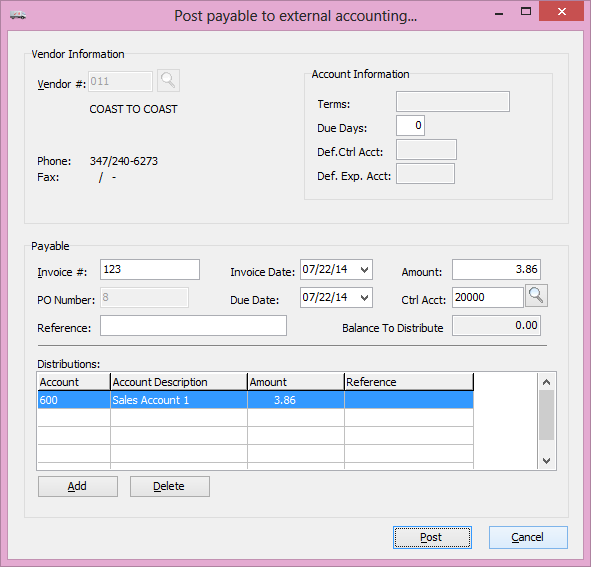
Amount - Enter the amount due from the vendor's invoice in this field. By default, it will contain the purchase order total.
Control Account – Enter the GL Liability account that should be credited for the amount of the vendor's invoice in the Ctrl Acct field. This field will default to the entrée vendor's default control account. If the control account is empty, it is because there is no default control account defined for the vendor, and entrée was unable to find an account that was flagged as an “Accounts Payable” account in QuickBooks.
The control account may be changed or added by keying the value directly into the Ctrl Acct field or using the GL Accounts search screen, which is accessed by clicking the Search button  to the right of the field or pressing the F5 key while the cursor is in the Ctrl Acct field.
Reference – Up to 20 characters reference or memo may be optionally keyed into this field.
The value entered in this field will appear in the Ref. No. field on the QuickBooks bill.
Balance to Distribute - This field will contain the remaining amount of the payable that needs to be distributed. This value cannot be edited directly, but is derived using the value in the Amount field less the total of the distributions that have been applied in the distribution grid. This field will be highlight in green when the balance reaches 0.00, otherwise it will be highlighted in red.
Distributions
Distributions are one or more offsetting transactions that are debited to a GL asset or expense account, the total of which offset the amount that was posted to the control account.
By default the total of the purchase order (or the Amount field if manually changed) is posted as a distribution to the vendors default expense account.
Changing the amount of a distribution in the grid:
| 1. | By selecting the distribution and then pressing the Enter key. |
| 2. | Enter the desired distribution amount in the Amount field in the distribution grid. |
| 3. | Optionally enter a transaction reference into the Reference field of the distribution grid. |
Adding a new distribution to the grid:
| 1. | Click Add. |
| 2. | The cursor will be placed in the GL Account field of the distribution grid. |
| 3. | Enter the account number for the asset or expense account that should be distributed to. Click the Search button or pressing the F5 key from within this field to open the GL Accounts search screen. |
| 4. | Enter the amount of the distribution in the Amount field in the distribution grid. |
| 5. | Optionally enter a transaction reference into the Reference field of the distribution grid. |
Removing a distribution from the distribution grid:
| 1. | Select the distribution to remove. |
| 2. | Click Delete. |
| 3. | A Confirm dialog box will be displayed. |
| 4. | Click Yes. |
Saving modifications to distributions in payables:
1. Once the total of the distributions matches the total of the vendors invoice, click Post to save the payable.
Canceling a payable:
| 1. | Click Cancel to discard the payable and the vendors invoice will have to be manually created in QuickBooks. |
| 2. | entrée will warn the operator upon clicking the Cancel button that the payable will be discarded. |
| 3. | Click the Yes button to proceed with the Cancel operation |
| 4. | Click the No button to save the payable in the state that it is in. |
| 5. | Click the Cancel button to return to the Post payables to external accounting dialog without saving the payable. |