GL Account Synchronization

Contents
This section will outline how to synchronize GL Accounts between entrée and QuickBooks. Typically GL accounts are pulled into entrée from QuickBooks using the Import GL Accounts utility. However as part of the initial setup of entrée.QB, operators are allowed to export an existing entrée GL account file into QuickBooks.
Importing GL Accounts
Internally, entrée has a GL Accounts file that is used mostly for system GL account searches. The data contained in this look up file, is imported directly from the QuickBooks system using the Import GL Accounts utility.
 Your QuickBooks GL Accounts must be imported into entrée before any payables or AR journal entries can be posted into QuickBooks.
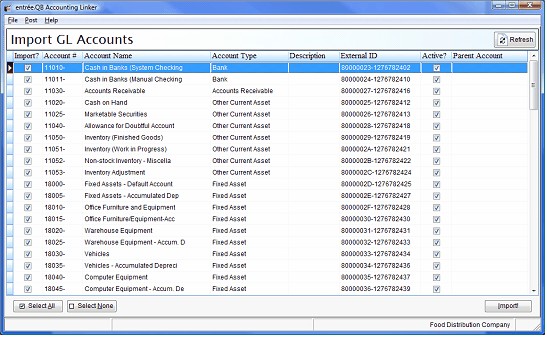
Grid Column |
Description |
|---|---|
Import? |
This column indicates if the account data will be imported from QuickBooks. |
Account # |
The numeric ID used as an identifier for the GL account. |
Account Name |
Descriptive name for the GL account. Must be 30 characters or less |
Account Type |
The type of account as defined in QuickBooks. |
Description |
The account description (assigned in QuickBooks). |
External ID |
The internal ID assigned to the GL account by QuickBooks. entrée.QB requires this code to ensure the account is a valid QuickBooks GL account. |
Active? |
Indicates if the account is available to post into. |
Parent Account |
When using departments or sub-accounts, this column will contain the name of the parent GL account. |
How to Use the Import GL Account Utility
| 1. | In entrée.QB use menu path: File > GL Accounts > Import |
| 2. | Select the accounts you want to import into entrée, (all are selected by default). |
•Accounts that should be imported will need to be checked in the "Import?" column.
•The checked state of an account can be toggled by…
▪Double clicking the line with the account to import in the grid.
▪Pressing the "Enter" or "Space" key will toggle the selected row.
▪All accounts will be checked by clicking the "Select All" button.
▪All accounts will be unchecked by clicking the "Select None" button.
| 3. | Once the accounts to import have been selected, click Import. |
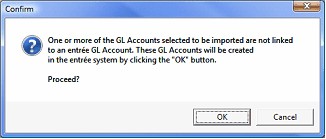
4. You may be presented with a Confirm dialog box with a warning that new accounts will be created in entrée. This is just an informational message.
5. Click OK to continue.
•During the import process, the account grid will be hidden and replaced with a message stating “Importing data…Please wait”.
•You will also notice a progress indicator in the lower left corner of the entrée.QB application window.

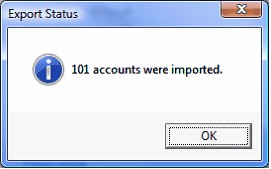
6. Upon completion the Export Status dialog box will display the number of accounts that were imported into entrée.