GL Department Account Number Conversion

Contents
If you were using GL Departments in the entrée accounting system, all of the existing GL account numbers will have to be reassigned. This is because entrée GL account numbers when departments are enabled are 9 characters in length (#####-###). QuickBooks will only support account numbers up to 7 characters in length. To help compensate for this during your company transition entrée.QB will attempt to convert your existing account numbers into a 7 character format using one of several options detailed below.
When departments are detected when exporting entrée GL accounts you will be prompted for the desired conversion method.
| 1. | Select the desired method by clicking the arrow to view the drop down menu. |
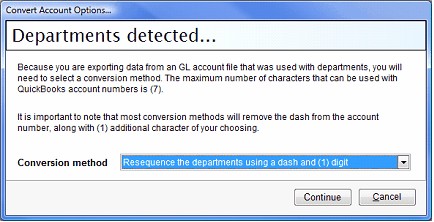
Conversion Method |
Description |
|---|---|
Drop the last character of the department |
The dash character and the last character of the department number will be removed from the account number. |
Drop the first character of the department |
The dash character and the first character of the department number will be removed from the account number. |
Drop the last character of the account |
The dash character and the last character of the account number will be removed from the account number. |
Re-sequence departments using (2) digits |
The dash character will be removed from the account. Departments will be reassigned using two digits starting with "01". |
Re-sequence departments using a dash and (1) digit Selected by default |
This is the only automated option where the dash character is retained. Departments will be reassigned using a single digit starting with "1". |
Manual |
All new account numbers will have to be manually entered. |
2. Select the accounts that you wish to export into QuickBooks, (all valid accounts are
selected by default).
•Accounts that should be exported will need to be checked in the "Export?" column.
•The checked state of an account can be toggled by…
▪Double clicking the line with the account to export in the grid.
▪Pressing the "Enter" or "Space" key will toggle the selected row.
▪All accounts will be checked by clicking the "Select All" button.
▪All accounts will be unchecked by clicking the "Select None" button.
| 3. | Once the accounts to export have been selected, click Export. |
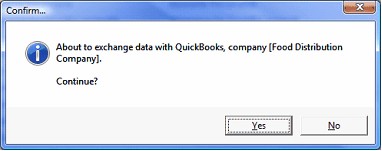
| 4. | You will be prompted with a confirmation dialog indicating the QuickBooks company file that you are about to exchange data with. |
| 5. | Click Yes to proceed with the export operation |
•During the import process, the account grid will be hidden and replaced with a message stating "Importing data…Please wait".
•You will also notice a progress indicator in the lower left corner of the entrée.QB application window.

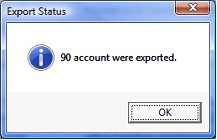
6. Upon completion the Export Status dialog box will display the number of accounts that were exported.