Posting Payables in QuickBooks

Contents
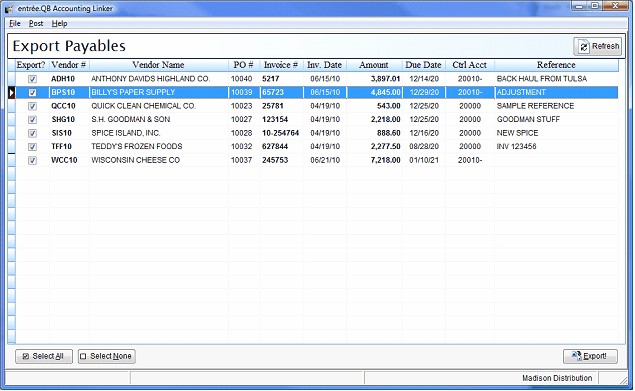
When a payable is created in entrée, it is put into a holding file. entrée.QB is then used to push the payable from the holding file into QuickBooks. This is done with the Export Payables utility.
 Before payables can be posted into QuickBooks, entrée vendors must be linked to existing QuickBooks vendors or exported into QuickBooks. Also, GL accounts must be imported from QuickBooks or exported into QuickBooks from the entrée.GL accounts file.
Grid Column |
Description |
|---|---|
Export? |
Place a check in this field if the payable should be exported into QuickBooks. |
Vendor # |
This column will display the vendor ID as defined in entrée. |
Vendor Name |
This column will display the vendor's company name as defined in entrée. |
PO # |
This column will display the entrée purchase order number associated with the payable. |
Invoice # |
This column will display the vendor's invoice number. |
Inv. Date |
This column will display the vendor's invoice date. |
Amount |
This column will display the total amount due for the payable. |
Ctrl Acct |
This column will display the Accounts Payable GL account that will be credited when the payable is created. |
Reference |
This column will display the optional reference that is associated with the payable.
|
How to Use the Export Payable Utility
| 1. | In the entrée.QB menu using menu path: Post > Payables |
| 2. | When the Export Payables utility is first opened, all pending payables are loaded into the payable grid. Payables are validated when they are first loaded to ensure the Vendors exist in QuickBooks, the control and distribution GL Accounts are valid, and the distributions are in balance with the payable total. This process may take a little time so a progress bar is displayed in the lower left corner of the entrée.QB application window. |

|
|
| 3. | Select the payables that you wish to export into QuickBooks, (all are selected by default). |
•Payables that should be exported will need to be checked in the "Export?" column.
•The checked state of a payable can be toggled by…
▪Double clicking the line with the payable to export in the grid.
▪Pressing the "Enter" or "Space" key will toggle the selected row.
▪All valid payables will be checked by clicking the "Select All" button.
▪All payables will be unchecked by clicking the "Select None" button.
| 4. | Once the payables to export have been selected, click Export. |
|
|
| 7. | During the export process, the payables grid will be hidden and replaced with a message stating “Exporting data…Please wait”. |
| 8. | You will see a progress indicator in the lower left corner of the entrée.QB application window. |

| 9. | Upon completion the Export Status dialog box will display the number of payables that were exported. |