Using Management Sales Review
Management Sales Review Utility Overview
Once you have authorized users in entrée they can perform Management Sales Review functions. When you need to adjust the quantity of a special order item on an invoice after it is been purchased, you will use the Management Sales Review utility, which is accessible from the Dot Foods Control Panel.
entrée V4 SQL Go to the Add-Ons ribbon menu > entrée.DOT drop down menu > select Management Sales Review.
entrée V3 Use menu path: Inventory > entrée.DOT Control Panel > select Management Sales Review.
Management Sales Review can be used to view pending sales and provides a historical view of the sales of your Dot Foods catalog items. Use it to easily observe which products are selling well and use this information to adjust the items you import from the Dot Foods catalog.
This utility allows authorized personnel to make changes to special order items on an invoice after it is been purchased. The authorization is given via the entrée Security Manager as described in the beginning of this chapter.
1.Edit invoices, sales orders, and/or purchase orders associated with the selected line item.
2.Print invoices, loading sheets, sales order confirmations, sales order loading sheets, sales order releases, and/or purchase orders associated with the selected line item.
3.Delete the selected item.
4.Undo changes to the selected item.
5.Properties, Filters and Columns similar to the Import Item Selection grid.
 Once an item has been delivered no additional changes are allowed.
Manager Items Grid Overview
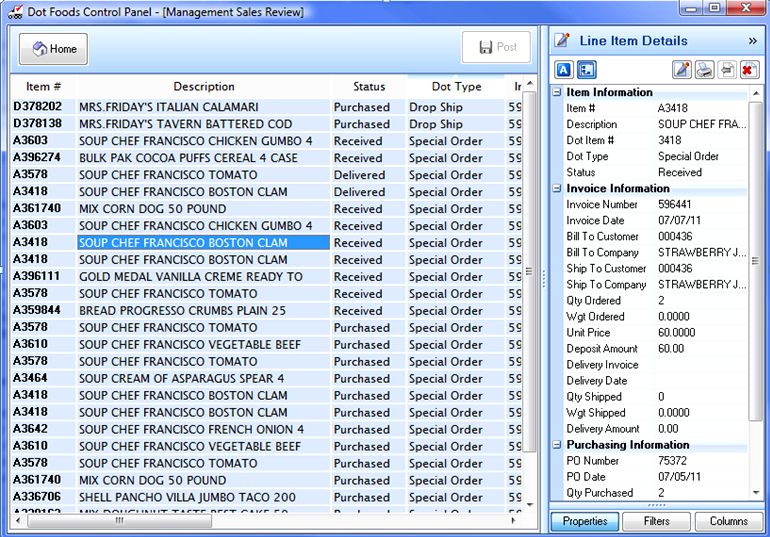
Along the left side of the dialog is the items grid area, which contains all of the pre-order items from the Dot Foods catalog ordered on the current system date.
Clicking on any column heading will sort the items in the grid by the selected column, which is indicated by a light blue line above the column heading with an arrow point up or down, depending on if the sort is in ascending or descending order.
Depending on the state of the item, one or more fields in the grid may be editable. Editable fields will remain white, where as non-editable fields will be shaded.
 Once an item has been delivered it becomes part of the sales history data.
Buttons:
▪Home button will return you to the Dot Control Panel without posting any changes.
▪Post button you will be able to click this button once one or more items have been modified to update the affected invoices and/or purchase orders.
Line Item Details Area Overview
Along the right edge of the dialog is the Line Item Details area. This area contains controls for filtering and searching the pre-order items from the Dot Catalog, configuring the columns that are displayed in the items grid and additional information about an item that is may not be currently displayed in the grid.
This panel can be collapsed by clicking the double >> symbol in the top right corner of the form, making room for more columns of data in the items grid. Once collapsed, clicking the << icon will cause the Line Item Details area to be expanded back into view.
At the bottom of the Line Item Details area are three buttons: Properties, Filters and Columns. Detailed explanations about the use of these buttons follow.
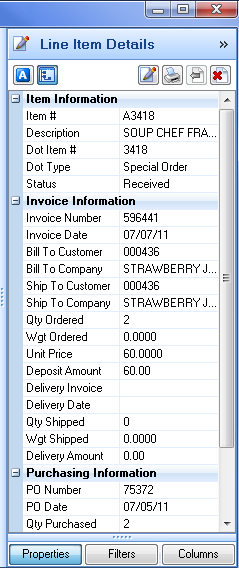
Clicking the Properties button at the bottom of the Line Item Details area will display information about the currently selected preorder item in the grid that pertains to the sale, purchase, receipt and delivery of the item.
By default data is broken out into categories, such as Item Information, Invoice Information, and Purchasing Information. Categories will be displayed in bold text with a blue gradient background and have a – or + button to the left of the category title text. These buttons will collapse that category to make room for additional data to be displayed or expand the category so the sub-properties become visible.
Directly above the properties grid on the left, there are two buttons used for altering how the data is displayed in the properties grid, Alphabetic and Category.
|
|
Along the right top of the properties grid, there are 4 additional buttons
 Edit Documents
Clicking this button will open a context menu allowing you to edit the invoice, sales order, and/or purchase order that is associated with the selected line item in the items grid.
 Print Documents
Clicking this button will open a context menu allowing you to print the invoice, loading sheet, sales order confirmation, sales order loading sheet, sales order release, and/or purchase order that is associated with the currently selected line item in the items grid.
 Undo Changes
Clicking this button will open a dialog asking confirmation to restore the currently selected line item in the items grid to its original state before changes were made. If there are no pending changes to the currently selected item in the grid this button will be disabled.
 Delete Item
Clicking this button will open a dialog asking you to confirm the deletion of the currently selected line item in the items grid.
Once deletion is confirmed, the item will remain in the line items detail grid until the Post button is clicked, but the row in the grid will be highlighted in red with a strike through line through the text.
You will still be able to abort the deletion, by highlighting the deleted item in the grid and clicking the Undo Changes button.
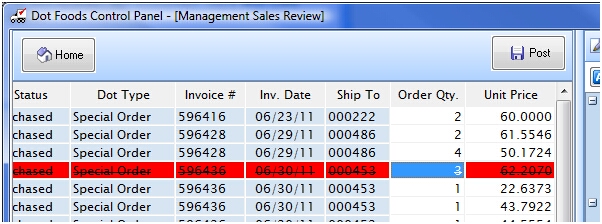
 Once an item has been delivered no additional changes are allowed.
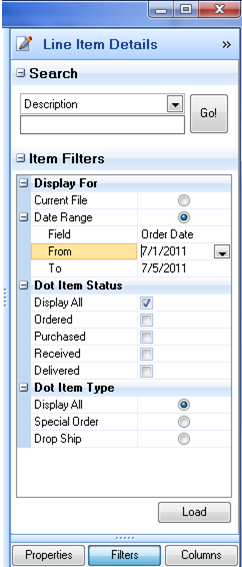
Clicking the Filters button at the bottom of the Line Items Detail panel will expose a means to filter or change the items that are displayed in the items grid. After clicking the Filters button, two sub groups will be displayed in the Line Items Detail area.
Search The most basic method of filtering is a simple search which can be performed in the first group entitled “Search”. This will default to Description, but there are many other columns that may be searched which can be accessed by selecting the desired column to search from the drop down control. Beneath the drop down control is where you will enter the word or phrase to search for.
▪Click the Go button and the item grid will only display the pre-order items in the item grid that meet the search criteria. The search is performed using a “contains” method on the selected column so the search expression can exist anywhere in the column searched.
▪To clear an existing search, simply delete the text in the search text box and click the Go button again. |
|
Item Filters
The items that are loaded in the grid are determined by item filter values defined in this section. The Display for sub-group allows you to display all items in current files or a subset of items by date range.
When using the date range option, you will be allowed to specify which field, Invoice Date, Purchase Date, or Delivery Date that should be validated against.
You may also filter by Dot Item Status, which allows for one or more of the “ordered”, “purchased”, “received”, or “delivered” options to be selected. This field defaults to “Display All”.
Finally the you may also filter what type of pre-orders should be displayed in the Dot Item Type subgroup. Available options include Special Order, Drop Ship, or to Display All.
To apply one or more of these filers, expand the title of the filter and check the values you wish to see displayed. Once the filter conditions are set, click the Load button to update the item grid.
Clicking the Load button will remove all existing search conditions.
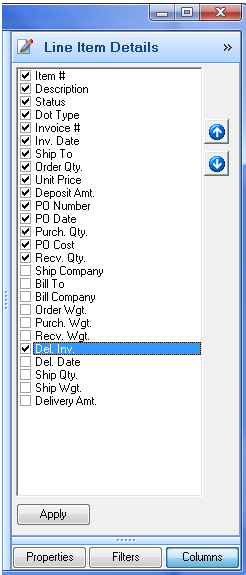
Clicking the Columns button in the Line Item Details panel, will invoke the Manager Items Grid layout configuration panel. Each of the available columns that can be displayed in the Items Grid is listed. Columns that are checked will become visible in the grid and unchecked columns will be hidden. Columns will be displayed left to right in the grid, starting with the first checked column in the list. Columns may be moved within the list by using the Up and Down arrow buttons on the Columns Layout editor or using a Drag and Drop method. Using the keyboard, the currently selected column can be moved using the Ctrl-Up or Ctrl-Down keyboard shortcuts. When the column order is set, click the Apply button to update the Items Grid. The displayed column in the list will also be re-sequenced so that all of the “checked” columns will be displayed at the top of the list. The column configuration is bound to the entrée user account and automatically saved when the Apply button is clicked, meaning entrée will remember your desired column layout the next time items are viewed in the Management Sales Review utility. |
|


