entrée System Options & CC Configuration
Follow the series of steps here to configure credit card processing in entrée.
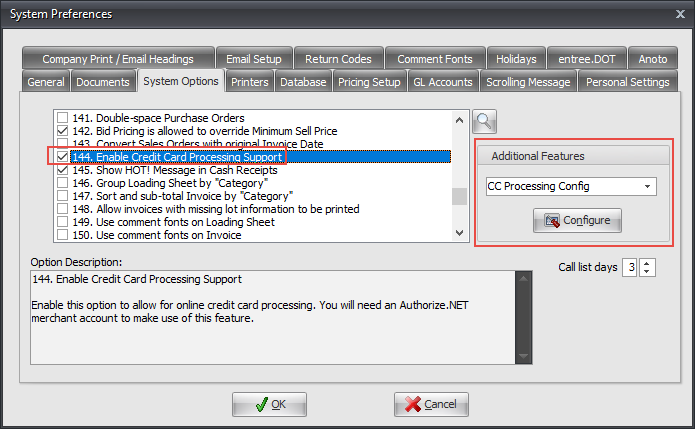
Enable System Option #144
1. Go to the System ribbon menu click System Preferences then click the System Options tab.
2. In the System Options list scroll down and check system option #144 Enable Credit Card Processing Support
3. Click OK to save and update the entrée system.
Update CC Processing Config Settings
Follow these steps to define your connection with your merchant account company.
1. Now go back into the System Preferences > System Options tab.
2. Go to the Additional Features section.
3. Click the drop down menu and select CC Processing Config option (the option will only be visible if system option #144 has been enabled).

4. Click the Configure button below Additional Features and the CC Configuration dialog will open.
CC Configuration Options Overview
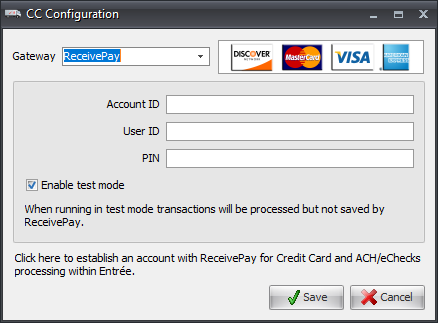
5. Click the Configure button and the CC Configuration dialog will open and display the Gateway menu.
6. In the Gateway drop down menu you will select the company you have your merchant account with for credit card processing.
Select from entree V4 choices: Authorize.Net or ReceivePay.
•Next you must enter the information to configure your chosen Gateway. Information about both processes follow. |
|
 If you have one Gateway setup and change to the other and save it, your account setup information from the first gateway will be removed from entrée.
If you mouse over the Click here text at the bottom of the dialog box it turns into a hyperlink to click and go apply for your merchant account immediately. |
|
ReceivePay CC Configuration
When you have attained your ReceivePay account you must configure these options for your connection.
1. In the CC Configuration dialog for Gateway select ReceivePay.
2. Enter your Account ID, your User ID and PIN.
3. Enable test mode - If you would like to test your connection check this option. (You will uncheck it once your testing is complete.)
4. Click Save.
•Next proceed to the Managing Customer Credit Cards chapter that follows. |
|
Authorize.Net CC Configuration
Once you have attained your Authorize.Net account you must configure these options for your connection.
1. In the CC Configuration dialog select Authorize.Net.
2. Enter the API Login and API Transaction Key.
3. Enable test mode - If you would like to test your connection check this option. (You will uncheck it once your testing is complete.)
4. Click Save.
•Next proceed to the Managing Customer Credit Cards chapter. |
|
API Login ID
API Transaction Key |
The API login ID and transaction key are issued by Authorize.NET and may be retrieved by logging into your merchant account through the Authorize.NET website at: https://secure.authorize.net/
Once logged into the Authorize.NET website click on the 'API Login ID and Transaction Key' link located under the 'Security Settings' heading of the 'Account' section. |
Enable Test Mode |
This flag puts the credit card processing system into test mode. While in test mode entrée will appear to process transactions normally but they will not be saved by the Authorize.NET gateway for settlement.
|


 Some operations may behave unexpectedly when operating in test mode. For example all transaction id's and auth codes returned from Authorize.NET will be '0'.