Overview Modify Special Prices
Impact of Manual Option on Modify Special Prices
Modify Special Prices utility will allow you to update:
•Only "regular" prices (any cost basis other than "Manual").
•Only "Manual" prices.
•Or both "regular" and "Manual".
 The "Manual" cost basis option for Special Prices is accessed via either the IFM or CFM Special Pricing Tab.
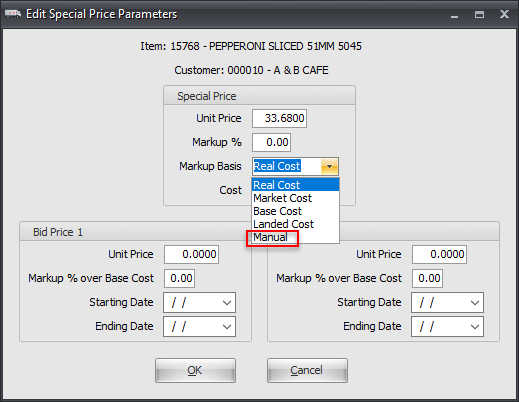
Click the Edit Pricing button to open the Edit Special Parameters dialog. Use the Markup Basis drop down menu and select Manual as show here. For Special Prices configured using the "Manual" option it means that the price is not linked to any cost value.
•Here you see the Customer File Edit Special Parameters dialog for an item. |
|
Important Information
The challenge is the cost basis of each Special Price can be defined individually, so we have to be able to specify appropriate adjustment values for either type of price up front (or exclude that price type from being updated).
The "Update regular prices" section is the original functionality of this utility.
The "Update 'Manual' prices" section is new and is only applied to prices which are defined to use the "Manual" cost basis.
Adjustments to "Manual" prices are applied directly to the price itself rather than to the mark up value.
How to Modify Special Prices
1. Click the button to select the Mode:
| a. | Update by Item |
| b. | Update by Customer |
| c. | Delete by Item |
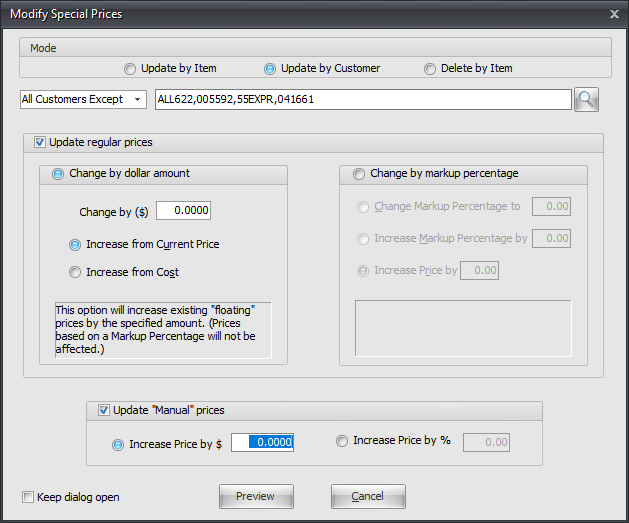
| 2a. | Update by Customer Mode - In the drop down menu select who you want the changes applied to: |
Use the  search tool to find the customers for each option.
a. Apply to Customers - The utility will update only the customers you add to the list with the search tool.
| b. | All Customers Except - The utility will update all customers *except* for the ones you specify in the list. |
- OR -
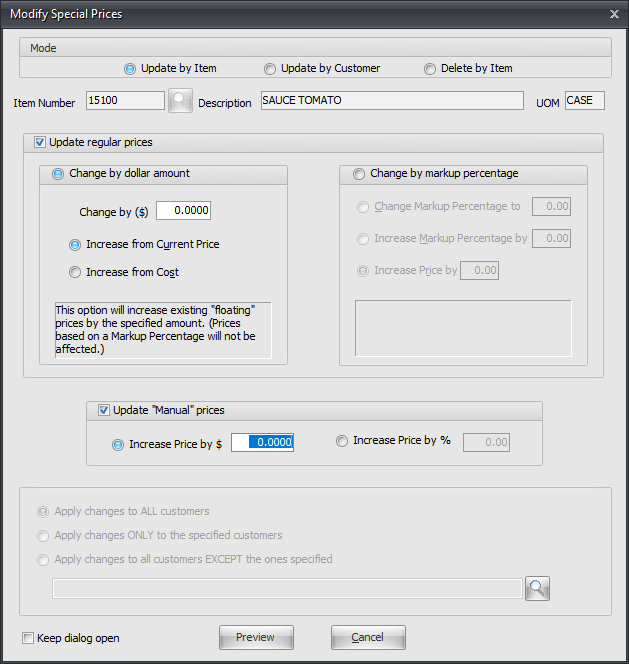
| 2b. | Update by Item Mode - Use the  search tool to find and select the Item Number. search tool to find and select the Item Number. |
3. Check your update options.
▪Update Regular Prices if you are only updating the regular prices.
▪Update Manual Prices if you are only updating manual prices.
▪Check both to update both prices.
4. To Update Regular Prices
Decide how the change will be made Change by dollar amount (a below) or Change by markup percentage (b below) and make your selections:
| a. | Change by dollar amount and select one option listed. |
| i. | Enter the number amount into the Change by $ field. |
| ii. | Click button to Increase from Current Price |
- or -
| iii. | Click button to Increase from Cost. |
| b. | If you use Change by markup percentage select from one of these options: |
i. Click button to Change markup percentage to and enter a percentage.
- or -
| ii. Click button to Increase markup percentage by and enter a percentage. |
| - or - |
| iii. Click button to Increase price by and enter the number amount. |
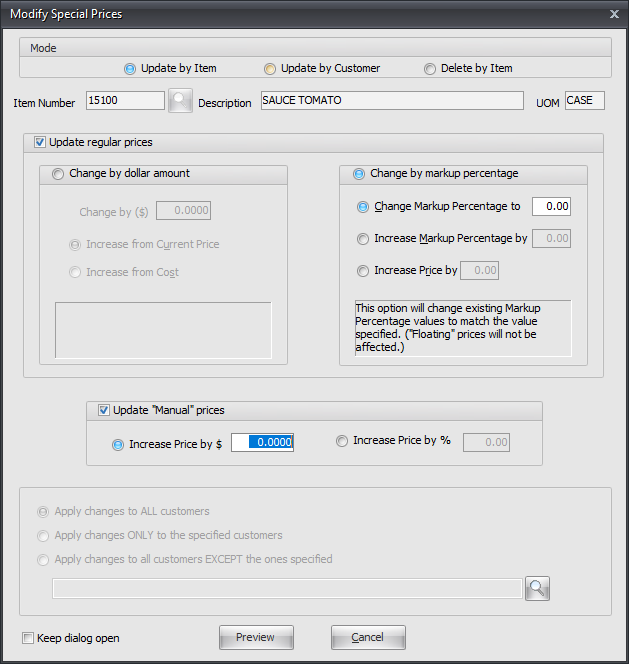
| 5. | Decide how you want to apply the Special Price changes. The Customer Search tool is used to make your customer selections. |
In Item Mode only go to the bottom of the screen and select from:
| a. | Apply changes to ALL customers |
| b. | Apply changes ONLY to the specified customers |
c. Apply changes to all customers EXCEPT the ones specified - If you choose this option then the utility will update all customer *except* for the ones you specify. Use the  search tool to find the customers to be excluded.
Use the Customer  search tool and entrée will add the specific customer's numbers to the list and the system will add the commas to separate the Customer Numbers. A list of ONLY customer numbers is seen in the following image.

6. Click Preview to review your changes and update prices. See the How to Preview Price Changes section that follows.
To Update Manual Prices
1. Click and select a Mode:
| a. | Update by Item |
| b. | Update by Customer |
| 2a. | In Update by Item mode use the  search tool to find and select the Item Number. search tool to find and select the Item Number. |
- OR -
2b. If Update by Customer mode is selected you must make a selection from these options and use the  search tool to find customers.
a. Apply to Customers - The utility will update only the customers you add to the list with the search tool.
| b. | All Customers Except - The utility will update all customers *except* for the ones you specify in the list. |
3. Check the Update Manual Prices option.

2. Select a method to increase the price either Increase Price by $ or Increase Price by %.
3. Enter a numeric value for the increase in the text box.
4. Click Preview to review your changes and update prices. See the How to Preview Price Changes section that follows.
How to Preview Price Changes
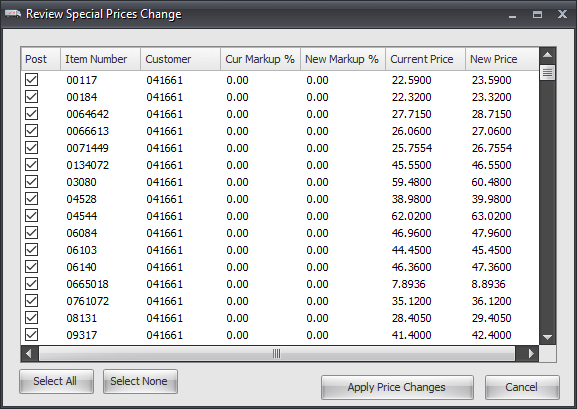
1. Click the Preview button to display the Review Special Prices Change pop up box.
a. Decide what customers to apply the price changes to by checking / unchecking the Post box or cancel the price changes.
Your options are:
• Select All (default)
• Select None
•Click to add or remove check marks from specific customers
• Apply Price Changes
• Cancel |
|
| 2a. | Click Select All or Select None or Cancel. |
2b. Click Apply Price Changes to perform the updates if the price changes are OK.
| 3. | A Confirm message box will display asking if you want to print the Special Price Changes Report. Click Yes to print or No to cancel the report. |
| 4. | The Re4 Special Price Changes Report window will open. In Report Destination Preview will be selected by default. Click OK now to see the report preview then you can save the report PDF to your computer at this time if you like. |
5. To Print: Select your report print options: Printer Properties, Report Destination, number of Copies and Email or Fax options.
6. Click OK.
Delete By Item Mode
1. Use the  search tool to find and select the Item Number.
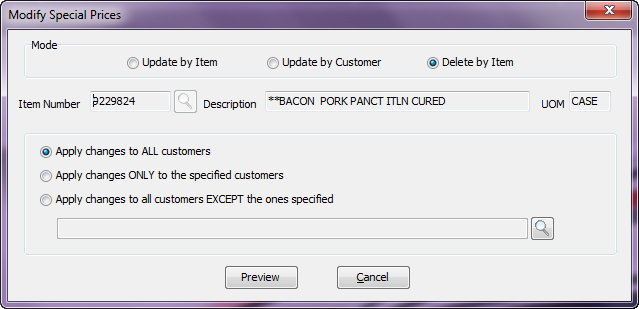
2. Decide how you want to apply the Special Price deletion. The Customer Search tool is used to make your customer selections.
| a. | Apply changes to ALL customers |
| b. | Apply changes ONLY to the specified customers |
c. Apply changes to all customers EXCEPT the ones specified - If you choose this option then the utility will update all customer *except* for the ones you specify. Use the  search tool to find the customers to be excluded.
3. Click Preview to display the Review Special Prices Change pop up box.
a. Decide what customers to apply the price changes to by adding / removing the checking in the Post column or click Cancel on the price changes.
| 4. | Click one: Apply Price Changes, Cancel, Select All or Select None. |
| 5. | Click Yes to print a Special Price Changes Report or No to cancel the report. |
| 6. | Select your report print options: |
| a. | Printer Properties, Report Destination, number of Copies and Email or Fax options. |
| b. | Click OK. |

