Mod #1532 NCR Back Office Export

Contents
The NCR EDI exports printed entrée invoices and credit memos for customers designated with an NCR Site ID in the Customer file, Miscellaneous tab. File transfer is via FTP.
The export process is accessed from the entree Export utility using the “NCR Back Office EDI” option. Once the consolidated invoice file has been exported no further edits to those invoices will be allowed.
entrée Folders
•The export staging: necs_shared\01\NCR\Export\
•The export archive: necs_shared\01\NCR\Export\Archive\
Where "01" is the entrée company number.
entrée Settings
Customer: Mark all the NCR customers.
1.Go to the Customer ribbon menu click Customer. 2.Find the NCR customer. 3.Go to the Miscellaneous Tab, EDI Setup. 4.Enter in the assigned NCR Site ID. 5.Click Apply to save. |
|

Files Exchanged
Document |
Import/ Export |
Naming convention |
Send/Receive Frequency |
Format (edi/flat/csv) |
Invoice File |
Export |
Invoice.yyyymmddhhnnss.xml |
Daily |
XML |
Credit File |
Export |
Credit.yyyymmddhhnnss.xml |
Daily |
XML |
Export Configuration
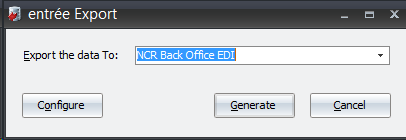
1. Go to the Add-Ons ribbon menu click Import/Export icon. 2. Select Export Data and the entrée Export dialog will open. 3. Select NCR Back Office EDI in the drop down menu. 4.Click Configure to enter in your Distributor ID and FTP connection settings. |
|
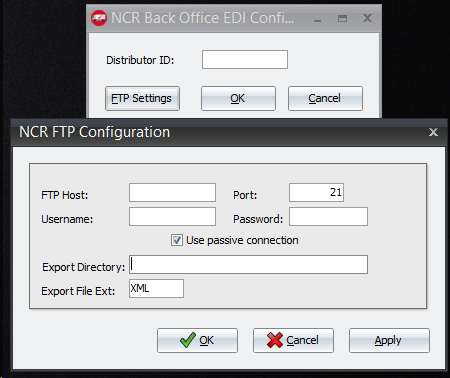
5.Enter in your Distributor ID supplied by NCR. 6.Enter your FTP credentials. 7.Export Directory: The name of the directory on the FTP site where the invoices will be exported to. 8.Export File Ext: XML 9.Click Apply |
|
Export
1.Go to the Add-Ons ribbon menu click Import/Export icon.
2.Select Export Data and the entrée Export dialog will open.
3.Select NCR Back Office EDI from the drop down menu.
4.Click Generate.
5.Select your invoice date range.
6.Click Generate.
Updates
V4.2.5.3 Updated the invoice file to meet NCR requirements.