Mod #1042-R Truck Dispatch Innovations (TDI) Routing Interface

Contents
Truck Dispatch Innovations (TDI) Routing interface.
This utility handles data exchange of customer and invoice data between the entree system and the Truck Dispatch Innovations Routing application.
entrée V4 Folder
•necs_shared\01\TDI
Where "01" is the entrée company number.
entrée Settings
| 1. | Purchase this TDI system modification. |
| 2. | Update your entrée system with this TDI modification. |
| 3. | Verify all Customer Address Information. |
| 4. | Decide which of your customers will be using the TDI delivery option. entrée default is that all customers will have TDI turned On with your company default values. |
| 5. | Turn TDI Off for specific customers as required. |
| 6. | Override TDI default company settings for specific customers in Customer File Maintenance or Invoicing as required. |
Setting System Defaults
entrée V4: Go to the System ribbon menu > System Preferences > General Tab > Company Information sub-tab.
or
entrée V3: Use menu path: System > Preferences > General Tab > Company Information.
| 1. | Click the Routing Defaults button. |
| 2. | The Truck Dispatch Innovations Default Options dialog box displays. |
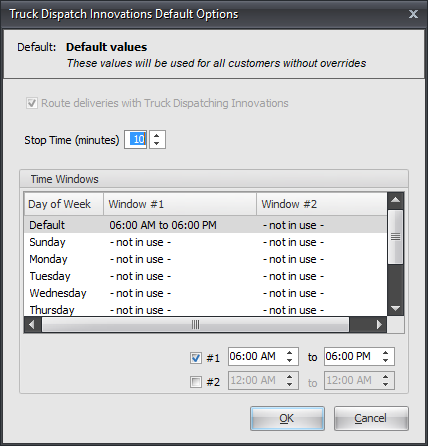
| 3. | Click and check Route Deliveries with Truck Dispatch Innovations. |
4. Stop Time: Use the arrows to set the default amount of time allocated for parking the truck and making the delivery.
| 5. | Time Windows: |
| a. | Click to select a day. |
| b. | Set the time window by using the arrows in the time window field. |
| c. | When default settings are completed click OK. |
| 6. | You will return to the System Preferences Company Tab click OK. |
| 7. | You will return to the main entrée screen. |
 TDI Default values can be overridden per customer in Customer File Maintenance or by invoice during the invoicing process.
Customer Updates/Verification
When a customer is initially entered into the system, it is assumed that the billing address is the same as the shipping address. entrée allows for the customer's invoices to be billed to another company. These addresses can be overridden in Customer File Maintenance.
entrée V4:
1. Go to the Customer ribbon menu > Customer > Find the customer.
2. Verify the primary customer address information. PO Boxes are not allowed as Ship To addresses.
3. Click the Routes Tab.
4. Click the Routing Options button to access the Truck Dispatch Innovations Customer Options.
or
entrée V3:
1. Use menu path: File > Customer Maintenance > find the customer.
2. Verify the primary customer address information. PO Boxes are not allowed as Ship To addresses.
3. Click the Customer Tab.
4. Click the Routing Options button to access the Truck Dispatch Innovations Customer Options.
| 5. | The Truck Dispatch Innovations dialog box displays with the customer number and company name options at the top. |
a. Route deliveries with Truck Dispatch Innovations check box.
| i. | Remove the check from the box to turn OFF TDI then click OK |
| ii. | System Default has all customers with this option turned ON. |
| b. | Stop Time: To override your System Preferences Company Tab default, use the arrows to make changes to the amount of time allocated for parking the truck and making the delivery. |
| c. | Time Windows: Make changes for this customer to override your System Preferences Company Tab default. Enter and verify delivery day and time overrides. |
| i. | Click to select a day. |
| ii. | Set the time window by using the arrows in the time window field. |
| iii. | When default settings are completed click OK. |
| 6. | Check the customer's Bill To / Ship To and One Ship information. PO Boxes are not allowed as Ship To addresses. |
entrée V4:
a. Click the Customer Tab > Bill To Account sub-tab.
b. Verify the Bill To Account address information if enabled.
c. Click the One Ship Info sub-tab.
b. Verify the address information if enabled.
or
entrée V3:
a. Click the Bill To / Ship To Tab.
| b. | Verify the Bill To information. |
| c. | Click the box for same if it is the same as the primary address on the Customer Tab. |
| d. | Verify the Ship To Address. |
| e. | Click the box for same if it is the same as the primary address on the Customer Tab. |
| f. | One Ship: Enter the address for the one ship. |
| g. | Ship To Address 3: Format must be city, state zip code. |
| 7. | Click Apply to save your changes then click OK. |
| 8. | You will return to the main entrée screen. |
Invoicing Overrides
entrée V4: Go to the Customer ribbon menu > click Invoice > select Create Invoice or Change Invoice.
or
entrée V3: Use menu path: Invoicing > Invoices > select Create Invoice or Change Invoice.
1. In Create or Change Invoice find the customer / invoice.
2. Click the Routing Options button.
| 3. | The Truck Dispatch Innovations Invoice Options dialog box displays with the Invoice Number and Customer name at the top. |
| a. | Route deliveries with Truck Dispatch Innovations |
| i. | Remove the check from the box to turn OFF TDI then click OK. |
| ii. | System Default has all customers with this option turned ON. |
| b. | Stop Time: To override your System Preferences Company default, use the arrows to make changes to the amount of time allocated for parking the truck and making the delivery. |
| c. | Time Windows: Make changes for this invoice to override your System Preferences Company default. |
| i. | Enter and verify delivery time overrides. |
| ii. | Set the time window by using the arrows in the time window field. |
| 3. | When override settings are completed click OK and you will return to the Invoicing screen. |
| 4. | Complete your invoice and process per normal procedures. |
Any Truck Dispatch Innovations changes made in Invoicing only apply to the current invoice number.
![]() Running TDI Data Exchange
Running TDI Data Exchange
entrée V4: Go to the Add-Ons ribbon menu > click the TDI Data Exchange icon.
or
entrée V3: Use menu path: Invoicing > TDI Data Exchange and the Truck Dispatch Innovations Data Exchange dialog box will open.
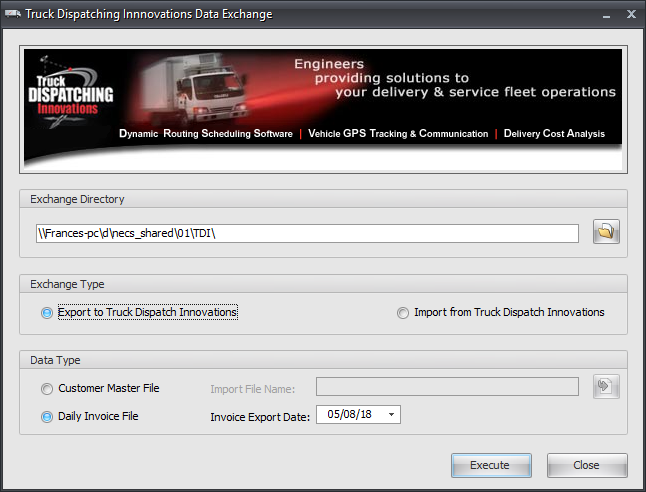
| 1. | Exchange Directory: This is the directory on your computer where the TDI data files are stored. Make sure you find the drive letter and path for the directory where the entrée TDI data files are located on your network. |
entrée V4: Enter the location of your necs_shared\01\TDI folder. Where "01" is the entrée company number.
or
entrée V3: The location would be F:\NECS\TDI\. Where "F" is the letter assigned to your network drive
| 2. | Exchange Type: |
| a. | Export to Truck Dispatch Innovations. |
| b. | Import from Truck Dispatch Innovations. |
3. Data Type:
a.Customer Master File - You must also select the Import File Name.
b.Daily Invoice File - You must also set the Invoice Export Date.
4. Once the desired transfer options are set click Execute.
5. You will then connect with TDI and that software application will begin it's processes. Consult with your TDI system manual for further information.
6. Once data exchange is completed click Close.