Mod #1201 Edible Arrangements EDI

Contents
Edible Arrangements by CH Robinson import and export.
Access: entrée Add-Ons ribbon menu > Import/Export > Import Data or Export Data > opens the import or export utility > select Edible Arrangements.
entrée Folders
•entrée V4 SQL will create two Edible data folders
▪necs_shared\01\Export\Edible
▪necs_shared\01\Import\Edible
Where "01" is the entrée company number.
Updates
V4.2.0 Updated the FTP HOST IP field in the EDI Configuration screen to support up to 100 characters.
V4.0.42 Updated this export to exclude Overpayment Credit Memos.
V4.0.40 Updated to add support for the Task Execution Application scheduler (TEA) in entrée.
V4.0.40 Consolidated mod #1212 Edible Arrangements Import into mod #1201 the Edible Arrangements EDI.
entrée Settings
•Configure FTP connections.
•Mark your customers.
•Test the export, import and check your files.
•Go live with FTP connection.
Customer: Perform this update for your Edible Arrangements customers.
1.Go to the Customer ribbon menu and click the Customer option.
2.Find your Edible Arrangements customer.
3.Go to the Miscellaneous tab and set the Type Code to "EA".
4.Click Apply.
•Find the next Edible Arrangements customer and one at a time mark them all. Perform this update for all your Edible Arrangements customers during the set up process.
Configure Export & FTP
1. Go to the Add-Ons ribbon menu click Import/Export. 2. Select Export Data and the entrée Export opens. 3. In Export the data To select Edible Arrangements. |
|
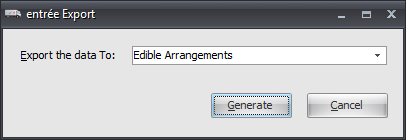
4. Click Generate and the Edible Arrangements Export dialog opens.
5. First click the FTP Settings button to set up the FTP connection that will transmit your data.
6. Enter the FTP Host IP, User Name, Password provided by Edible Arrangements.
7. Data Directory: Enter the location of your necs_shared\01 folder. Where "01" is the entrée company number.
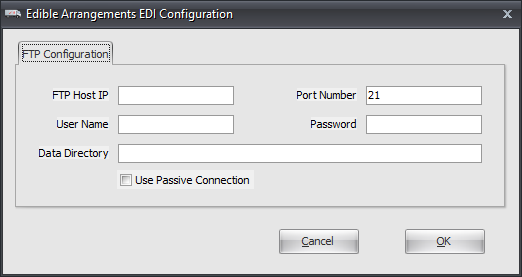
8. Click OK to save your settings.
Export
1. Go to the Add-Ons ribbon menu click Import/Export icon.
2. Select Export Data and the entrée Export dialog will open.
3. In Export the data To select Edible Arrangements.
4. Click the Generate button.
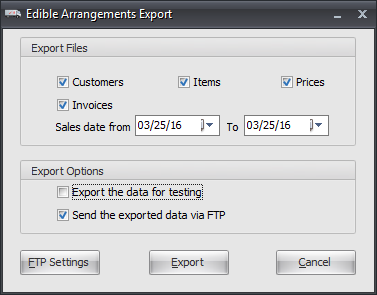
5. Now make these changes to the Export dialog to set up the options for your data export.
5a. In the Export Files area National Produce Connection will tell you:
▪What files need to checked for your export.
▪What span your dates cover for the data in your files.
▪How often you will FTP your data.
5b. In the Export Options area:
▪Be sure to Unchecked the Export the data for testing option.
▪Check the Send the exported data via FTP option.
6. Click the Export button and your files will be generated and sent via the FTP connection.
Configuring the Import
1.Go to the Add-Ons ribbon menu click Import/Export icon.
2.Select Import Data and the entrée Import dialog will open.
3.In Import From select Edible Arrangements.
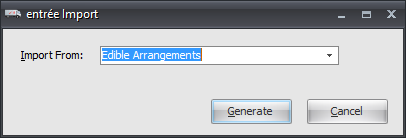
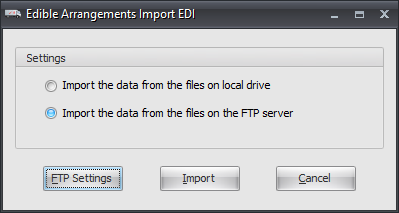
4. Click the Generate button and the Edible Arrangements Import EDI dialog will open.
5. In Settings click Import the data from the files on the FTP server option.
6. Click the FTP Settings button.
7. The the Edible Arrangements Import EDI Configuration dialog will open.
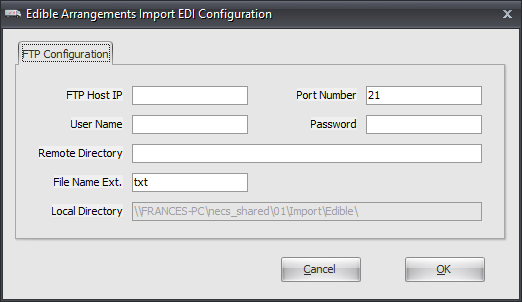
•Edible Arrangements will provide you with the FTP server information you need to enter here, FTP Host IP, your assigned User Name and Password.
8. Enter your Remote Directory location and the File Name Ext (file extensions like .txt, .dat...).
Local Directory is where your file will be stored once it is imported.
9. Click OK to save the configuration.
10. Close the Edible Arrangements Import EDI dialog.
Import
1.Go to the Add-Ons ribbon menu click Import/Export icon.
2.Select Import Data and the entrée Import dialog will open.
3.In Import From select Edible Arrangements.
4. Click the Generate button and the Edible Arrangements Import EDI dialog will open.
5. In Settings be sure the Import the data from the files on the FTP server option is selected.
6. Click the Import button and the import process will run automatically.
7. Once completed the Imported Orders window will open displaying all the orders.