Mod #1300 Golbon Export

Contents
NECS is proud to be a select supplier to members of the Golbon Buying Group.Our entrée software is used by 40 Golbon members across the United States.
Here we explain how to use the Golbon Export option in entrée V4. This modification creates an Excel file of your purchases related to Golbon and will replace any manual methods you now use to provide Golbon with this information. You should generate your file once a month.
This export is provided by Golbon at no cost to you and only available for entrée V4.
Before you can use this export, you must contact your NECS technical support representative and have them enable “Modification #1300” for your entrée system.
 You may also want to activate modification #900, the Purchase Order Checkoff Utility, so you can process closed purchase orders before you receive the invoice. This export option is available with entrée V4 SQL version 4.0.38 and later.
Exported Golbon Data
Currently these fields are exported for each Golbon PO record in the Excel file from entrée V4 SQL:
Distributor ID, company name, vendor number, vendor name, PO number, invoice number, invoice date, item number, vendor item number, pack size, cost, unit weight, brand, item description, quantity ordered, weight ordered, extended cost, and unit of measure.
The vendor's Invoice Number and Invoice Date information are still required in order to be able to export Purchase Orders but the data may be entered for closed Purchase Orders using the Purchase Order Checkoff Utility with Modification #900 active.
Golbon PO Data Exported from entrée
The fields exported for each Golbon PO record in the file are:
Distributor ID, company name, vendor number, vendor name, PO number, invoice number, invoice date, item number, vendor item number, pack size, cost, unit weight, brand, item description, quantity ordered, weight ordered, extended cost, and unit of measure.
entrée Settings
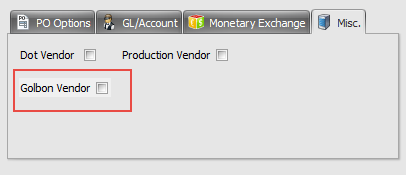
•Vendor: Mark all your Golbon Vendors.
1.Go to the Vendor ribbon menu and click the Vendors option.
2.Use the Vendor Number search feature to find and select your Golbon vendor.
3.Click the vendor tab Misc. sub-tab on the right and check the Golbon Vendor option. 4.Click Apply then OK to save the changes in the Vendor file. •Now the POs for those vendors will be marked for the Golbon export. You will also be able to filter by this field in some reports. * See the report filtering example later in this topic. |
|
Configure the Export
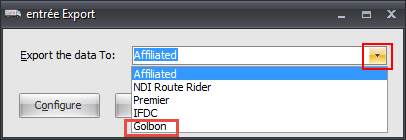
1.Go to the Add-Ons ribbon menu click Import/Export icon.
1.Select Export Data and the entrée Export dialog will open. 2.In Export the data To select Golbon. |
|
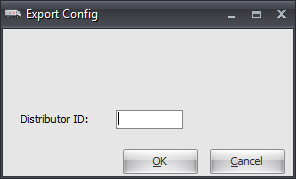
4. In the entrée Export dialog box click the Configure button. 5. The Export Config dialog will open. 6. Enter your assigned Distributor ID (Golbon member ID #). 7. In the Export Config dialog box click OK to save your configuration settings. 8. Close the entrée Export dialog. |
|
What Qualifies a Purchase Order for Export to Golbon
1. In the Vendor File your Golbon Vendors must be identified by checking the Golbon Vendor option on the Misc Tab. * See the Identify Golbon Vendors topics that follows for instructions.
2. The Golbon Export requires that POs must not have already been exported, unless you have been directed to check the Include purchase data that has already been sent option and you must use the Invoice numbers and Invoice dates provided by the Golbon vendor. The Invoice Number and Invoice Date must be attached to the POs using one of the following three methods.
a.If you have entrée.AP and use it to pay your vendor invoices you can use the Link invoices from entrée.AP before exporting data option in the Golbon Export dialog. When this option is checked the export will scan the Payable files for the invoices associated with the POs and automatically fill in these values in the PO file. * See page 4 Running the Golbon Export.
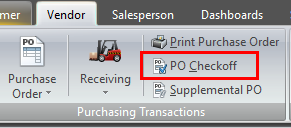
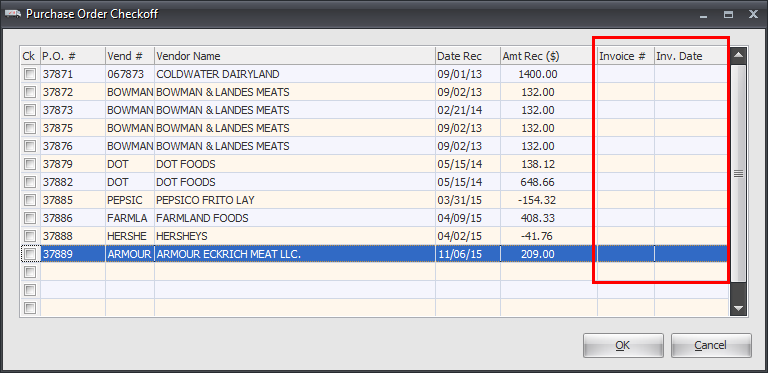
b.Use the PO Checkoff Utility to add the Invoice Number and Invoice Date to POs following these steps.
i.Go to the Vendor ribbon menu Purchasing Transactions section . ii.Click the PO Checkoff option. iii.In the Purchase Order Checkoff dialog enter the Invoice # and Inv. Date for the Golbon POs then click OK. |
|
Important: The Invoice Number and Invoice Date are required to export your Purchase Orders to Golbon.
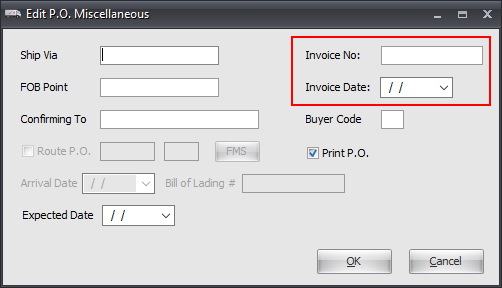
c. Use the Edit P.O. Miscellaneous dialog from the Change PO Utility to enter Invoice Number and Invoice Date. Follow these steps to use this utility.
i.In the Vendor ribbon menu use Change Purchase Order and process the purchase order for the product you have already received. ii.Click the Miscellaneous button and the Edit P.O. Miscellaneous dialog will open. iii.Before you close the purchase order you must enter the Invoice No. and Invoice Date provided by the Golbon vendor. iv.Click OK. |
|
Running the Golbon Export
1. Go to the Add-Ons ribbon menu click Import/Export icon.
2. Select Export Data and entrée Export dialog will open.
3. In Export the data To select Golbon.
4. Click Generate and the Golbon Export dialog will open.
5. Set your Purchases from and to dates.
•The Invoice Date provided by the vendor, that you entered in the Edit P.O. Miscellaneous dialog, is compared to the start and stop dates you set in the Purchases from and to date fields in the export. |
|
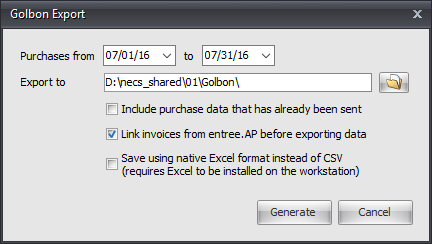
6. Export to field will default to your Golbon directory in the necs_shared\01 folder. entrée will automatically create the Golbon folder for you. To search for the Golbon folder click the Folder button.
 It is recommended that you leave Export to set to the default location so that the files may be accessed from any workstation on the network.
7. Select your Golbon Export options.
a.Include purchase data that has already been sent. When this option is checked entrée will by-pass the safeguards that prevent a PO from being submitted more than once. It will send all Golbon POs to the export process.
Important: Normally a PO should only be submitted once to the export process. Only check this option if NECS Tech Support or a Golbon representative instructs you to use it to resend all your PO data.
b. Link invoices from entrée.AP before exporting data. This option will link with the invoice information from entrée.AP. If you have the entrée.AP add-on module installed this option is checked by default.
|
|
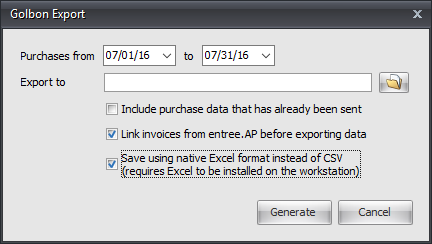
c. Save using native Excel format instead of CSV. When you check this option entrée utilizes OLE/COM to create a native format Excel workbook. If this option is not checked it will export in CSV format.
Important: You must have Microsoft Excel installed on the workstation running the export to use this option.
8. Click the Generate button to run the export file generation process. If there is a problem with the dates an error message will be displayed.
9. Your Golbon vendor will provide you with information about emailing the export file to them.
Using the Vendor Golbon Identifier in Reports
Once you have marked all your Golbon Vendors in the Vendor File Misc. Tab, (see page 3), you can use the Golbon Vendor field in all entrée PO reports and in the Vendor Listing report.
PO Invoice Number and PO Invoice Date have been added to the PO Tracking, PO Receipts, and PO Status Reports.
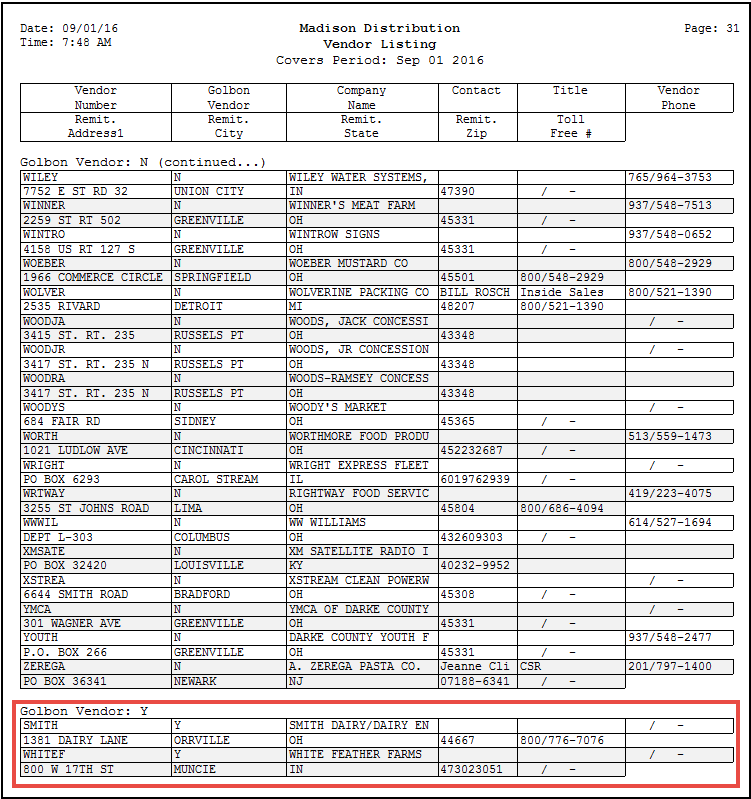
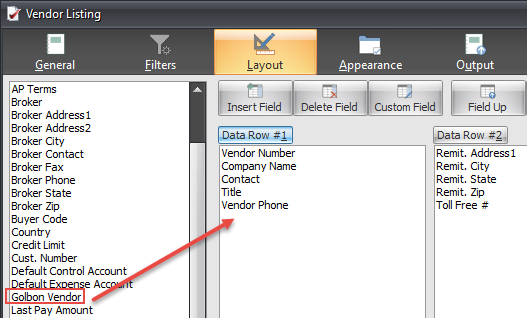
Grouping By Golbon Vendor in the Vendor Listing Report
1.In the Vendor ribbon menu go to the Vendor Reports section click the File drop down menu.
2.Select Vendor File.
3.Click the Layout tab on in field list on the left drag Golbon Vendor field to a position in a Data Row.
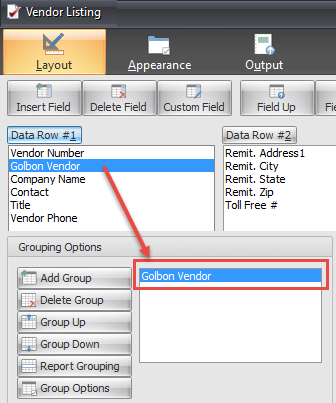
4. Next in the Layout tab from the Data Row drag the Golbon Vendor field to the Grouping Options area. |
|
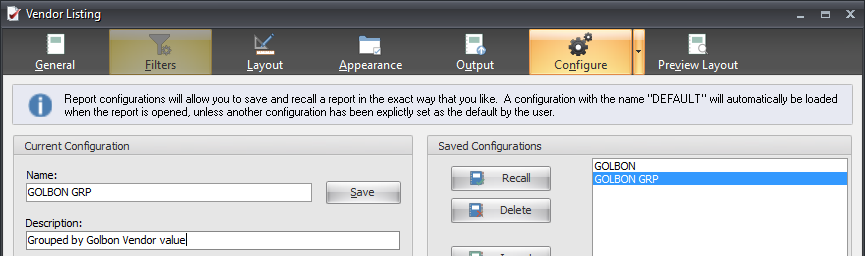
5. If you would like to save this report configuration go to the Configure tab.
a.Give the configuration a Name.
b.Enter a Description.
c.Click the Save button.
You can use the Recall button to reload the Saved Configurations any time you need to run the report.
6. To run the report once click the OK button at the bottom of the screen and select your printer and output options.
Or if you want to run the report on a regular basis click the Schedule button and set up days and times for regular report runs. *See the Scheduler chapter in the entrée System Guide for details.
 An example of the Vendor Listing report grouped by Golbon Vendor value with Golbon vendors group at the bottom of the report.