Mod #1367 CrunchTime EDI

Contents
CrunchTime EDI import and export.
Export invoices and catalog items and import invoices using flat files.
Related:
Mod #1544 CrunchTime EDI Enhancements
Mod #1571 Mile End Export
Mod #1572 Rename the CrunchTime Export1340
Updates
V4.6 Enhanced the CrunchTime EDI by adding an option to transfer files via SFTP.
V4.5.4.3 Updated the CrunchTime import process used by the Scheduling Utility to prevent error notifications from being sent when there are no files to download on the FTP server.
V4.5.1 Updated the CrunchTime EDI catalog to support version 7.4 file specifications.
V4.4.1 Implemented support to send confirmation emails for Invoices created through the Crunchtime EDI.
V4.3.0.4 Updated the order import and invoice export to move files to an Archive folder after being processed.
V4.2.2 Updated the export to extend Unit Price out to four decimal places.
V4.2.1
•Added a "Include Catalog File Prefix" check box option. If checked, this will include the "200_" file prefix on the Catalog export files.
•Updated the CrunchTime Export Configuration to be able to specify Vendor Code.
•Various additional enhancements to the Import and Export.
V4.2.0 Updated the export process to exclude all Credit Memos, and any Invoices that do not have a P.O. number of "Verbal".
V4.1.4 Updated the CrunchTime EDI export process to exclude all Credit Memos, and any Invoices that do not have a P.O. number of "Verbal".
Access: entrée Add-Ons ribbon menu > Import/Export > Import Data or Export Data > opens the import or export utility > select CrunchTime.
entrée Folders
•Import: necs_shared\01\CrunchTime\Import\
•Export invoice: necs_shared\01\CrunchTime\Export\Sales
•Export catalog: necs_shared\01\CrunchTime\Export\Catalog
Where "01" is the entrée company number.
FTP Settings
Values are supplied by CrunchTime when setting up your account.
entrée Settings
•Customer File: Mark all CrunchTime customers for the export.
1.Go to the Customer ribbon menu > click Customer. 2.Find a CrunchTime customer. 3.Click the Miscellaneous Tab. 4.Go to the Options list on the right. 5.In the Export Options section check the Crunch Time Customer option.
|
|
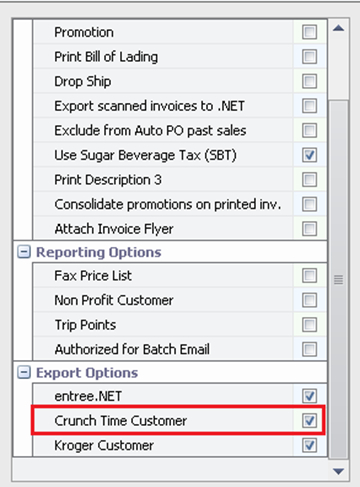
6.Next on the same tab go to the EDI Setup section and add the two letter location code for the store location in the CrunchTime Cat Code field. This will qualify the customer for Catalog items.
7.Click Apply to save your changes to the customer.

Files Exchanged
Document |
Import/Export |
Naming convention |
Send/Receive Frequency |
Format (edi/flat/csv) |
|---|---|---|---|---|
Sales Invoice |
Both |
009-yyymmddhhnnsszzz.txt |
|
flat |
Item Catalog File |
Export |
ITEM_DISTID_LOC.txt |
|
flat |
Export Setup
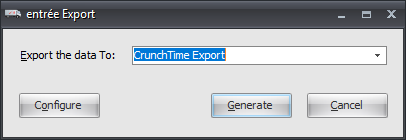
1. Go to the Add-Ons ribbon and click Import/Export icon.
2. Select Export Data and the entrée Export dialog will open.
3. In Export the data To select CrunchTime Export.
4. Click Configure and the CrunchTime Export Configuration dialog opens. Enter the Distributor ID assigned by CrunchTime or enter the dummy Distributor ID for testing.
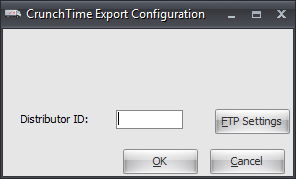
5. Click the FTP Settings button.
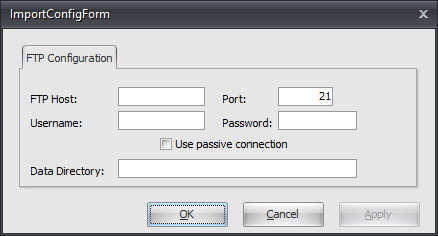
6. Now set up the FTP connection with the information you received from CrunchTime.
•Data Directory: Enter the location of your necs_shared\01 folder. Where "01" is the entrée company number.
7. Click Apply then OK to save.
8. Back in the CrunchTime Export Configuration click OK.
9. Now you are back in the Export dialog.
Running the Export
The export process will work with the Task Execution Application scheduler (TEA) in entrée V4.
1. Go to the Add-Ons ribbon and click Import/Export icon.
2. Select Export Data and the entrée Export dialog will open.
3. In Export the data To select CrunchTime Export.
4. Click Generate and the Export Orders for CrunchTime dialog opens.
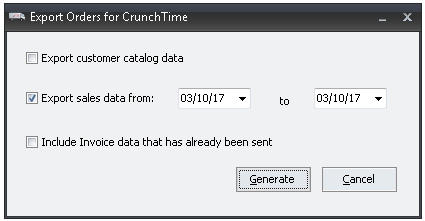
5. Select from these options as required:
▪Export customer catalog data: check to export the items that qualify under CrunchTime.
▪Export sales data from: check to export data from the invoices from the given date range. Enter start date and end date from the date picker.
▪Include Invoice data that has been already sent: check if you want to include the invoices already exported.
6. Click Generate to start the export process.
▪You will see new files in your FTP directory and in your necs_shared folder.
▪In the Export folder two folders will be created for Invoices and Catalog Items.