Mod #1403 US Foods JIT Orders EDI

Contents
Import/export utility for US Foods JIT orders.
Access: entrée Add-Ons ribbon menu > Import/Export > Import Data or Export Data > opens the import or export utility > select US Foods JIT in the menu.
•Imports the EDI 850 PO from US Foods SFTP site and converts it into an entrée invoice, using the Customer's Broadline Distributor ID.
•After the 850 PO is received, an EDI 997 Functional Acknowledgment is sent back.
•The export utility provides the ability to export a Price File and/or the JIT orders.
•Since the invoices will not be editable after exporting to US Foods, a utility has been provided that can be used after US Foods receives it.
•If the order successfully imported into US Foods, a PO Number will be provided which can be updated in the utility. If not, the utility can be used to clear the US Foods JIT export flag.
•A confirmation email of the purchase with the purchase order number which must be manually entered into entrée via Change Invoice.
•Imports and Exports can be done manually or can be scheduled using the entrée Task Execution Application (TEA).
entrée Settings
•Customer File: Enter for all your US Foods JIT Customers.
1.Go to the Customer ribbon menu click Customer. 2.File find the US Foods JIT customer. 3.Click the Miscellaneous Tab. 4.Go to the US Foods EDI section.
|
|
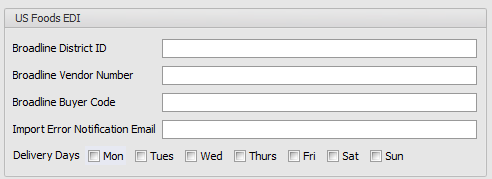
5. Enter: Broadline Distributor ID, Broadline Vendor Number, and Broadline Buyer Code provided by US Foods.
6. Enter an email address for the Import Error Notification Email.
7. For Delivery Days check the days for that customer.
8. Click Apply to save.
•Inventory File: Perform these updates on all US Foods items in your inventory.
1.Go to the Inventory ribbon menu click Inventory.
2.Find the US Foods item in the Inventory File.
3.Click the Misc 1 Tab.
4.Check the US Foods option.
5.Click the Vendor Tab.
6.In the Manufacturer Item Number field enter the US Foods Item Number if it does not match the entrée item number.
7.Click Apply to save.
SFTP Settings
Most of these values are supplied by the US Foods when setting up your account.
Passive Connect: No
Files Exchanged
Document |
Import/Export |
Naming convention |
Send/Receive Frequency |
Format |
JIT Orders In (PO) |
Import |
15 minutes |
Flat File |
|
JIT Orders Out (PO Confirm) |
Export |
JITO_yymmddhhnnsszzz.txt |
End of Day |
Flat File |
Catalog/Cost file |
Export |
CAT_yymmddhhnnsszzz.txt |
Weekly |
Flat File |
entrée Folders
•The import staging: necs_shared\01\USFoods\Import\
•The import archive: necs_shared\01\USFoods\Import\Archive
•The export staging: necs_shared\01\USFoods\Export\
•The export archive: necs_shared\01\USFoods\Export\Archive
Where "01" is the entrée company number.
Configure the Export
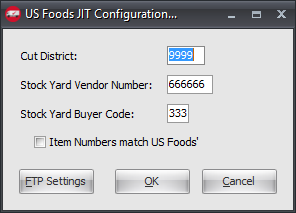
1. Go to the Add-Ons ribbon menu click Import/Export icon. 2. Select Export Data and the entrée Export dialog will open. 3. Select US Foods JIT. 4. Click Configure. |
|
5. Enter: ▪Cut District ▪Stock Yard Vendor Number ▪Stock Yard Buyer Code
6. Check Item Numbers match US Foods', if true.
7. Click FTP Settings. |
|
8. Enter FTP Configuration information provided by US Foods.
•Import Directory: Enter the location of your necs_shared\01 folder. Where "01" is the entrée company number.
•Import File Ext
•Export Directory: Enter the location of your necs_shared\01 folder. Where "01" is the entrée company number.
•Export File Ext
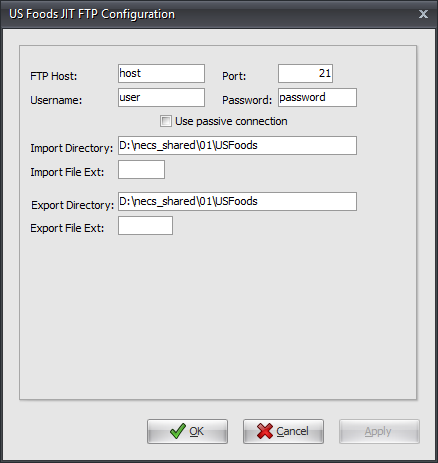
9. Click Apply to save then OK.
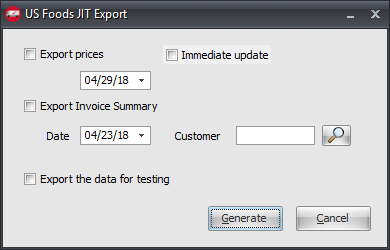
Export
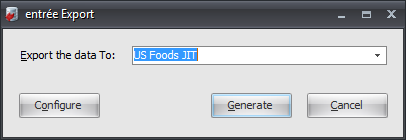
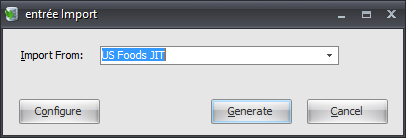
1. Go to the Add-Ons ribbon menu click Import/Export icon.
2. Select Export Data and the entrée Export dialog will open.
3. Select US Foods JIT.
4. Click Generate.
5. Make your export selections from:
•Export Prices ▪Select a date. ▪Immediate Update
•Export Invoice Summary ▪Date - Select a date ▪Customer - Use the customer search tool to find a customer.
•Export the data for testing
6. Click Generate to run the export.
|
|
Configure the Import
1. Go to the Add-Ons ribbon menu click Import/Export icon. 2. Select Import Data and the entrée Import dialog will open. 3. Select US Foods JIT. 4. Click Configure.
|
|
5. Enter FTP Configuration information provided by US Foods. (See Export FTP above)
•Import Directory: Enter the location of your necs_shared\01 folder. Where "01" is the entrée company number.
•Import File Ext
•Export Directory: Enter the location of your necs_shared\01 folder. Where "01" is the entrée company number.
•Export File Ext
6. Click Apply to save then OK.
Import
1. Go to the Add-Ons ribbon menu click Import/Export icon.
2. Select Import Data and the entrée Import dialog will open.
3. Select US Foods JIT.
4. Click Generate.
Updates
V4.5.1.1 Updated the US Foods invoice staging table to expand the length of fields UNIT_PRC and EXT_PRC from 9 to 13 digits.
V4.2.1 Updated the Export to add a Preparation Days field.