Mod #1417 Aramark EDI

Contents
The Aramark EDI import and export.
Access: entrée Add-Ons ribbon menu > Import/Export > Import Data or Export Data > opens the import or export utility > select Aramark EDI from the menu.
•This utility imports an EDI 850 Purchase Order from Aramark locations and converts it into an entrée invoice.
•After the 850 PO is received, an EDI 997 Functional Acknowledgment is sent back to the FTP export directory, confirming that the order was received.
•The EDI 855 Purchase Order Acknowledgment file will be uploaded to the FTP Export directory confirming quantities and prices for the receive PO.
•Once the associated invoice has been printed, it should be exported using the Export utility with the Aramark EDI option selected. This will generate an EDI 810 Invoice.
•Once the invoice has been exported no further edits to that invoice will be allowed.
•This Export utility has an option to generate an item catalog file in CIF format containing the order guides and pricing for the Aramark locations.
•Imports and Exports can be done manually or can be scheduled using the entrée Task Execution Application (TEA).
 Related to Mod #1239
Updates
V4.5.1.5 Updated the Aramark EDI to support Birchstreet per specs on file.
V4.1.2 Updated to remove the option to generate for invoices that have already been sent.
entrée Settings
•Customer: Add customer's Aramark Store IDs.
1.Go to the Customer ribbon menu click Customer.
2.Find the Aramark customer.
3.Click the Miscellaneous Tab.
4.Go to the EDI Options section and enter the customer's Aramark Store ID (assigned by Aramark).
5.Click Apply to save.
•Inventory: Add UNSPSC Code to items.
1.Go to the Inventory ribbon menu click Inventory.
2.Find the Aramark item in the Inventory File.
3.Click the Misc1 Tab and enter the UNSPSC Code. Required field for the item to be included in the catalog export.
4.Click Apply to save.
The UNSPSC or United Nations Standard Products and Services Code is a taxonomy of products and services for use in eCommerce. GS1 US is the code manager for the United Nations Standard Products and Services Code.
•Inventory: In the Inventory File in the Header section enter the Brand. Required non-blank value to be included in the catalog export.
entrée Folders
•Customer Catalog data: necs_shared\01\Aramark EDI\Catalog
•The import: necs_shared\01\Aramark EDI\Import\
•The import archive: necs_shared\01\Aramark EDI\Import\Archive\
•The export: necs_shared\01\Aramark EDI\Export\
•The export archive: necs_shared\01\Aramark EDI\Export\Archive\
Where "01" is the entrée company number.
FTP Settings
Values are supplied by Aramark when setting up your account.
Files Exchanged
Document |
Import/Export |
Naming convention |
Send/Receive Frequency |
Format (edi/flat/csv) |
|---|---|---|---|---|
EDI 850 Purchase Order |
Import |
PO_mmddyyhhnnsszzz.edi |
15 minutes |
EDI |
EDI 997 Functional Ack. |
Both |
FA_mmddyyhhnnsszzz.edi |
As imported |
EDI |
EDI 855 Purchase Order Ack. |
Export |
POA_mmddyyhhnnsszzz.edi |
As imported |
EDI |
EDI 810 Invoice |
Export |
INV_mmddyyhhnnsszzz.edi |
Daily |
EDI |
Item Catalog File |
Export |
xxxxx_ARAMARK.cid |
Daily |
CSV |
xxxxx is a place holder for the ANID when generating a catalog file.
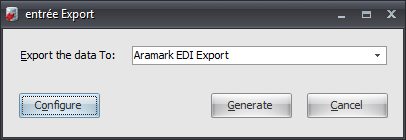
Configure the Export
1. Go to the Add-Ons ribbon menu click Import/Export icon. 2. Select Export Data and the entrée Export dialog will open. 3. Select Aramark EDI Export. 4. Click Configure. |
|
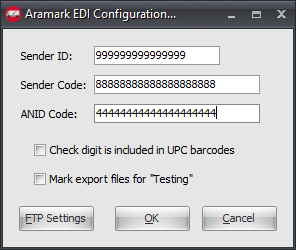
5. Enter your Sender ID, Sender Code, and ANID Code provided by Aramark.
Check these options are needed:
•Check digit is included in UPC barcodes
•Mark export files for Testing
7. Click FTP Settings.
|
|
8. For the Aramark FTP Configuration screen Aramark will provide you with the FTP server information you need to enter here, FTP Host, your assigned Username and Password.
•Export Directory: Enter the location of your necs_shared\01 folder. Where "01" is the entrée company number.
•File Ext: Leave blank
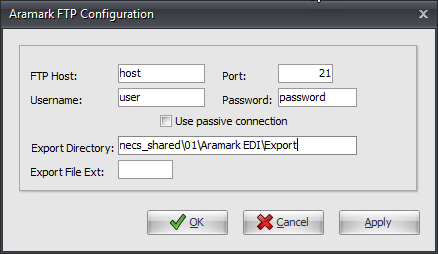
9. Click Apply to save then click OK.
Export
1. Go to the Add-Ons ribbon menu click Import/Export icon.
2. Select Export Data and the entrée Export dialog will open.
3. Select Aramark EDI Export.
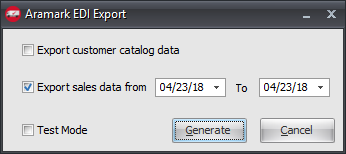
4. Click Generate.
5. The default is Export sales data. Set the from and To dates for the export.
6. If you need to check these options. ▪Export customer catalog data ▪Test Mode
7. Click Generate. |
|
8a. If you just run the default and Export sales data the process will check Aramark customers for invoices and export.
•When done the Export Completed dialog box will display with the export stats.
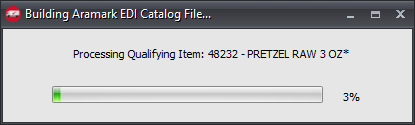
8b. If Export customer catalog data was checked the catalog will be built first.
|
|
•When the Catalog build has completed the Catalog Issue Log will be displayed showing the errors that need to be resolved. As you can see in our log we have not assigned the UNSPSC Codes.
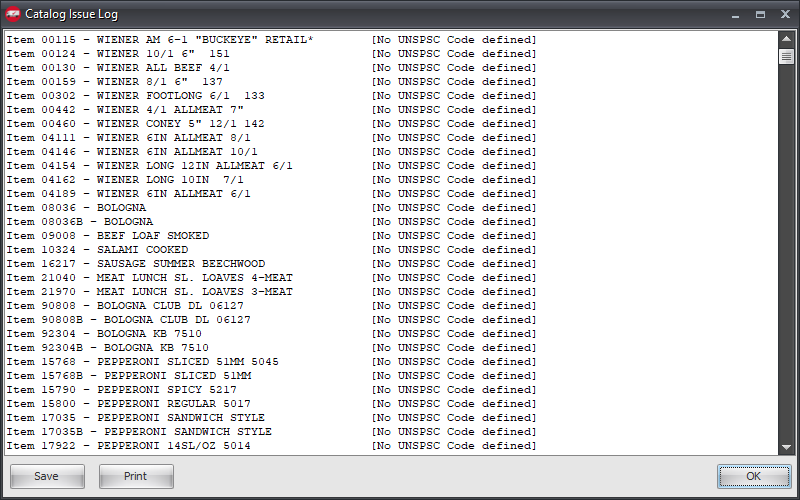
•Use Save or Print to provide a list of the errors that must be resolved for the catalog.
9. Click OK to close the issue log.
10. A Confirmation message box will display asking if you would like to Continue with Export?
▪Click Yes to run even though you had issues.
▪Click No to abort so you can resolve the issues in the log.
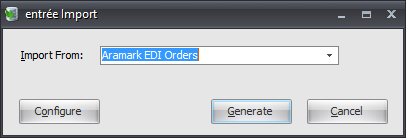
Configure the Import
1.Go to the Add-Ons ribbon menu click Import/Export icon. 2.Select Import Data and the entrée Import dialog will open. 3.In Import From select Aramark EDI Orders. 4.Click Configure. |
|
5. For the Aramark FTP Configuration screen Aramark will provide you with the FTP server information you need to enter here, FTP Host, your assigned Username and Password.
•Import Directory: Enter the location of your necs_shared\01 folder. Where "01" is the entrée company number.
•Import File Ext: edi
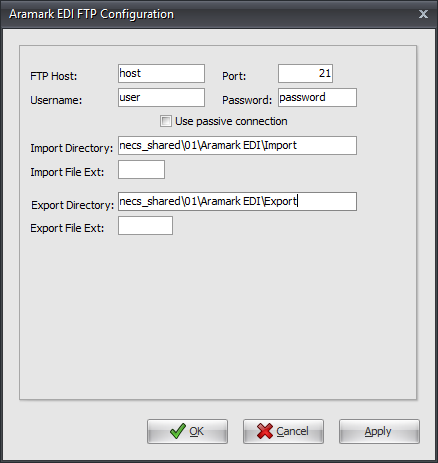
9. Click Apply to save then click OK.
Import
1.Go to the Add-Ons ribbon menu click Import/Export icon. 2.Select Import Data and the entrée Import dialog will open. 3.In Import From select Aramark EDI Orders. 4.Click Generate and the import will run. |
|