Mod #1420 ORCA EDI

Contents
ORCA EDI for the ORCA Inventory & Ordering system.
Access: entrée Add-Ons ribbon menu > Import/Export > Import Data or Export Data > opens the import or export utility > select ORCA in the menu.
•This interface uses SFTP to import 850 Purchase Orders from ORCA locations and converts it into an entrée invoice.
•Then the 855 Purchase Order Acknowledgments file, which confirms quantities for the received POs, is exported.
•Once the invoice has been printed use the export utility ORCA option to generate the 810 Invoice file for export.
•Once an invoice has been exported no changes can be made to that invoice.
•The mod works with the entrée Task Execution Application (TEA) to schedule file transfers with ORCA.
entrée Settings
•System Preferences: Add your Dun & Bradstreet Number.
1.Go to the System ribbon click System Preferences.
2.Go to the General Tab click the Miscellaneous sub-tab.
3.Enter your company DUNS+4 (The Dun & Bradstreet Number assigned to your company).
4.Click OK.
•Customer: Mark your Orca customers.
1.Go to the Customer ribbon and click Customer.
2.Find the Orca customer.
3.Click the Miscellaneous Tab.
4.Go to the EDI Options section and enter the ORCA Store ID for the customer (assigned by ORCA).
5.Click Apply to save.
•Inventory:
1.Go to the Inventory ribbon menu click Inventory.
2.Find the Orca item.
3.Click the Misc1 Tab.
4.Enter the Pack Quantity. This is the total number of units inside the larger selling unit.
5.Enter the Pack Description. This is a text description of the inner most pack of the selling unit.
6.Click Apply to save.
 If you have a case of ketchup packets you could have a Pack Quantity of 1000 and Pack Description of 9 gram.
entrée Folders
•import: necs_shared\01\Orca\Import\
•import archive: necs_shared\01\Orca\Import\Archive\
•export: necs_shared\01\Orca\Export\
•export archive: necs_shared\01\Orca\Export\Archive\
•Acknowledgment: necs_shared\01\Orca\Ack
Where "01" is the entrée company number.
FTP Settings
Values are supplied by ORCA when setting up your account.
Files Exchanged
Document |
Import/Export |
Naming convention |
Send/Receive Frequency |
Format (edi/flat/csv) |
|---|---|---|---|---|
EDI 850 Purchase Order |
Import |
850_mmddyyhhnnsszzz.edi |
15 minutes |
EDI |
EDI 855 Purchase Order Ack. |
Export |
855_mmddyyhhnnsszzz.edi |
As imported |
EDI |
EDI 810 Invoice |
Export |
810_mmddyyhhnnsszzz.edi |
Daily |
EDI |
Configure the Import
1. Go to the Add-Ons ribbon click for the Import/Export icon. 2. Select Import Data and the entrée Import dialog will open. 3. In Import From select ORCA EDI. 4. Click Configure. |
|
5. Enter the FTP Configuration information provided by Orca.
•Import Directory: Enter the location of your necs_shared folder. Where "01" is the entrée company number.
•File Ext
•Confirmation Dir: Enter the location of your necs_shared folder. Where "01" is the entrée company number.
•Conf File Ext
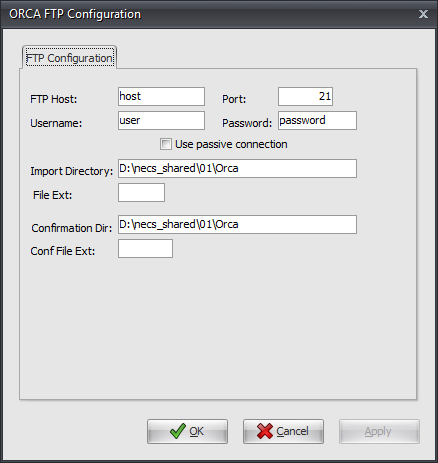
6. Click Apply to save then OK.
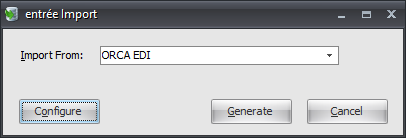
Import
1. Go to the Add-Ons ribbon click for the Import/Export icon.
2. Select Import Data and the entrée Import dialog will open.
3. In Import From select Orca EDI.
4. Click Generate.
Configure the Export
1. Go to the Add-Ons ribbon click for the Import/Export icon. 2. Select Export Data and the entrée Export dialog will open. 3. In Export the data to select ORCA Export. 4. Click Configure. |
|
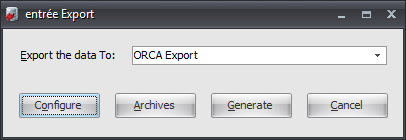
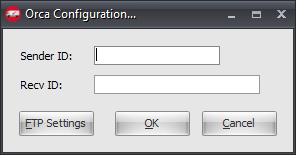
5. Enter the Orca Configuration information provided by Orca.
▪Sender ID ▪Recv ID
6. Click FTP Settings. |
|
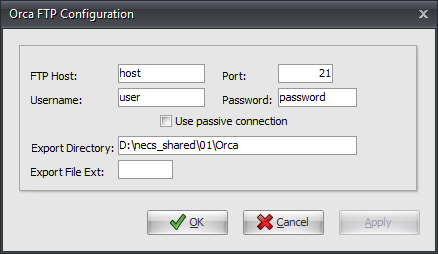
7. Enter the FTP information provided by Orca.
•Export Directory: Enter the location of your necs_shared folder. Where "01" is the entrée company number.
•Export File Ext
8. Click Apply to save then OK.
9. Click OK in Configuration dialog. |
|
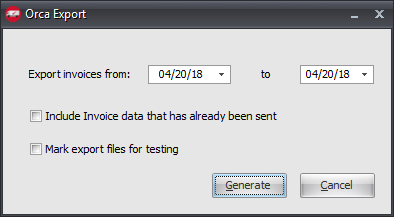
Export
1. Go to the Add-Ons ribbon click for the Import/Export icon.
2. Select Export Data and the entrée Export dialog will open.
3. In Export the data to select ORCA Export.
4. Click Generate.
5. In Export invoice from / to select your dates.
6. Check the Include Invoice data that has already been sent option box if needed for this export run.
•If testing check Mark export files for testing.
7. Click Generate to run the export. |
|