Mod #1434 Compeat EDI

Contents
Compeat EDI Interface
Access: entrée Add-Ons ribbon menu > Import/Export > Import Data or Export Data > opens the import or export utility > select from one of four restaurant groups; HatCreek, Generic1, Generic2, or Generic3.
•Allows for up to four restaurant groups.
•Imports/Exports can be manually executed as well as automated through the TEA Scheduling utility.
•Import: 850 Purchase Orders from Compeat locations and converts it into an entrée invoice.
•Export: Once the invoice has been printed, it is exported using the Export utility with the selected restaurant group name.
•Export: Generates and exports the 810 Invoice file. Once the invoice has been exported no further edits to that invoice will be allowed.
•Export: Has ability to export an Order Guide containing all items and pricing that are available to the selected restaurant group locations based on Special Price Customer entries and/or Bill To-Ship To entries.
•Export: User defined text values are enclosed in quotes for export files.
Updates
V4.3.0.4 Updated so that the imported orders are archived. Previously the import files were deleted after they were processed.
V4.3.0 Added a new "Units Shipped" field to the end of the item line in the Compeat invoice file, after Total Tax.
V4.2.5.1 Updated the invoice file to add Extended Amount and Item Tax at the end of the item lines. Also added new lines for Fuel Surcharge and CRV/Bottle Deposit at the end of the invoice.
V4.2.1
•Updated the export to add an Include Credit Items check box option.
•Updated the import to report back any errors encountered when running under TEA.
V4.2.0 Updated both export files so that user defined text values are enclosed in quotes.
entrée Folders
•The import staging: necs_shared\01\group\Orders
•The import archive: necs_shared\01\group\Orders\Archive
•The export staging: necs_shared\01\group\Order Guides\
•The export staging: necs_shared\01\group\Invoices\Archive
Where "01" is the entrée company number.
Where "group" is the name of the restaurant group, HatCreek, Generic1, Generic2, or Generic3.
entrée Settings
•Customer File: Perform this update for your Compeat customers.
1.Go to the Customer ribbon menu and click the Customer option.
2.Find your Compeat customer.
3.Go to the Miscellaneous tab and set the Type Code value from these options:
HatCreek = HC
Generic1 = G1
Generic2 = G2
Generic3 = G3
4.Click Apply.
Configure the Import
1. Go to the Add-Ons ribbon click Import/Export icon. 2. Select Import Data and the entrée Import dialog will open. 3. In Import From select from: HatCreek, Generic1, Generic2, or Generic3 4. Click Configure. |
|
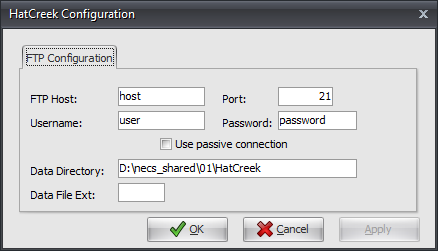
•In the example here we have selected HatCreek.
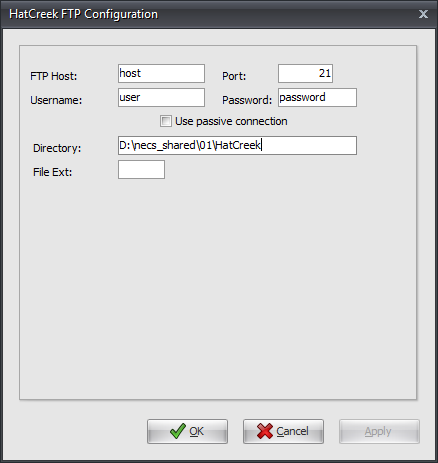
5. Enter the FTP Configuration information provided by Compeat.
•Directory: Enter the location of your necs_shared\01\group folder.
Where "01" is the entrée company number.
6. Click Apply to save then OK. |
|
Import
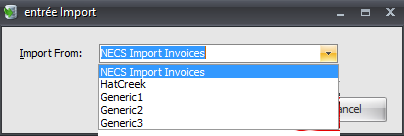
1.Go to the Add-Ons ribbon and click Import/Export.
2.Select Import Data and the entrée Import will open.
3.In Import From select from: Hatcreek, Generic1, Generic2, or Generic3.
4.Click Generate to run the import.
Configure the Export
1.Go to the Add-Ons ribbon click Import/Export icon. 2.Select Export Data and the entrée Export dialog will open. 3.In Export the data To select from: HatCreek, Generic1, Generic2, or Generic3. 4.Click Configure. |
|
5. Enter the FTP Configuration information provided by Compeat.
•Data Directory: Enter the location of your necs_shared\01\group folder.
Where "01" is the entrée company number.
6. Click Apply to save then OK. |
|
Export
1.Go to the Add-Ons ribbon click Import/Export icon.
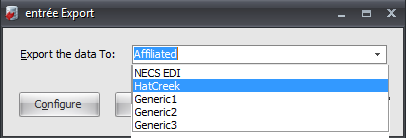
2.Select Export Data and the entrée Export dialog will open.
3.In Export the data To select from: HatCreek, Generic1, Generic2, or Generic3.
4.Click Generate.
•In this example we have selected HatCreek.
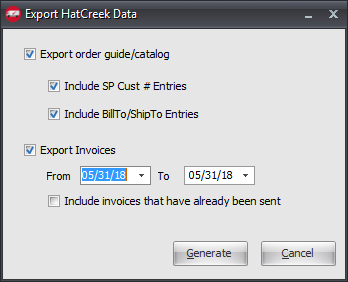
5. In the Export HatCreek Data dialog make your export selections.
•Export order guide/catalog ▪Include SP Cust # Entries ▪Include Bill To/Ship To Entries
•Export Invoices ▪Set the From / To dates.
▪Check the Include Invoices that have already been sent option box if needed for this export run.
6. Click Generate to run the export. |
|