Mod #1438 Select Marketing Export

Contents
The Select Marketing Export utility creates an Excel or CSV file containing information about purchases by Select Marketing vendors and saves it to the local computer.
For specific reports, this mod adds an option to the AP Vendor, PO Receipts, AP PO Tracking, and PO Order Status reports to only print information for Select Marketing vendors.
entrée Folder
The export staging: necs_shared\01\
Where "01" is the entrée company number.
Files Exchanged
Document |
Import/Export |
Naming convention |
Send/Receive Frequency |
Format |
|---|---|---|---|---|
Select Marketing POs |
Export |
Select_mmddyyhhnnsszzz |
As Exported |
CSV or XLSX |
entrée Settings
•Vendor File: Mark all of your Select Marketing vendors.
1.Go to the Vendor ribbon menu and click the Vendors option.
2.Use the Vendor Number search feature to find and select your vendor.
3.Go to the Vendor Tab Misc. sub-tab on the right.
4.Check the Select Vendor option.
5.Click Apply to save.
•Purchase Order: The PO must have the Invoice Number and Invoice Date entered to be included in the export.
Manually Marking Purchase Orders for Export
1.Go to the Vendor ribbon menu.
2.In the Purchase menu select Change Purchase Order.
3.Find and open the desired Purchase Order.
4.Click the Miscellaneous button.
5.In the Edit P.O. Miscellaneous dialog enter the Invoice No and Invoice Date.
6.Click OK.
7.Check to make sure the PO totals match the Vendor invoice totals.
8.Click OK in Change Purchase Order.
Configure the Export
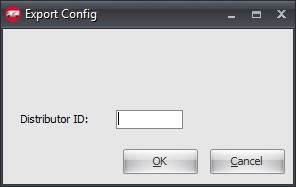
1. Go to the Add-Ons ribbon menu and click Import/Export icon. 2. Select Export Data and the entrée Export dialog will open. 3. In Export the data To select Select Marketing Export. 4. Click Configure. |
|
5. Enter your Select Marketing Distributor ID.
6. Click OK. |
|
Export
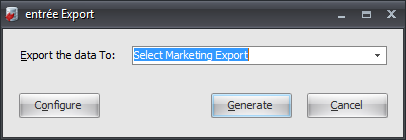
1. Go to the Add-Ons ribbon menu click Import/Export icon.
2. Select Export Data and the entrée Export dialog will open.
3. In Export the data To select Select Marketing Export.
4. Click Generate.
5. In the Select Marketing Export dialog make your selections.
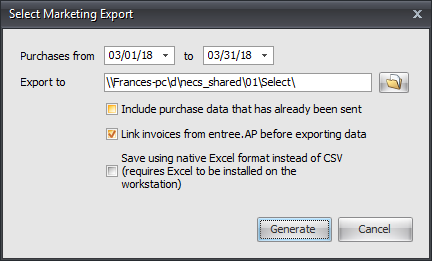
a.Purchases from: Set your dates.
b.Export to: Use the Browse feature to find necs_shared\01\Select\ for the export file. Where "01" is the entrée company number.
c.Options: Check the desired options from the list.
▪Include purchase data that has already been sent.
▪Link invoices from entrée.AP before exporting data.
▪Save using native Excel format instead of CSV (requires Excel to be installed on the workstation).
6. Click Generate to run the export.