Mod #1443 Sales-I Export

Contents
Sales-I CRM Export Utility
•Exports Customer, Product, and Invoice Journal files in CSV format via FTP.
•Exports distributor sales data for the purpose of data mining, analysis, and reporting.
•The initial export is 24 months of sales data breakdown. The Sales-I Export Utility dialog includes a check box for this 24 month option.
•Ongoing daily exports will include the current (partial) + previous month’s sales data, and can include previously sent transactions (in case there were updates to those transactions).
•A customer master file, and an inventory master file will also be sent daily.
•Export data is transmitted to the sales-i hosted server via SFTP.
entrée Folders
The export staging: necs_shared\01\sales-i EDI\Export\
The export archive: necs_shared\01\sales-i EDI\Export\Archive
Where "01" is the entrée company number.
entrée Settings
•Customers: Mark customers to Exclude from the Export
1.Go to the Customer ribbon menu and click the Customer option.
2.Find the desired customer and go to the Miscellaneous tab on the far right.
3.In the EDI Options section check the Exclude from Sales-I Export option.
4.Click Apply to save.
•Inventory: Mark Items to Exclude from Export
1.Go to the Inventory ribbon menu and click the Inventory option.
2.Find the desired item and go to the Misc 1 tab.
3.Check the Exclude from Sales-I Export option.
4.Click Apply to save.
SFTP Settings
Values are supplied by Sales-I when setting up your account.
Configure the Export
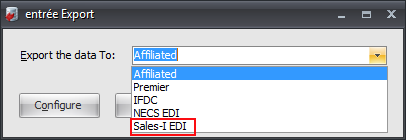
1. Go to the Add-Ons ribbon menu click Import/Export icon. 2. Select Export Data and the entrée Export dialog will open. 3. In Export the data To select Sales-I EDI. 4. Click Configure. |
|
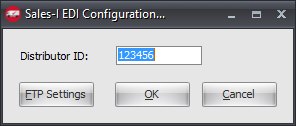
5. In the Sales-I EDI Configuration... dialog enter your assigned 6 digit Distributor ID in the text box.
6. Now click the FTP Settings button to set up FTP. |
|
7. Enter the FTP information provided by Sales-I
•Export Directory: Enter the location of your necs_shared\01 folder. Where "01" is the entrée company number.
•Export File Ext: csv.
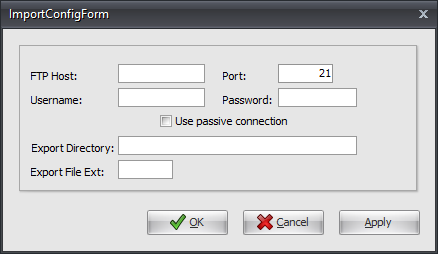
8. Click Apply to save then OK.
9. In the Sales-I EDI Configuration... dialog click OK.
Export
Once you have your customer and items marked and have setup the FTP and entered your Distributor ID you are ready to run the export.
1. Go to the Add-Ons ribbon menu click Import/Export icon.
2. Select Export Data and the entrée Export dialog will open.
3. In Export the data To select Sales-I EDI.
4. Click Generate and the Sales-I Export Utility dialog opens.
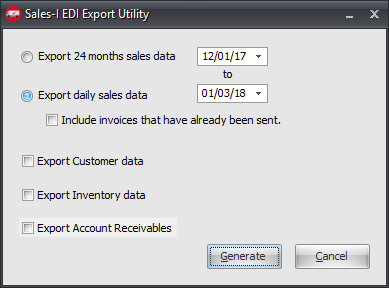
5. Working with Sales-I make selections here that are appropriate for your business needs.
6. Click Generate to export your data.