Mod #1489 Shopify EDI

Contents
The Shopify EDI interface enables the exchange of data between entrée and the Shopify ecommerce platform via FTP.
•The utility provides for export of a customer master file and inventory master file and the import of order information.
•Imports and Exports can be done manually or can be scheduled using the entrée Task Execution Application (TEA).
•If an account does not have a salesperson assigned, it will be exported with a salesperson of “HOUSE ACCOUNT”.
•If a customer is defined as a “One Ship” customer, the shipping address will be sent instead of the billing address.
•Files are sent in Comma Delimited Format with a double quote (“) as a text qualifier.
•Group codes in the customer file are sent in pipe delimited name value pairs. [code=level|code=level| code=level].
•If there is no entry in ARINVT2 for an item in ARINVT01, a description of “UNDEFINED” will be sent for the item description. This can be fixed by editing the item description in Inventory File Maintenance.
•Item tags in the inventory file are sent in pipe delimited format [tag|tag|tag].
•When acquiring item weight for the inventory export, average is sent if greater than zero, otherwise constant weight is sent.
entrée Folders
•The import staging: necs_shared\01\Shopify\Import\
•The import archive: necs_shared\01\Shopify\Archive\
•The export staging: necs_shared\01\Shopify\Export\
Where "01" is the entrée company number.
entrée Settings
•Customer: Mark all your Shopify customers.
1.Go to the Customer ribbon menu click Customer.
2.Find the Shopify customer.
3.Go to the Miscellaneous Tab Export Options section.
4.Check Shopify Customer.
5.Click Apply to save.
•Inventory: Mark all your Shopify items.
1.In the Inventory File find the item.
2.Click the Misc1 Tab.
3.Go to the Export Options section and check Include in Shopify Export.
4.Click Apply to save.
Files Exchanged
Document |
Import/Export |
Naming convention |
Send/Receive Frequency |
Format (edi/flat/csv) |
Customer Master File |
Export |
123456_Customer.csv |
Daily |
CSV |
Item Master File |
Export |
123456_item.csv |
Daily |
CSV |
Purchase Order |
Import |
XXXXXX_yyyymmdd_hhmmss.csv |
Hourly |
CSV |
•File Prefix = Shopify client code (6 digit Distributor ID)
•XXXXXX = Order number
FTP Settings
•Most of these values are supplied by the Shopify when setting up your account.
Configure & Export
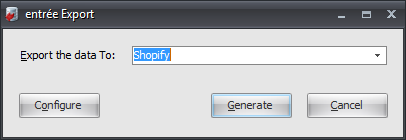
1. Go to the Add-Ons ribbon menu click Import/Export icon. 2. Select Export Data and the entrée Export dialog will open. 3. In Export the data To select Shopify.
4. Click Configure. |
|
5. Enter the FTP Configuration information provided by Shopify.
•Import Directory: Enter the location of your necs_shared folder. Where "01" is the entrée company number.
•Import File Ext is csv.
•Export Directory: Enter the location of your necs_shared folder. Where "01" is the entrée company number.
•Export File Ext is csv.
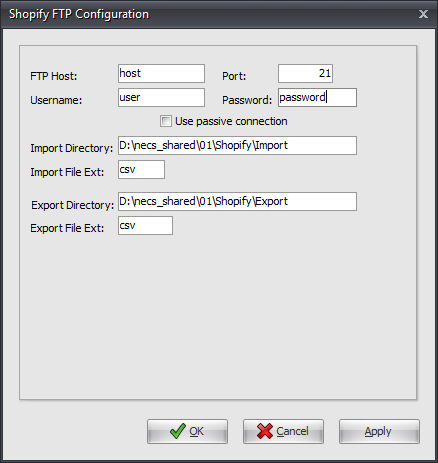
6. Click Apply then OK.
7. Back in the Export dialog click Generate to open the Export Shopify Data... dialog.
8. Check the boxes for the data you need to export.
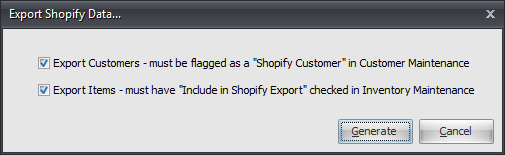
9. Click Generate to run the export
Import
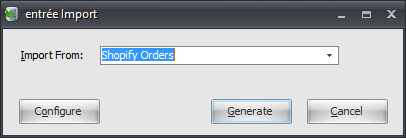
1. Go to the Add-Ons ribbon click Import/Export icon. 2. Select Import Data and the entrée Import dialog will open. 3. In Import From select Shopify Orders.
4. Click Generate to run the import. |
|
Updates
V4.2.1 Updated the export to report back any FTP errors encountered when running under TEA.