Mod #918 Edy's Export

Contents
An export utility for the distributor to generate a weekly sales export file (of Edys products) and a monthly freezer export file.
•Freezer data will be entered via the Freezer Maintenance Utility documented after the export process.
•entrée V4 SQL will create a data folder Edys that will be stored in your necs_shared\01 folder.
entrée Settings
•Inventory: Mark all your Edy's Items.
1.Go to the Inventory ribbon menu and click the Inventory option.
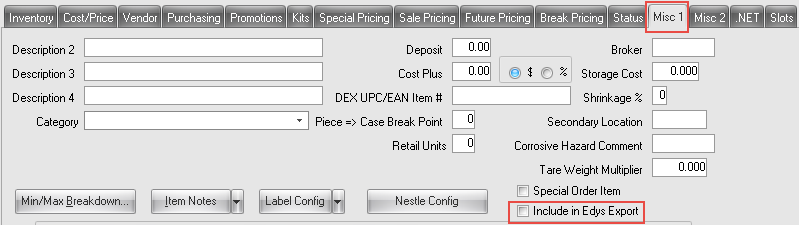
2.Find your Edy's items and go to the Misc 1 Tab.
3.Check the Include in Edy's Export option.
4. Click Apply to save the change.
Configure the Export
1. Go to the Add-Ons ribbon menu click Import/Export icon.
2. Select Export Data and the entrée Export dialog will open.
3. In Export the data To select Edys Data Exchange.
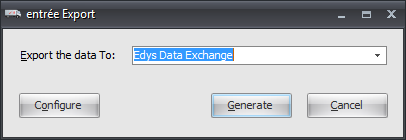
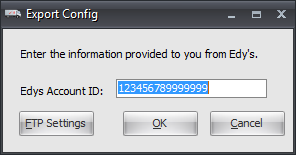
4. Click Configure and the Export Config dialog will open.
5. Enter your Edys Account ID.
6. Now click the FTP Settings button.
7. In the Edy's FTP Configuration dialog enter the FTP Host, Username, and Password provided by Edys.
8. Data Directory: Enter the location of your necs_shared\01 folder. Where "01" is the entrée company number.
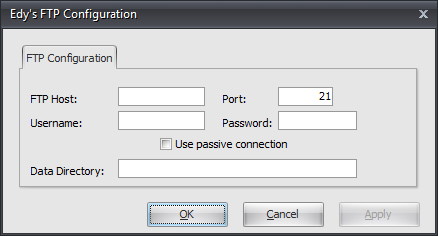
9. Click Apply to save then OK.
Export
1. Go to the Add-Ons ribbon menu click Import/Export icon.
2. Select Export Data and the entrée Export dialog will open.
3. In Export the data To select Edys Data Exchange.
4. Click the Generate button.
5. In the Export Ed's Data dialog
5a. Check the Export Freezer Placement Data option if you are using the Freezer Maintenance Utility.
5b. Check the Export Items Sales option and enter your Sales from through dates.
5c. If you need to resend data check the Include sales that have already been exported option.
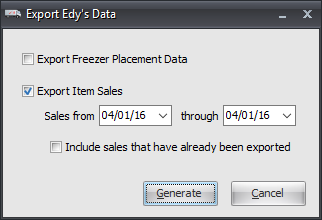
6. Click the Generate button and the files will be generated and sent via FTP to the Edy's server.
Using the Freezer Maintenance Utility
1. Go to the Customer ribbon menu Customer File section.
2. Click the Freezers icon to open the utility.
|
|
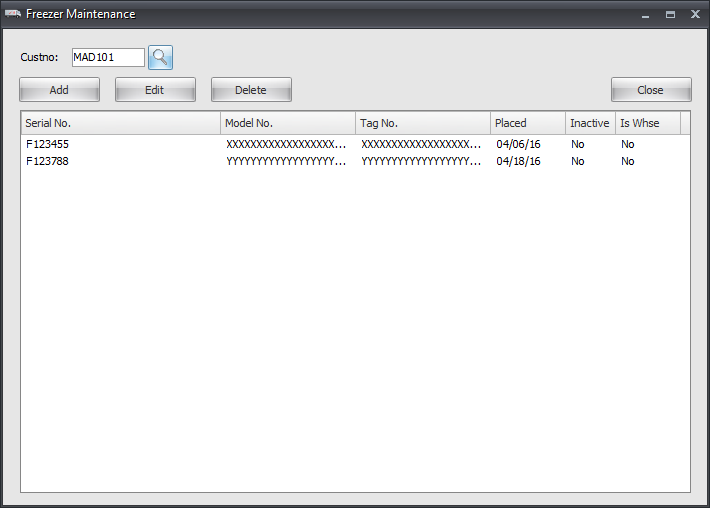
3. The Freezer Maintenance dialog opens. Here you will use the Add, Edit, and Delete buttons to manage your warehouse and your customer freezer information.
4. In the Custno field use the search tool to find the desired customer. Below you see the current freezer information for the customer MAD101.

•If you would like to add your own freezers the first time you use the utility leave the Custno field blank and hit the enter key. Now use the Add feature for your warehouse freezers that follows.
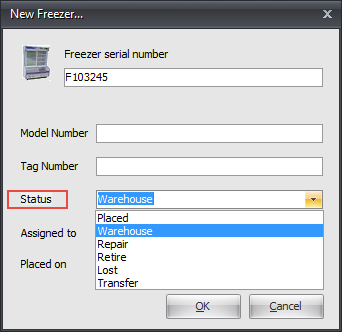
Add a New Freezer 1. Enter the information for:
▪Freezer serial number ▪Model Number ▪Tag Number
|
|
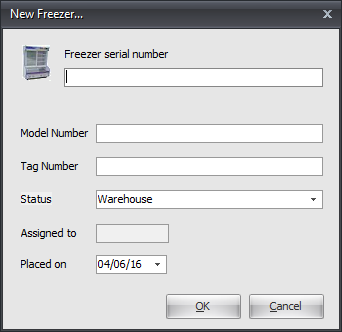
2. Use the Status drop down menu to indicate the current status of the freezer.
3. Then enter a date for Placed on.
4. Click OK to save.
5. Add the rest of the freezers for this customer.
Then continue with all your other customers one at a time. |
|
Edit a Freezer
1. In the Custno field use the search tool to find the desired customer.
2. When the freezer grid is loaded select freezer serial number you would like to edit.
3. Click the Edit button and the Freezer Properties dialog opens.
4. You will not be allowed to edit the Freezer serial number.
Edit the other properties as needed and update the Status.
5. Click OK to save. |
|
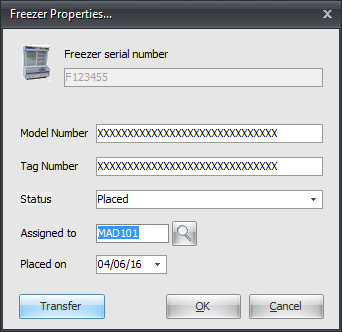
Freezer Transfers
1.If you would like to transfer this freezer to another location
2.Click the Transfer button.
3.Then use the Assigned to Customer search tool and select a new customer location.
 In the Export Ed's Data dialog be sure to check the Export Freezer Placement Data option if you are using the Freezer Maintenance Utility.
 Warehouse Freezer Maintenance
When the Custno field is left blank the utility defaults to your warehouse location's freezer entries.
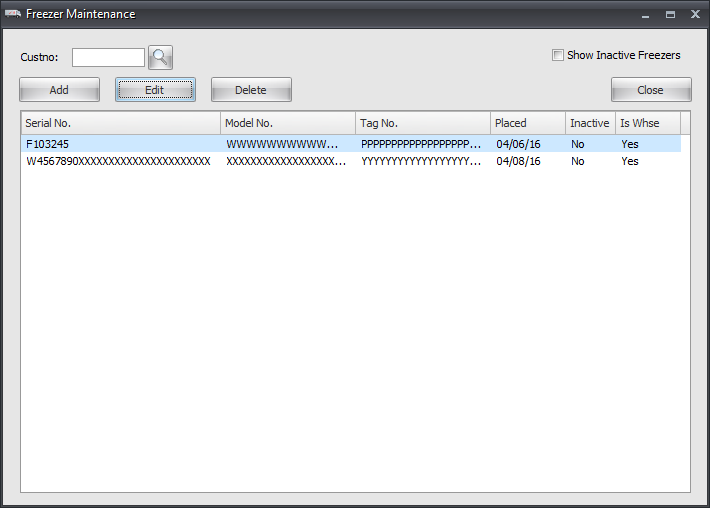
Customer Freezer Maintenance
Search for the desired Custno and access your customer's freezer information.