Label Printing

Contents
This section will provide an overview of label creation, saving label configurations, adding data as bar codes for scanning and printing in the entrée system. First the related system updates will be listed by version.
Update Version 3.6.18
PICKING LABELS:
Modified so that, if you have checked the "Return to report setup" option, the originally-loaded report configuration will be reloaded after the print job has been completed.
INVENTORY FILE REPORT:
Added "Picking Label Config" as a column option for this report and also provided a filter for this column.
PRODUCTION LABELS:
A "Production Label" printing feature was added in the entrée Reports > Label Printing menu to support printing of Production labels from the Electronic Warehouse Manager. This feature requires the Electronic Warehouse Manager app.
Update Version 3.6.21
LABEL PRINTING:
Updated the label printing system to support a secondary sorting option on all label configurations.
Update Version 3.6.26
PRINTING PICKING LABELS:
Update the label printing process so that catchweight items which have no weight defined will have a blank line ("____.____") printed instead of a "0.00" weight value when using the "Box Weight" field.
Items that are not catchweights will still have nothing printed in the "Box Weight" field and catchweight items with a valid weight available will still have that weight printed.
PRINTING RECEIPT LABELS:
Added a new "Pallet Quantity" column option which is intended to be used with the Pallet Labels feature. This field will print the number on the Print Receiving Labels report, indicating the total number of units for the pallet.
 This feature may not work correctly if the operator provides overrides to the total number of pallet labels to print.
PRINTING RECEIPT LABELS:
Updated the label to use "Quantity Ordered" instead of "Quantity Received" if no product has been received at time the receiving label is printed.
Access
Use menu path: Reports > Label Printing.
Make your selection from these Label Type options in the drop down menu:
•Customer
•Vendors
•Picking
•Inventory
•Lots
•Receipt
•Production: Which are labels only from the Electronic Warehouse Manager app.
The Label Printing Tool bar: 
▪General: Input dates and make selections from options available for the selected Label Type.
▪Filters: Provides field filtering using Include Filters and Exclude Filters options lists to reduce the amount of data on your label or to restrict the label data to specific field values.
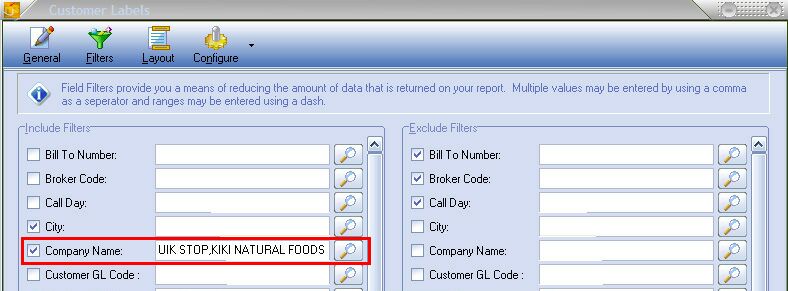
In the example below the magnifying glass search tool was used to select specific Company Name values from the entrée customer for the Include Filters option.
▪Layout: Opens the Label Options screen where Label Layout and Page Settings are accessed for that Label Type. This area is where you will design the label and set the Avery label number for printing at your business.
▪Configure: Name, save and recall the label configurations you create in entrée to meet your business needs.
How to Design and Save a Label
The label design and configuration process is basically the same for any label. The data in the label and the label options will change in relation to the Label Type selected in the menu. In this example the features of each screen will be described as you see how a customer mailing label is designed, configured and saved in entrée.
1. Use menu path: Reports > Label Printing > Customers.
2. The Customer Labels, General screen will be displayed. The options on the General screen will change with the Label Type selected, customer, vendor, picking etc...
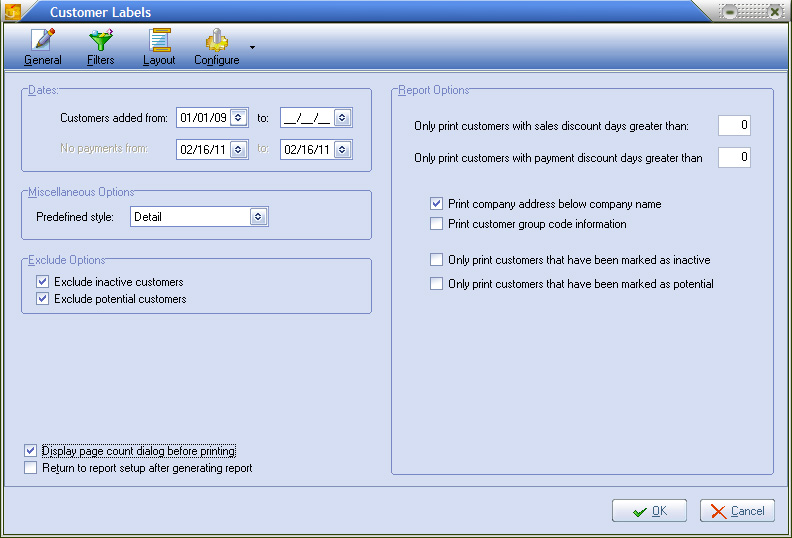
Since we are making customer mailing labels the options on this screen are related to the customer Label Type. Some of the options listed can be used to refine what customers you make labels for.
Dates:
▪Customers added from / to /
▪No payments from / to /
Miscellaneous Options:
▪Predefined style: Select one from the drop down list. Summary, Detail and Non-payment.
Exclude Options:
▪Exclude inactive customers.
▪Exclude potential customers.
Report Options:
▪Options in this area of the screen are for the customer Label Type. The Report Options will change related to the Label Type selected.
Display page count dialog before printing:
▪Checking this box will cause the Information message box to display a label count before printing is initiated.
Return to report setup after generating report:
▪Checking this box will return you to the General screen after printing.
3. Click Layout in the tool bar and the Label Options screen will display. It contains the Label Layout tab and the Page Settings tab.
4. Use the group and sort options displayed at the bottom of the Label Options screen to organize your labels before printing:
▪Group By: List of data fields in entrée that can be used to group the output labels.
▪Sort By: List of data fields in entrée that can be used to sort the output labels.
▪Page Break after group: Check this box if you want a page break at the end of each group.
5. Click the Page Settings tab.
6. Select your Avery Labels number from the drop down menu. This number can be found on the label package.
* Avery and all Avery brands, product names and codes are trademarks of Avery Products Corporation.
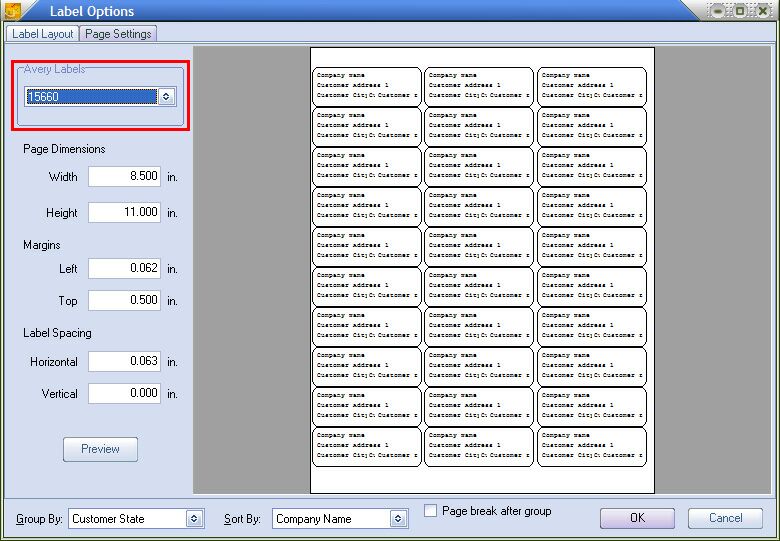
7. Click the Label Layout tab to design the label. In the Label Layout tab you will see a blank version of the Avery label number you selected.
![]()
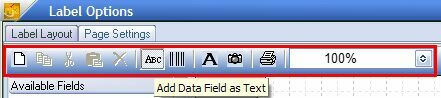
Label Layout tool bar:
When you roll your mouse over some of buttons in the tool bar a description of the button will be displayed. The tools are listed from left to right below:
▪Clear Label
▪Copy Selected
▪Cut Selected
▪Paste Clipboard
▪Delete Selected
▪Add Data Field as Text
▪Add Data Field as Barcode
▪Add Static Text Field
▪Add Picture Field
▪Printer - Click and the Print Setup dialog box will display. It is used to assign a printer and initiate a label printing job. See step 18 below for more information about the Print Setup dialog.
▪Zoom - Click the drop down menu to select the zoom value to view your label image. The default zoom value is 100%.
8. Use the Label Layout tab, Available Fields list to drag and drop the desired fields into the label.
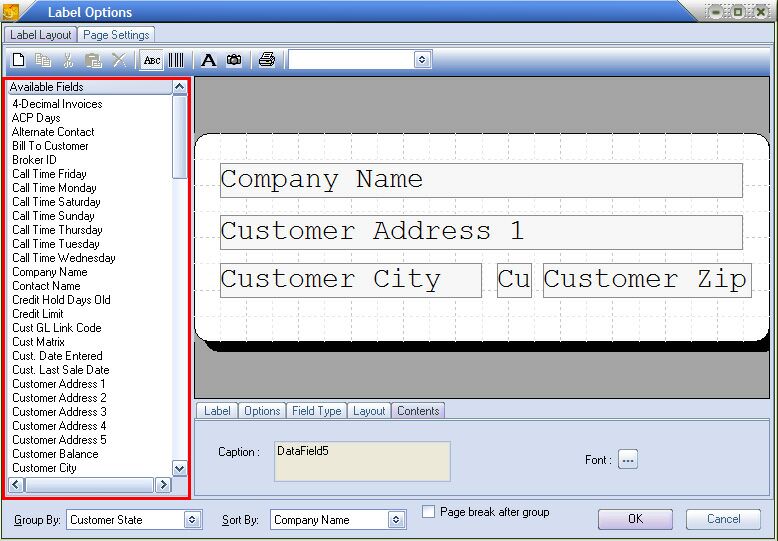
9. Use the options in the Label Design Area tabs to modify the data fields and design the label.
All the Label Design Area tabs will not be displayed for every Label Type.
Label tab: Sets label properties.

Height and Width: Should already be filled in from the Avery Label selected in the Page Settings tab.
Label Style: Select from Laser or Dot Matrix to match your company printer.
Options tab: Controls the grid in the label design area above.

Show Grid: Turns grid display on or off.
Snap Grid: Controls whether fields added to the label are snapped to grid lines automatically.
Grid Spacing: Controls the size of the blocks in the label design grid above.
Field Type tab: Indicates the type of data in the field selected.

Orientation: Choose the orientation of the selected field in the label.
Layout tab: Indicates the location and size of the field selected on the label.

Horizontal / Vertical Align: Are set using the drop down lists.
Contents tab: Displays the filed name and controls Font characteristics.
Caption: Displays the caption of the selected field or it can be edited to add a caption to a new field you have added to the label.
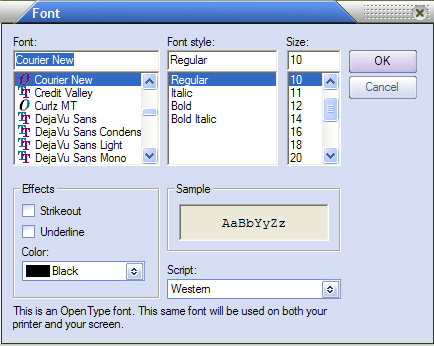
Font: Choose the Font, Font Size, Color and Font Style for the selected field in the label.
|
|

10. Once you have completed the design of your label click OK in the Label Options screen.
11. Click the Page Settings tab. Then click Preview to see an image of a printed sheet of your labels. If your label sheet looks good then continue to the next step. If not adjust the fields in your label until it looks good for printing.
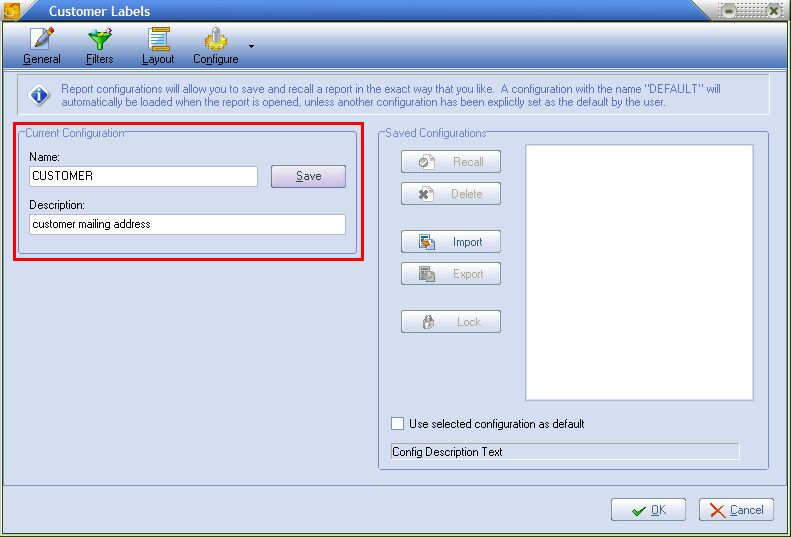
12. Now save the label configuration so you can use it again later. Click the Configure button in the main label screen.
13. Enter a meaningful name in the Name text box.
14. Enter a short description in the Description text box.
15. Click Save. The new label configuration name will now be displayed in the Saved Configurations area of the screen.
16. Click OK.
|
|
17. The Re2 Label Output Options dialog box will display. Update your label output options here then click OK when you are done.
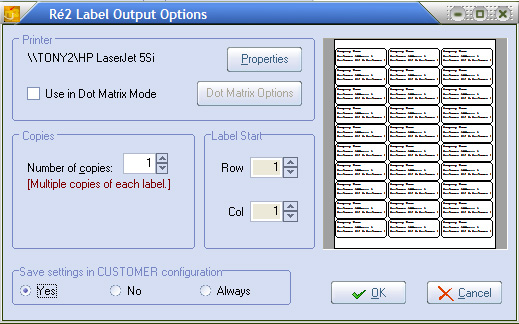
The options in the Label Output Options dialog box are:
Printer:
▪Click the Properties button and the Print Setup dialog box will display. Make selections here to match your labels in step 18 below.
▪Click "Use in Dot Matrix Mode" if that option is available on your printer and needed for printing your labels.
Copies: Use the arrows to set the number of copies for the label print job.
Label Start:
▪The default is Row 1 Column 1 of the sheet of labels.
▪Use the arrows to change the position on the sheet where you want to begin printing.
Save Settings:
▪Yes - save the current changes to the label configuration.
▪No - do not save any changes.
▪Always - always save any changes made to the label configuration.
18. When you click the Properties button in the Re2 Label Output Options the Print Setup dialog box will display so you can assign a printer to your label print job. The settings in this dialog need to be geared to the specific label printing job.
Printer: Click the Name drop down menu to select the printer from your network for the label printing job.
Paper: Select the paper size that matches the sheet of labels to be printed.
Orientation: Select the orientation that matches the sheet of labels to be printed.
Network: Click this button to connect to a printer on your company's network. Labels can be printed in various locations of your business from the office to the warehouse and the loading dock as long as a printer is defined on your network in that location. You will need to enter the printer IP address in the Connect to Printer dialog box that will be displayed to assign a network printer to the label print job. See your IT person for IP address information.
The Printer button in the Label Options, Label Layout tab tool bar will open the same dialog box.
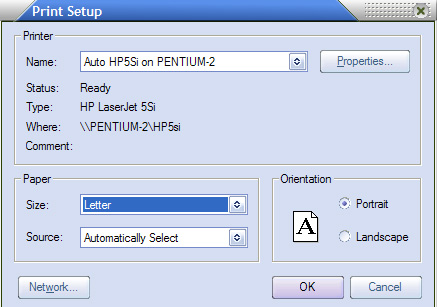
19. Click OK in the Print Setup dialog box to save your settings or click Cancel.
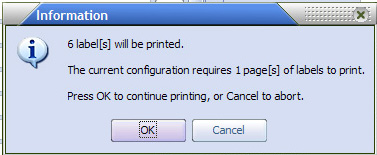
20. Click OK in the Re2 Label Output Options dialog box and label printing will be initiated. If your checked the Display page count dialog before printing option on the General screen this Information box will display. You will have the option to click OK to continue printing your labels or Cancel the label print job.
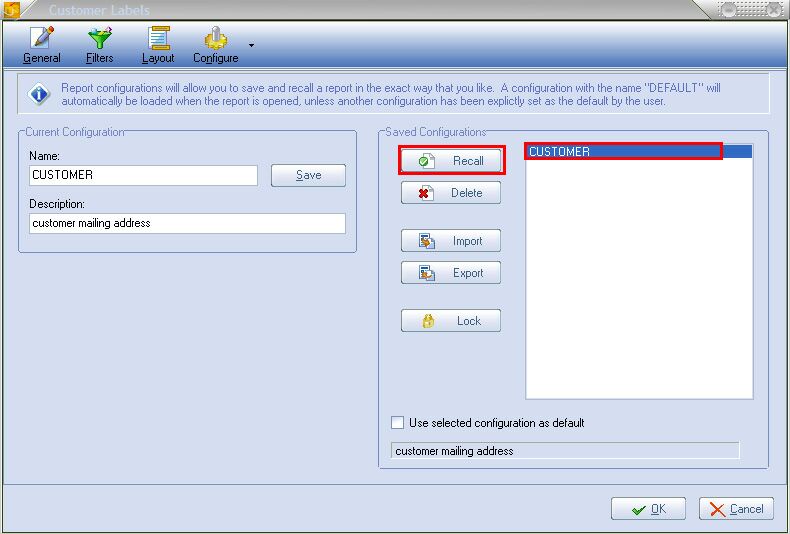
How to Recall a Saved Label Configuration
The customer mailing label example was saved with the name "Customer". Now we want to recall the label configuration to use it again or make some modifications and save it with a new name.
1. Use menu path: Reports > Label Printing > Customers.
2. Click the Configure button.
3. Click on the name of the saved report in the Saved Configurations area.
4. Click the Recall button.
5. Now click the Layout button to see your label configuration has been loaded and ready to use.
Label Printing and the UPC Bar Code Print Option
An option has been added to display Item Number and Invoice Number values as entrée.UPC barcodes in the label printing system. Label type options are: Customers, Vendors, Picking, Inventory, Lots and Receipt. Any label that utilizes either of those fields can now display them as a bar code.
1.Use menu path Reports > Label Printing.
2.Select the label type desired from the menu.
3.Click the Layout button.
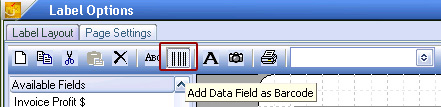
3.In the Label Options screen click the “Add data Field as Barcode” tool. |
|
5.Click on the Item Number or Invoice Number field in the Available Fields list and drag it to the label. A barcode will appear on the label. Adjust the size and position of the barcode for your label application.
The Item Number and Invoice Number fields may not be available in all the label types listed.
6.While the barcode is selected click on the label Contents tab and select the proper Symbology from the drop down list.
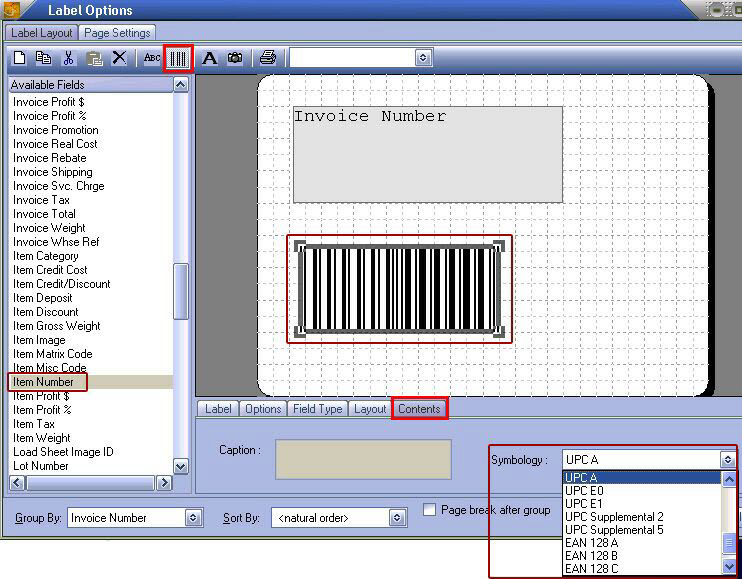
7.Continue building the rest of your label following the procedures presented previously in this chapter.