Adding New Prospects

Contents
Adding New Prospects to entrée.NET
There are two ways prospects are added to entrée.NET: manually by using the Prospects tab. Or if you have the website option (not true for website only option), prospects are automatically created in the system by turning on the “Create prospects for quote requests from the website.” option. To manually create a new prospect account in the Prospects tab:
1.Click the Prospects tab.
2.Click the Create Prospect button.
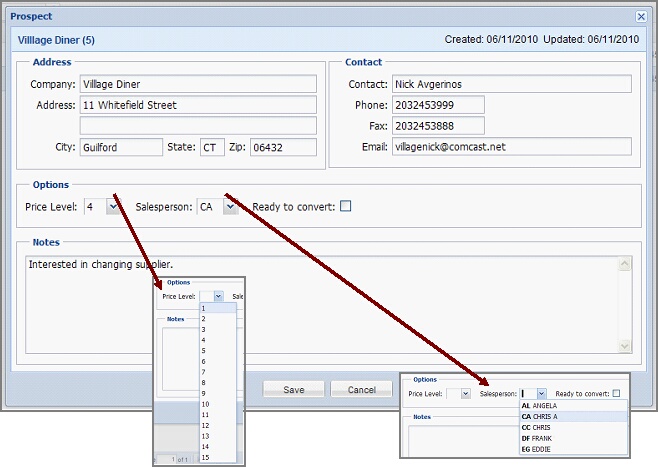
3.The Create New Prospect dialog box will display.
4.Fill in your prospect’s Address information.
5.Fill in the Contact information.
6.In the Options section make selections for:
▪Price Level from the drop down list.
▪Salesperson from the drop down list.
▪Ready to Convert will only be checked when the prospect is ready to be converted to a regular customer account.
7.Notes – Enter any notes about the prospect in the section provided to assist in your work with them.
8.Click Save.
 The Creation and Updated fields in the upper right corner. The Updated field value will change each time a prospect account has been modified and saved.
New Prospect Accounts from our entrée.NET Website
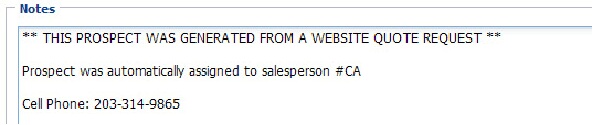
When our website creates a prospect account automatically from the Request Quote process emails are sent to the Prospects Manager. See the Request Quote chapter in this guide for more information. As a part of the Prospects feature a “new prospect notification” email will also be sent as a part of the automatic assignment of salespeople in the Request Quote process. An example of this email was shown earlier in this chapter.
It is important to regularly monitor your emails for notifications from your website.
Once a prospect account is listed in the Prospects tab follow steps 6 – 8 in the Adding New Prospects to entrée.NET procedure above. The Notes section will contain the notes from the email notification as shown below.