entrée System Options

Contents
There are system options that can be set in the main entrée system that will impact how entrée.NET and EOP work. These options are listed below.
System Options
•System Option #171 - Use Landed Cost for GP Calculations in Invoicing. This option is automatically set and maintained based on the system option setting in entrée.
When this option is checked the calculation of Gross Profit in Invoicing will change to be based off of Landed Cost rather than Base Cost. This option has been expanded so that it also controls the calculation of the "Margin %" column on the "Cost/Price" tab of entrée Inventory File Maintenance.
•System Option #180 - Invoicing deducts billback amount when calculating Gross Profit features introduced in the entrée.NET and the Electronic Order Pad Version 3.4.1.
Support for this option is provided to ensure the correct representation of GP information when viewing printed invoice information from any of the sales reporting features in the Electronic Order Pad - it has not been integrated into the GP estimation calculation when placing orders. This option is automatically set and maintained based on the entrée system options settings.
System Options Additional Features
entrée V3 Use menu path: System > System Preferences > System Options tab > click Additional Features drop down menu > select entrée.NET Options > click Configure button.
entrée V4 SQL Go to the System ribbon menu > System Preferences > System Options tab > click Additional Features drop down menu > select entrée.NET Options > click Configure button.
.NET Configuration Options
General: For entrée.NET users you now have the ability to update the entrée.NET version number by clicking on the drop down list when it is activated. |
|
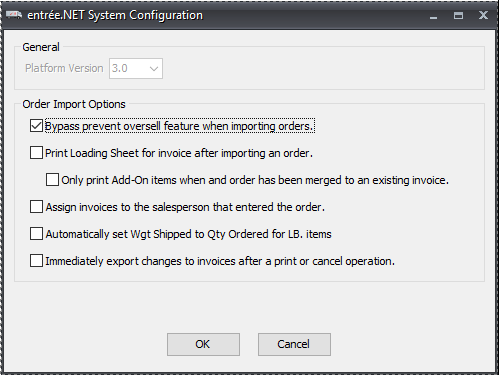
•Order Import Options support these entrée system options:
▪System Option #80 - "Prevent OVERSELL of items".
▪System Option #126 - "Prevent OVERSELL of items on Sales Orders".
▪System Option #128 - "Prevent oversell is allowed to reallocate product".
•Bypass prevent oversell feature when importing orders
Controls the use of systems options for oversell on orders imported into entrée from entrée.NET. Check the box for to activate the option.
•Print Loading Sheet for invoice after importing an order
Provides the option to print Loading Sheets when importing the orders from entrée.NET. Check the box for to activate the option. Once this option has been enabled the Loading Sheet for invoices created from entrée.NET orders will automatically be printed to your configured "Loading Sheet" printer as part of the order import process.
▪Only print Add-On Items when an order has been merged to an existing invoice: This new option helps control when Loading Sheets are printed for merged orders and whether Add-On Items print.
 The printing process was revised to ensure that only one Loading Sheet is printed per-invoice during an import batch. This way if the initial invoice and all of the associated revisions are imported in one shot it will only print one copy of the Loading Sheet.
•Assign invoices to the salesperson that entered the order
This option provides the ability to control which salesperson gets assigned to orders placed through both entrée.NET and the Electronic Order Pad.
Activating this option will change the order entry process so that the Salesperson ID of the person entering the order will be assigned to that order. The normal behavior of the system is to always assign the salesperson according to the salesperson assigned to the customer in entrée Customer File Maintenance.
•Automatically set Wgt Shipped to Qty Ordered for LB. items
This option will set the “Weight Shipped” value for “LB.” items to automatically be set to match the “Quantity Ordered” value during the order import process.
•Immediately export changes to invoices after a print or cancel operation
This new “Sales Update” mode only transfers pending invoice changes. It allows the new export to run automatically any time an invoice has been printed or canceled. This mode does not require a lock on the export process to permits it to run while other exports are in process.
Order Import Consolidation
entrée V4 SQL Go to the System ribbon menu > System Preferences > System Options tab > click Additional Features drop down menu > select Order Import Consolidation > click Configure button.
The Order Import Consolidation Settings dialog will open. Here you will configure how the order import consolidation will function in your system.
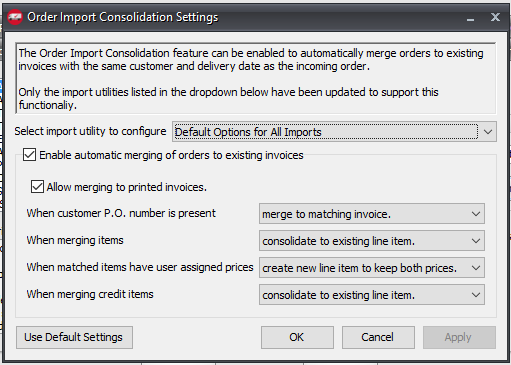
1. Enable automatic merging of orders to existing invoices: Check this option to turn on the Order Import Consolidation feature in selected import utility for entrée.
2. Now select the import utility you want to use with the consolidation features.
Select import utility to configure:
▪entrée.NET
▪Electronic Order Pad
▪Default options for All imports. (only entrée.NET and the Electronic Order Pad app at this time)
•Next you have to make some decisions about how you want order import consolidation to work.
3. Allow merging to printed invoices: Check this option to override the system default and merge a new invoice with a printed invoice. Once enabled the system can modify an invoice that has already been printed. The system default has the invoice left in an unprinted state.
 For printed invoices the default is NO order import consolidation unless this override option is checked.
4. When Customer P.O. Number is present: To control how orders with customer provided P.O. numbers will be handled you have two options.
▪Merge to matching invoice: Consolidate orders for the same customer, delivery date, and customer provided P.O. number. Any customer invoice WITHOUT a P.O. Number merges by Delivery Date.
▪Always create a new invoice: Will create a new invoice for any order with a customer provided P.O. number even if the same P.O. number has been submitted with another order for the same customer and delivery date.
5. When Merging Items: you have two options for controlling how items from the incoming order are added to the existing invoice.
▪Always Create a New Line Item: Will always create a new line item for each line item of the incoming order, even if another entry for the item with the same price is already on the invoice.
▪Consolidate to Existing Line Item: Checks for a line item with the same item number and price on the existing invoice. If one is found the quantity from the incoming order for that item will be added to the existing line item.
6. If you select the Consolidate to Existing Line Item option you will have to make a selection for the When matched item has user assigned prices option. These options allow you to control line item price conflicts. It only applies if a price has been manually set in either entrée or the entrée.NET or Electronic Order Pad remote systems.
▪Create new line item to keep both prices: Will not merge line items and will instead create a new line entry to keep the pricing separated. Will result in two entries for the same item with different prices on one invoice.
▪Merge and use the current invoice price: Will add the quantity from the incoming order to the matched line item entry on the invoice. It will ignore the incoming price and keep the currently set price on the invoice.
▪Merge and use the incoming order price: Will add the quantity from the incoming order to the matched line entry and replace the current price with the new price from the incoming order.
7. When Merging Credit Items: If your entrée system is setup to allow credit items to be entered on invoices an additional option for controlling how credit items from the incoming order are added to the existing invoice can be controlled by these two options.
▪Consolidate to Existing Line Item: Will check for a credit line item with the same item number price, and return code on the existing invoice. If one is found the quantity from the incoming order for that item will be added to the existing line item.
▪Always Create a New Line Item: Always creates a new line item entry each line item of the incoming order.
8. Be sure to click Apply then OK to save your settings.