Overview / Installation
The entrée.NET system is specialized e-commerce software running on high capacity cloud based servers to always ensure the system is available and performing at top speed. For security and other issues, it does not allow a user to directly access your local server. Instead entrée.NET communicates directly with the local server in your office for such things as accessing inventory information and downloading customer orders. All the activity such as when a user creates an order is saved on the entrée.NET cloud servers as the order is built. So if for some reason the user looses Internet access, no data will be lost. The customer or DSR will simply log back in and continue where they left off.
The entrée.NET system was created primarily for Internet based order entry by your customers and DSRs. It was designed to speed the user through the order entry process while helping them identify items they should be ordering but may have missed, locate items in your product catalog and discover your current "specials" and other items on sale or featured. They can view extensive information about each item including extended descriptions, images, available pack sizes, etc. Your product catalog can be viewed using "Tags" such as Kosher, Gluten Free, Fat Free, Peanut Free, etc. Customizable reports can be generated based on up to 13 months of purchase history including exporting to Excel or PDF documents. Customers can view their accounts receivable status, including open invoices and payments. If you use our entrée.DOC software, they can view and print their scanned invoices showing their signature.
If you have your own domain name (ex: myfooddistributingcompany.com) and would like a modern and professional looking site for your business, this can also be accomplished with entrée.NET. NECS can help you create your website and give you the ability to maintain it yourself. You’ll have the ability to change images, update the content of your “Welcome,” “About Us,” “Contact,” "Blog" and “Directions” pages. You will be able to automatically post your inventory list and specials, from your NECS entrée software, directly to your website, as often as you’d like.
If you currently have a website which you love, entrée.NET provides an option for a public Pop-Up Catalog which you can easily integrate into your existing site. This will allow the public to see your product catalog which is automatically updated from your entrée software, so there is never a need to contact a web developer to keep your product catalog updated.
Resources
Access our interactive search-able web-based knowledgebases using the links here.
• entrée.NET KnowledgeBase at http://www.necs.com/net_KB/
• entrée V4 SQL KnowledgeBase at http://www.necs.com/eV4SQL_KB/
• entrée V3 KnowledgeBase at http://www.necs.com/knowledgebase/
entrée.NET Guides
Included with the entrée.NET system are customized guides for the Administrator, Administrator Website Only guide, Salesperson, User Guide (for Customers) and a guide for the Language Translator. These guides will answer any questions you, your employees and customers may have in addition to making it easy for you to manage your new online ordering system, catalog, and website.
The .NET guides are available as PDF files that you can download via the Help tab in entrée.NET or from the NECS website using these instructions.
1. In your browser go to www.necs.com and click the Support option to access the drop down menu.
2. Click Customer Login and enter your username and password to access the secure area of the website. In this area release upgrades are posted along with links to other support services and documentation.
3. In the menu on the far left click the System Guides option.
4. Select entrée.NET from the list displayed.
5. The entrée.NET Product Guides list will be displayed select the desired guide. The guides can easily be read or printed using the free Adobe Reader download.
entrée Versions 3 & 4SQL
With the release of entrée version 4 SQL in 2014 and the major differences between the menus and screens in both entrée versions 3 and 4 we have included instructions for using both versions of entrée in this guide.
To differentiate topics for each major version of entrée you will see color coded entrée V3 or entrée V4 SQL headers in the impacted topics to direct you to the correct information for your system.
entrée.NET System Requirements
•entrée.NET requires you to have installed either entrée version 3.5.1 or later or entrée version 4.0.
•You will need to upgrade to the proper version of entrée in order to utilize the data import/export utility.
•entrée.NET works with virtually all computers which support Internet connectivity and a Web browser like Internet Explorer, Mozilla Firefox, Apple Safari and Google Chrome.
entrée.NET Version
The About tab in your entrée.NET system provides you with the version number and information about the modules installed with your software. NECS will also provide you with detailed version update notes in the About tab. With each release you will know what modifications and enhancements have been made to entrée.NET.
entrée.NET Installation Overview
You will need to make these same changes in the main entrée system whether you have entrée version 3 or entrée V4 SQL. There are new menu paths using the ribbon menus in entrée V4.
entrée V3 |
entrée V4 SQL
|
1.Login and select System > Preferences. 2.Then click on the System Options tab. 3.Go to the Additional Features drop down menu on the right and click entrée.NET options. 4.Click the Configure button. |
1. Login and go to the System ribbon menu and click on the System Preferences option. 2. Click on the System Options tab. 3. Go to the Additional Features drop down menu on the right and click entrée.NET options. 4. Click the Configure button. |

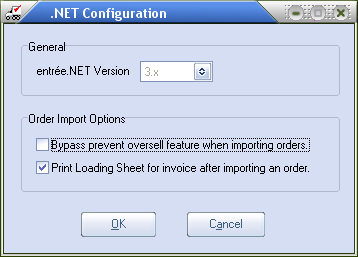
5. The .NET Configuration dialog box will display.
Next follow the instructions for the entrée version you are running for steps 6 and 7. Then continue on with steps 8 - 10 for all versions.
entrée V3 .NET Settings
6. General section the entrée.NET Version will default to 3.x.
7. Order Import Options section options:
•Bypass prevent oversell feature when importing orders - If you have System Option # 126 "Prevent OVERSELL of items on Sales Orders" checked in entrée System Preferences you may want to switch it off for orders imported from entrée.NET by checking this option.
•Print Loading Sheet for invoice after importing an order - If you check this box after your orders are imported from entrée.NET the loading sheets will be printed automatically. |
|
entrée V4 SQL .NET Settings
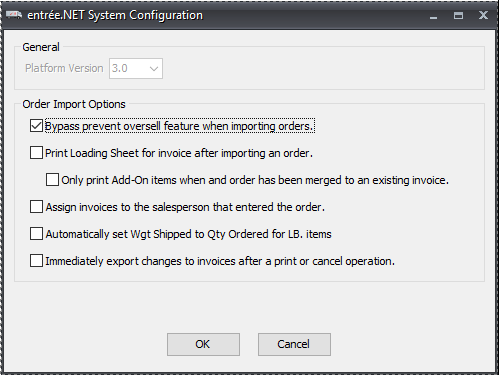
6. General section allows update of the entrée.NET Version by using the drop down menu.
7. Order Import Options
The Order Import Options feature was added to support these entrée system options:
▪System Option #80 - "Prevent OVERSELL of items". ▪System Option #126 - "Prevent OVERSELL of items on Sales Orders". ▪System Option #128 - "Prevent oversell is allowed to reallocate product". |
|
Order Import Options:
•Bypass prevent oversell feature when importing orders - Controls the use of systems options for oversell on orders imported into entrée from entrée.NET. Check the box for to activate the option.
•Print Loading Sheet for invoice after importing an order - Provides the option to print Loading Sheets when importing the orders from entrée.NET. Check the box for to activate the option.
Once this option has been enabled the Loading Sheet for invoices created from entrée.NET orders will automatically be printed to your configured "Loading Sheet" printer as part of the order import process.
•Assign invoices to the salesperson that entered the order - This option provides the ability to control which salesperson gets assigned to orders placed through both entrée.NET and the Electronic Order Pad.
Activating this option will change the order entry process so that the Salesperson ID of the person entering the order will be assigned to that order. The normal behavior of the system is to always assign the salesperson according to the salesperson assigned to the customer in Customer File Maintenance.
•Automatically set Wgt Shipped to Qty Ordered for LB. items - This option will set the “Weight Shipped” value for “LB.” items to automatically be set to match the “Quantity Ordered” value during the order import process.
8. Check the boxes for the desired options in the entrée version you are running either V3 or V4 SQL.
9. Click OK in the .NET Configuration dialog box.
10. Click OK in System Preferences.


