Manager Setup Tab

Contents
Designating Prospect / Website Managers
The Manager Setup tab has been added to the distributor’s menu to allow for the creation and maintenance of manager accounts. These manager accounts can be assigned specific administrative roles in the entrée.NET system. The process of approving a prospect to be converted into a customer can only be performed by the distributor or a prospects manager. Currently the two roles supported are:
Manage Website |
Allows the account to access and modify content in the “Website” section. |
Manage Prospects |
Allows the account to access and modify content related to the “Prospects” feature. |
 The account setup process will allow you to change an account Username. This authorization has also been provided to salespeople who have been given the ability to create accounts for customers.
The Manager Setup tab with a new manager account.
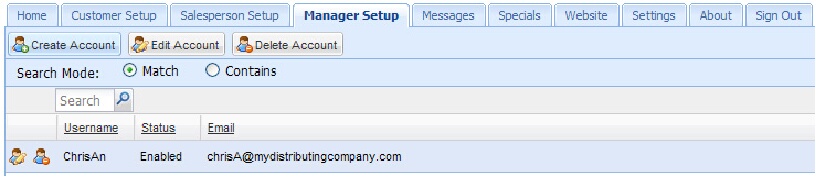
Manager Setup Screen Details
•Create Account - Click to create a new manager account.
•Edit Account – Click to edit an existing manager account.
•Delete Account – Click to delete a selected manager account.
•Search Mode - Select either “Match” or “Contains”.
•Search box - Type a word or letters here then click the search icon  to get your results.
•First column – contains the icons for the Edit and Delete functions.
•Username – The username assigned when the account was created.
•Status – Values are “Enabled” or “Disabled”. This value is controlled by the System Administrator.
•Email – The account contact person’s email address.
Creating Manager Accounts
If you decide to designate an employee as a “Prospects Manager” or “Website Manager” you will need to create a manager account for them in the Manager Setup tab. Follow these steps to create the new manager account:
1.Click the Manager Setup tab.
2.Click the Create Account button.
3.The Create New Manager Account dialog box will display.
4.Enter information for:
a.Username – create a new username for the manager.
b.Password – create a password.
c.Email – current email address.
d.Disabled – Can be used later to disable the account if needed. |
|

5.For the Select roles for this account: section check boxes to designate the role for the new manager account.
a.Manage Website
b.Manage Prospects
6.Click Save.
7.The new manager account will now be listed in the Manager Setup screen
Edit / Disable / Delete Manager Accounts
Now that you have designated a “Prospects Manager” and / or a “Website Manager” if you need to make changes or remove the account completely you will use the Manager Setup tab.
•Editing a manager account –
1.Click and highlight the manager account in the list to select it.
2.Click the Edit Account button or the Edit Account icon in the leftmost column.
3.Make your changes in the Edit Manager Account dialog box.
4.This Disabled check box for the manager account can be updated here.
5.Click Save.
•Deleting a Manager Account
1.Click and highlight the manager account in the list to select it.
2.Click the Delete Account button or the Delete Account icon in the leftmost column.
3.Click Yes in the Delete Accounts? confirmation dialog box.