Setting up entrée for QuickBooks

Contents
This section will provide an overview of what needs to be configured in entrée version 3 or entrée version 4 SQL, prior to running entrée.QB for the first time.
 Before beginning this update process all users must exit the entrée system so these steps can be completed.
First Update the entrée Accounting System
| 1. | Login to your entrée system and do the steps for your version: |
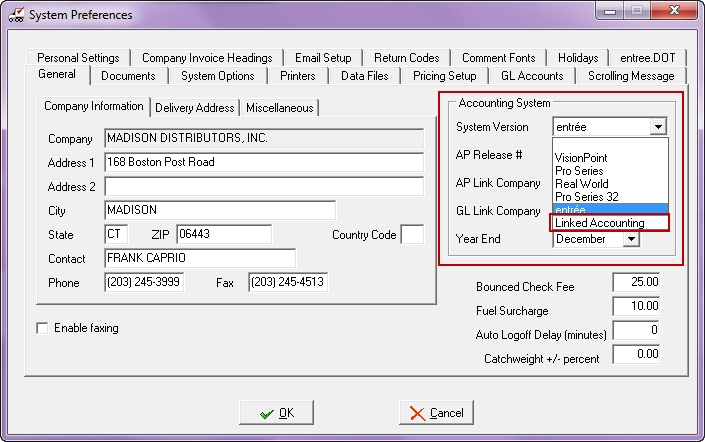
entrée V3 use menu path: System > Preferences > General Tab.
entrée V4 SQL Go to the System ribbon menu > System Preferences > General Tab.
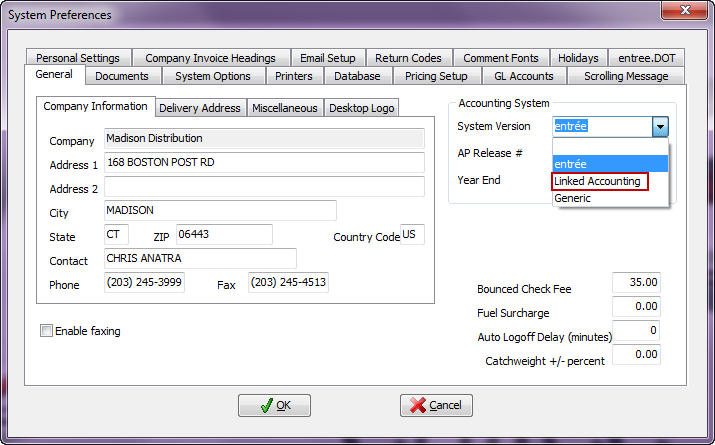
| 2. | Go to the Accounting System section in the System Version drop down menu select Linked Accounting. |
entrée V3 use menu path: System > Preferences > General Tab
entrée V4 SQL Go to the System ribbon menu > System Preferences > General Tab
| 3. | Click OK to save the new accounting system. Now the “File Moved” message box may display saying that the Vendor file has been relocated to the proper directory. Click OK. |
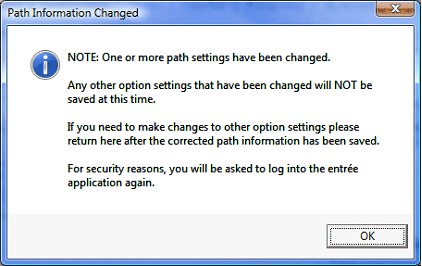
| 4. | You will then see the “Path Information Changed” message box noting that the data paths have been changed. Click OK. |
| 5. | Restart your entrée system. |
After you complete this step users can use the entrée system again.
Second, Setup Access to entrée.QB for User Accounts
All users of the entrée.QB application must be granted access in their entrée user account. If one or more of the operators of entrée.QB does not already have an user account in entrée, you will need to create one for them now.
 Detailed instructions on how to create entrée user accounts can be found in the entrée KnowledgeBases using the links found in the Getting Started chapter.
Perform the following steps for only users that will be authorized to use the entrée.QB application.
| 1. | Open the Security Management utility in entrée use menu path: |
entrée V3 use menu path: System > Security Management
entrée V4 SQL Go to the System ribbon menu >
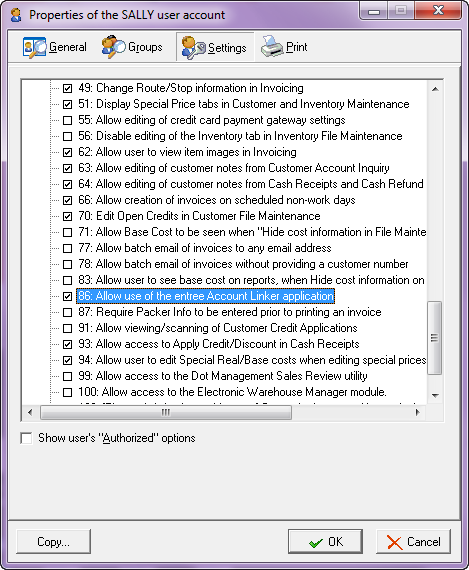
| 2. | Select the entrée user to grant access to and click Edit. This will open the user account properties dialog. |
| 3. | Click Settings. |
entrée V3
7. Process the rest of the user accounts that require this access following the steps here.
8. When done click Exit to close Security Management. |
|
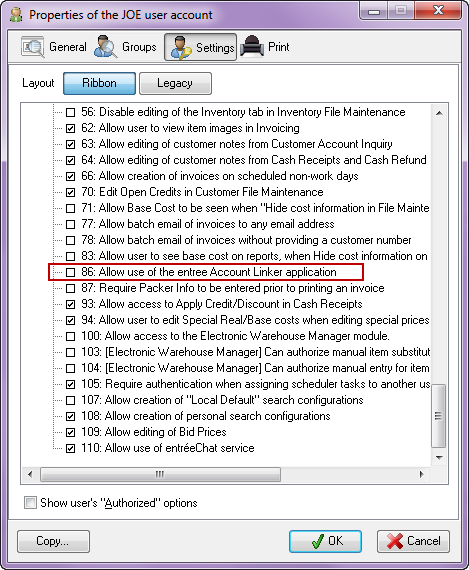
entrée V4 SQL
5. Go to the Miscellaneous system options list.
8. Process the rest of the user accounts that require this access following the steps here.
9. When done click Exit to close Security Management. |
|
What's Next
The next part of the installation process for entrée.QB is detailed in the First Run chapter. This chapter will explain the processes required for you to set up access to both systems, and synchronize your entrée and QuickBooks applications and files. Most of these steps will only have to be done for the first time you run the application. There is information provided so you can maintain your data going forward. During this process you will be verifying the data and resolving any errors you encounter. This process will involve fixing account number conversion errors, adding or removing accounts in one system or the other etc… These are the steps in the next phase:
| 1. | Add Application Access |
| 2. | GL Account Synchronization |
| 3. | GL Department Account Number Conversion |
| 4. | Verification of the Chart of Accounts in entrée |
| 5. | Verification of entrée Inventory Cost / Price |
| 6. | Verification of entrée Vendor Accounts |
| 7. | Vendor Account Synchronization |