Posting Journal Entries in QuickBooks

Contents
When the entrée Release to GL utility is run, all account postings are saved to a holding file. entrée.QB then uses the data contained in the holding file to push the journal entries into QuickBooks.
 For more information on the Release to GL process use the entrée KnowledgeBase links found in the Getting Started chapter.
The Journal entry grid is displayed on the left side of the Export Journal Entries utility. This grid displays information about the journal entry as a whole. If you are posting in Detail mode, this grid will contain additional columns pertaining to the Sales and Receipt transactions.
The Journal Entry Grid in detail mode displays the miscellaneous code from the Miscellaneous tab in Customer Maintenance in the main entrée system.
Journal entries can be selected by a specific Misc Code for batch exporting. This process will be discussed in more detail in the instructions below.

Grid Column |
Description |
Mode |
|---|---|---|
Export? |
Indicates if the journal entry will be exported into QuickBooks. |
|
Batch |
Displays the Batch ID assigned by entrée to the journal entry. |
|
Trans Date |
Displays the journal entry transaction date. |
|
Trans Type |
Displays the journal entry transaction type (Sales or Receipt). |
(detail only) |
Invoice # |
Displays the invoice number associated with a Sales journal entry. |
(detail only) |
Cust # |
Display the customer number associated with a Sales or Receipt journal entry. |
(detail only) |
Check # |
Display the check number associated a Receipt journal entry. |
(detail only) |
Misc Code |
Displays the customer's miscellaneous code from the Miscellaneous tab of Customer Maintenance in entrée. |
(detail only) |
Export Journal Entries Detail Grid
The detail grid is displayed on the right side of the Export Journal Entries utility. This grid displays each of the GL accounts that will be credited or debited as part of the journal entry. Beneath the Amount column the total of all accounts is displayed and should always be 0.00, which indicates a journal entry is in balance.
Grid Column |
Description |
|---|---|
Account # |
Displays the GL account number, as defined in QuickBooks. |
Account Name |
Displays the GL account name, as defined in QuickBooks. |
Amount |
Displays the amount that will be credited or debited into the GL account |
entrée.QB allows for journal entries to be posted into QuickBooks in one of two methods.
1.Summary mode: will post an entire entrée release batch as a single journal entry.
2.Detail mode: will post a journal entry for each Sales transaction (invoice/credit memo) and cash receipt within the entrée release batch. While the detailed posting provides much greater traceability in the general ledger, it comes at the cost of significantly longer data export times.
•entrée.QB by default will post journal entries using Summary mode.
How to Export Journal Entries
| 1. | From entrée.QB menu use menu path: Post > Journal Entries |
| 2. | To post the full detail, click the Detail button in the top right corner of the Export Journal Entries window. The detail loading process may take a little time, so a progress bar is displayed in the lower left corner of the Export Journal Entries window, while the transaction are loaded. |
| 3. | Once detail mode is displayed, you can switch back to summary mode by clicking the Summary button in the top right corner of the Export Journal Entries window. |
| 4. | Whichever method you decide to post journal entries with, it should be the same for every export to provide proper consistency in the general ledger. |
|
|
| 5. | Select the batches (summary mode) or transactions (detail mode) that you wish to export into QuickBooks, (all are selected by default). |
•In Detail mode to select transactions by Misc Code:
▪Double-click the desired miscellaneous code in the Misc Code column.
▪This will initiate the display of a confirmation dialog box indicating the Misc Code value selected.
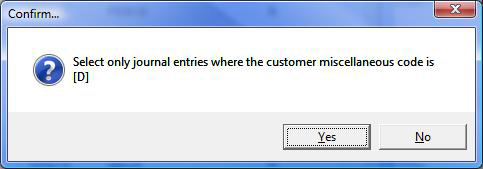
| § | Click Yes to select only the transactions with that specific customer miscellaneous code. |
| § | Proceed to step 6 below. |
•In Summary mode to select batches/transactions to be exported you need to check the Export? column. The checked state of a batches/transaction can be toggled by…
▪Double clicking the line with the batch/transaction to export in the Journal Entry grid.
▪Pressing the "Enter" or "Space" key will toggle the selected row.
▪All valid batches/transactions will be checked by clicking the "Select All" button.
▪All batches/transactions will be unchecked by clicking the "Select None" button.
 It is strongly recommended that all transactions in a single batch are exported together as to not have partial release data in QuickBooks.
| 6. | Once the batches/transactions to export have been selected, click Export. |
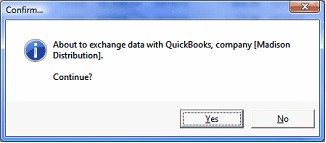
| 7. | A Confirm dialog box will display indicating the QuickBooks company file that you are about to exchange data with. Click Yes to proceed with the export operation. |
| 8. | During the export process, the journal entry and the detail grid will be hidden and replaced with a message stating “Exporting data…Please wait”. |
| 9. | You will also notice a progress indicator in the lower left corner of the entrée.QB application window. |

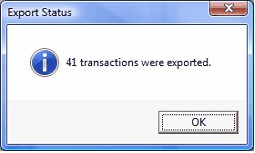
| 10. | Upon completion the Export Status dialog box will display the number of transactions that were exported. |