Lot Hold Feature
The Lot Hold feature uses the Hold Customer, Hold Date and Hold Price fields in this screen to hold a lot item for a specific customer until a specific date for a specific price.
|
|
In the Customer File > Miscellaneous Tab the new Lot Hold Customer No. field is used to assign a customer number to be used for the lot hold customer.
When qualifying available lots the Hold Customer will be validated against the customer buying the product (existing behavior) and the Lot Hold Customer No, defined in the Customer file Miscellaneous Tab. If the lot is reserved for either customer it will be considered valid for sale.
Setting Up the Lot Hold
| 1. | Click the Inventory ribbon menu > Inventory icon. |
2. Find the lot item in the Inventory file.
3. Click the Lots Tab and find the lot you want to put on hold for the customer.
 You will need to know the Customer Number to enter it for this process.

 To locate the Hold fields in the screen you may have to scroll to the far right.
4. Double-click in the Hold Customer field to edit it.
5. Enter their Customer Number from the Customer File and hit the Enter key.
6. Double-click in the Hold Date field.
Hold Date is the date the hold for the lot expires.
7. Enter the Hold Date value and hit Enter.
Either type in the desired date or Use the calendar feature (small down arrow) to open the calendar and select a date.
|
|
8. Double-click in the Hold Price field.
9. Enter the Hold Price value and hit Enter.
10. When the Hold entries have been completed click the Apply button to save them.

11. If your work with that lot item is finished click OK to close the window.
Invoicing For the Lot Hold Customer
1. In Invoicing when the lot item is added to an invoice the specific lot on hold will not be shown in the Lot Info dialog if the Hold Customer does not match the customer on the invoice.
2. Hold Customer Invoice: When you create the invoice for the Hold Customer you will add the lot item with the hold to the grid.
3. Click the Lot Info button to open the Assign Lots dialog.
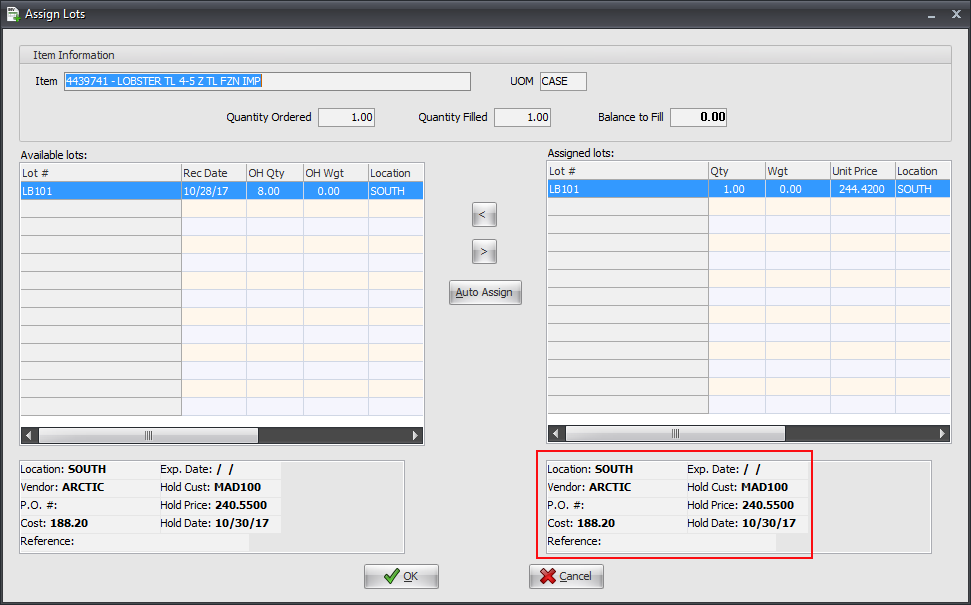
4. When the lot on hold is selected you will see your Hold settings for the lot item in the Lot information area in the bottom of the dialog. On the left is Available Lots and right is Assigned Lots. Here you see the lot item on Hold.

5. In Assign Lots select the customer's hold lot in the Available lot grid and use the arrow button to move it to the Assigned lots grid.
6. Edit the Assigned lots grid Hold Price value to match the Hold Price in the information section below if needed.

7. When all the required hold lots are moved to Assigned lots for the Hold Customer click OK.
8. Then complete the rest of the order and process the invoice per the normal process in your business.


