Purchase Orders
This backhaul option supports when a delivery truck will be used to pick up purchases for the distributor while on their route. To implement backhauls for POs in Assign Routes you can add route and stop information in two areas in entrée, the Vendor File and the Purchasing Edit P.O. Miscellaneous dialog.
What Vendors should you Update
The vendor file updates set the default configuration to be used when creating new Purchase Orders for a vendor. You will not perform these updates for all your vendors as explained below.
•If a distributor always picks up orders from a certain vendor (or does it most of the time) then you will want to enable the "Show this vendor’s orders in Assign Routes" option so that all new POs for this vendor will default to being "route-able". The Route/Stop values in the vendor file are the defaults to be used for new Purchase Orders (and can be left blank). You can always use the "Edit P.O. Miscellaneous" dialog to change these values on a "per document" basis.
•If you never pick up from certain vendors then the "Show this vendor’s orders in Assign Routes" option in Vendor File Maintenance will NOT be unchecked. But if the occasion arises and you need to pick up a specific order from a vendor then you can go into the Change Purchase Order, "Miscellaneous" dialog and make that one PO "route-able" without affecting the vendor file.
Vendor File Updates
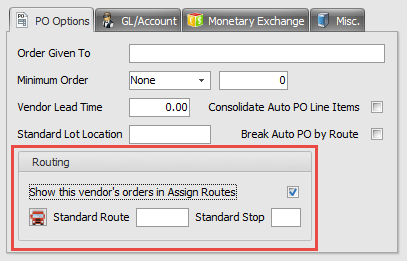
In the Vendor File go to the Vendor Tab > PO Options tab. Here you will add Routing information for each vendor you would like to setup. This will facilitate PO Routing for the vendor in the Assign Routes utility.
1.Go to the Vendor File and find the vendor. 2.In the Vendor Tab go to the PO Options sub-tab Routing area. 3.Check the “Show this vendor’s orders in Assign Routes” option. 4.Enter the Standard Route and Standard Stop values. 5.Click Apply to save.
See the Vendor File chapter for more details. |
|
Purchase Orders Updates
When creating POs for your backhaul vendors go to Edit P.O. Miscellaneous. Once you are in Create Purchase Order and editing your PO make these updates for PO Routing in Assign Routes.
1.Check the Route P.O. option 2.Enter the Route in the left text box. 3.Enter the Stop in the right text box for the Vendor's PO pick-up location. 4.Click OK to save. 5.Then complete your PO.
This will support the occasions when a delivery truck will pick up purchases for the distributor while on their route.
* See the Purchasing chapter of this guide for more details. |
|
![]() In the Assign Routes Doc Type column Purchase Orders use the red circle with the left arrow icon.
In the Assign Routes Doc Type column Purchase Orders use the red circle with the left arrow icon.
 The Assign Routes document grid with a Backhaul PO on Route 0003. The Route Summary Truck Purch field in the Backhauls area shows the amount of the PO. The values in weight, cubes, pieces and stops are related to this pick-up.

Assigning a Truck Number to a PO
1.Select the PO in the grid and click the Add Route  button
2.The Add Route dialog box will be displayed.
3.Enter the new route number in the Route text box.
4.Click OK in the Add Route dialog box.

5.Right-click the route field and click the Edit Truck Number option.

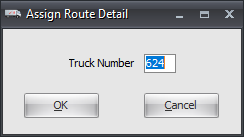
6. In the Assign Routes Detail dialog you can assign a Truck Number to a PO with a route. Click OK.
7. Click Apply at the bottom of the Assign Routes screen to save the new route.
8. The Truck Number will be saved to the PO record. |
|


