Salesperson/Broker Information Area
In the Salesperson area is where you can enter and maintain basic information about the salesperson, including address and telephone numbers. In addition, you specify whether this person is a salesperson or broker. Most of the fields on the salesperson tab are intended for informational purposes only and is not used in the entrée system unless otherwise noted.
When System Option #169 "Accept orders for Credit Hold customers and queue for approval" is checked the Customer Credit Manager field is displayed on this tab. See the Customer Credit Manager topic in this section for more information.

•NECS recommends defining each field in the salesperson information area for every salesperson.
•The data in the salesperson information area is independent of the tab controls.
12 Month Breakdown of Sales
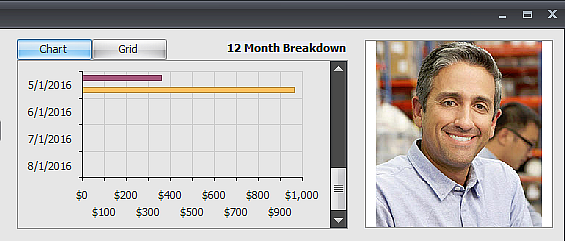
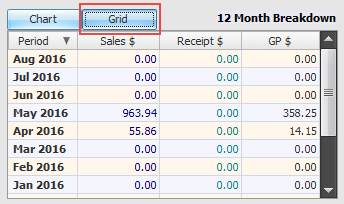
There are two ways to view the 12 month sales history information, Chart or Grid.

Chart
Trending can be a very useful tool to a sales department. Through the use of graphs, your sales force can see upward or downward trends in sales with entrée's graphical representations of historical data.
It is much easier to see trends when looking at graphs and charts than looking at numbers in a table. There are many different styles of charts and graphs from which to choose. You can experiment with these until you find one that suits your taste.
Mouse over any section of the graph will show a bubble caption that contains an exact numeric sales value for the given period.
Grid The monthly breakdown grid displays:
Period - The month and year. Sales $ - The total sales for the customer for the month. Receipt $ - The total amount received from the customer in the month. GP $ - The total amount of gross profit from the customer sales in the month. |
|
Salesperson Image
In the top right corner of the screen is the image preview area for a salesperson image. You can use a photo of the employee from their company ID or whatever works for your operation.
When you see the Image Not Defined message inside this area you must right-click in the area to see the options for finding and assigning images in the system. This feature works the same all other areas of the system for items, customers, vendors, etc...
•Assigning a Salesperson Image the first time
1.Use the Right-Click for Options feature to view the menu of options.
2.Make a selection from:
▪Import Image from file
▪Search the Web
▪Use an existing image
•When Replacing an image you have these additional options:
▪Export this Image to a file
▪Remove this image assignment

