Contacts Toolbars

Contents
Along the top of the contact manager window there are two toolbars. This section will detail each of the buttons on the toolbar and their functions.
|
The Contact Manager toolbar is used to manage records from the contact database and import contacts from Microsoft Outlook versions 98 forward. |
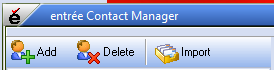
Add
Click this button to add a new contact to the contact database.
Delete
This button is used to delete a contact from the contact database.
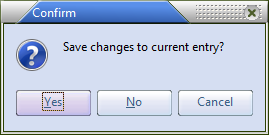
| 1. | Select the contact you wish to delete in the contact explorer. |
| 2. | Click the Delete button. |
| 3. | When the Confirm dialog box asks "Delete selected Contact?" click the Yes button. |
Import
Click the Import button to begin the Outlook Import Contacts process.
The Elements Toolbar
The elements toolbar is used to add new elements to the currently selected contact.

Address
Click this button to add a new address element for the currently selected contact.
•Click for a drop down menu containing these predefined address types: Primary, Shipping, Billing and Alternate addresses.
•After selecting the desired address type, the new address element will be displayed in the element panel and the cursor will be moved to Address1 field of the element details area.
• After entering the new address information, click the Update button in the element details area.
Phone
Click this button to add a new phone element for the currently selected contact.
•Click for a drop down menu containing these predefined phone types: Primary, Alternate, After Hours, Fax, Emergency Phone, Cell Phone and Pager.
•After selecting the desired phone type, the new phone element will be displayed in the element panel and the cursor will be moved to the Number field of the element details area.
•After entering the new phone information, click the Update button in the element details area.
Click this button to add a new email element for the currently selected contact.
•Click for a drop down menu containing these predefined email types: Primary, Alternate and Personal email addresses.
•After selecting the desired email type, the new email element will be displayed in the element panel and the cursor will be moved to the Address field of the element details area.
• After entering the new email information, click the Update button in the element details area.
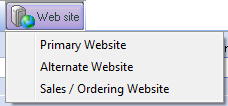
Web site
Click this button to add a new website element for the currently selected contact.
•Click for a drop down menu containing these predefined website types: Primary, Alternate and Sales/Ordering Website options.
•After selecting the desired website type, the new website element will be displayed in the element panel and the cursor will be moved to the URL field of the element details area. |
|
• After entering the new website information, click the Update button in the element details area.
Add Note
Click this button to add a new note element for the currently selected contact.
•The new note element will be displayed in the element panel and the cursor will be moved to the element details area.
•After entering the new note, click the Update button in the element details area.
Close Click this button to close the contact manager.
•If there are any unsaved changes for the currently selected contact you will be prompted to save them before the contact manager is closed.
|
|
|
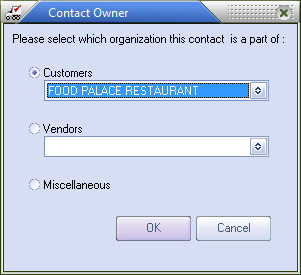
If the contact manager was invoked using the main menu you will be presented with the Contact Owner dialog when adding contacts to the contact database. This is so the contact can be linked to the appropriate customer or vendor if required.
|

If you are adding a customer contact...
If you are adding a vendor contact...
If you are adding a miscellaneous contact...
|
|