Inventory Usage Action Report Overview

Contents
NECS has developed a new “Inventory Usage Action” report in version 3.6.12 which will become a powerful tool for food distributors who want to track their sales and use this information to manage purchases from their vendors. This new report combines the features of the Commodity and Buyer’s Stock Status reports.
The Inventory Usage Action report will provide you with a snap shot of sales and usage data for each of your line items over a defined period of time. Period averages and vendor running totals will assist in the management of your inventory and buying. Usage calculations and order amount numbers generated in the report will become a valuable tool to assist your Buyer.
The Inventory Usage Action report will generate sales figures for the six previous periods and you have the option to include the current period for a total of seven periods.
There are many new report options and exclusions that have been built into the entrée Ré3 report generating system, so you can customize this report to meet your specific business requirements. Next we will present an example of the quarterly version of the report then each section of the report example will be explained.
 Inventory Usage Action Quarterly report
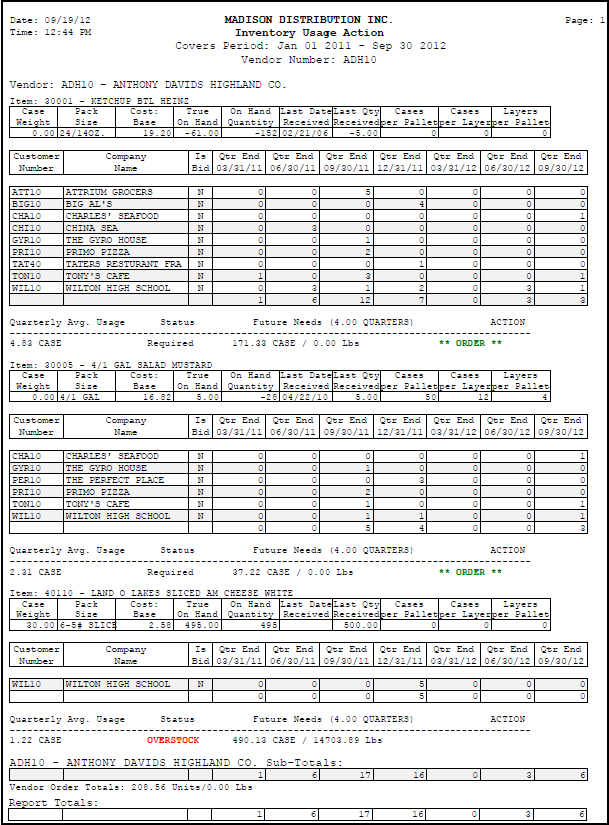
An overview of the Inventory Usage Action Quarterly report and the major features available to customize the report will be covered next.
•To access the report in entrée use menu path: Reports > Purchase Orders > Inventory Usage Action.
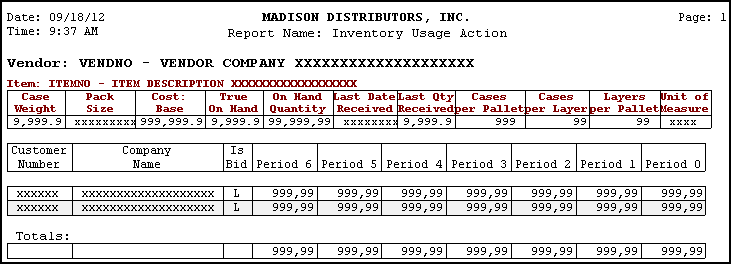
•In the report item section sample below you see the information generated for a single line item for the primary vendor. The vendor number and vendor name start their section of the report.
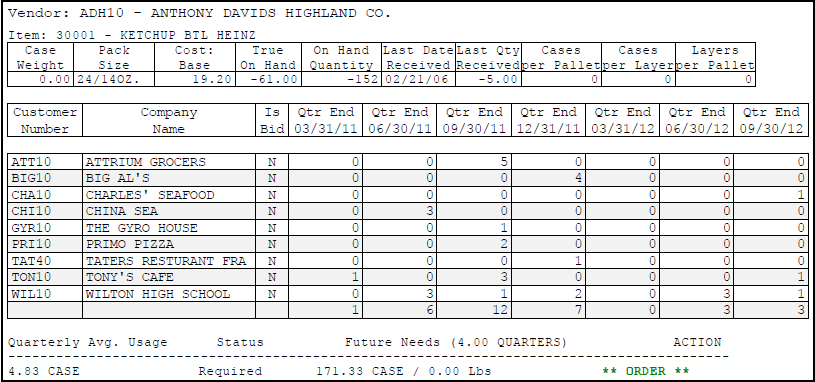
•The item number and item description headers are next. There will be a section for each line item you purchase from the vendor. For each line item the inventory detail information selected to display using the Vendor & Item Detail section is displayed. The Vendor & Item Detail information can be customized to show only the information important to your business needs.
•Next the sales information for the item during the reporting period is listed with the customers, sales activity and totals for each period.
•Below sales is an analysis of the line item usage which includes the following information:
▪Period Average Usage (where period is Quarterly, Monthly or Weekly).
▪Status which is either a value of “OVERSTOCK” or “Required”.
▪Future Needs with case and weight information.
▪ACTION which will be blank for overstocks or “ORDER” for required items.
* See the item image above and the image here for both examples.

•If the Vendor Running Totals option is checked, it will be added below each item’s period averages.

•At the end of each vendor’s section are the Vendor Sub-Totals for each period and the Vendor Order Totals. At the end of the report are the Report Totals for each period.

General Tab Overview
•The report generator is accessed in entrée using menu path: Reports > Purchase Orders > Inventory Usage Action. The General tab screen will be displayed when it opens.
•The General tab features are used to customize your report.
•Then use the Preview Layout tab to view the report with your customizations.
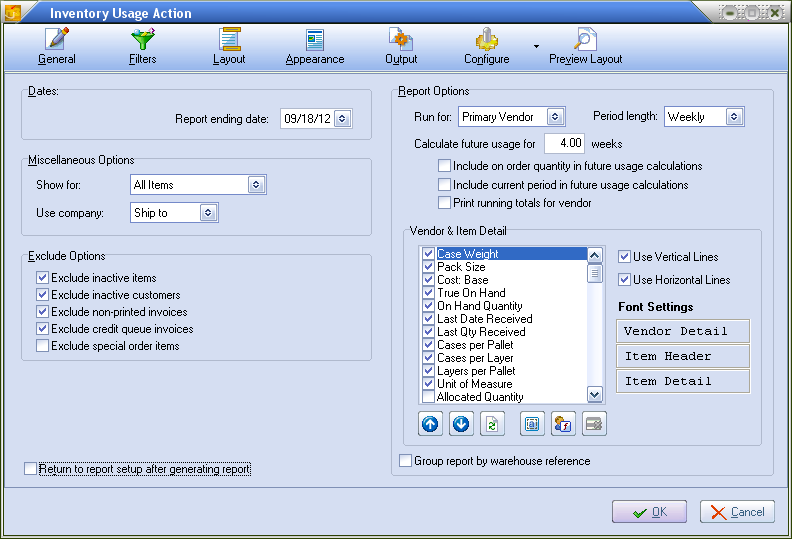
Dates Section
•Report Ending Date: Use the keyboard or drop down calendar tool to select the ending date for your report data.
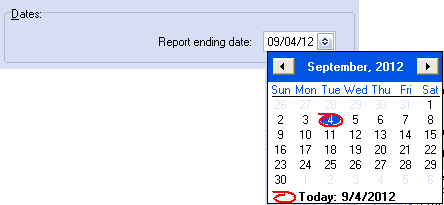
 This date may be modified by the report generator to correspond to the proper end date for the Period Length selected in the Report Options section. The Periods Length options are Weekly, Monthly or Quarterly. More detailed information about how ending dates are used is explained in the Period Length topic to follow.
Miscellaneous Options Section
Show For: Select the items you want to generate the report for.
▪All Items
▪Reorder Only
▪Overstock Only
Use Company:
▪ Ship to - Uses the Ship To company name for the customer.
▪Bill to - Uses the Bill To company name for the customer.
The information for “Use Company” comes from the entrée Customer File Maintenance Bill To / Ship To tab.
Exclude Options Section
Check the option to omit the specified entrée data and items from the report.
•Exclude inactive items - Items marked inactive will not be included.
•Exclude inactive customers - Customers marked inactive will not be included.
•Exclude non-printed invoices - Invoices that have not been printed will not be included.
•Exclude credit queue invoices - Invoices in the credit queue waiting for approval will not be included.
•Exclude special order items - Any items defined as special order items will not be included.
Report Options Section
•Run For: ▪All Vendors - All vendors in the entrée system.
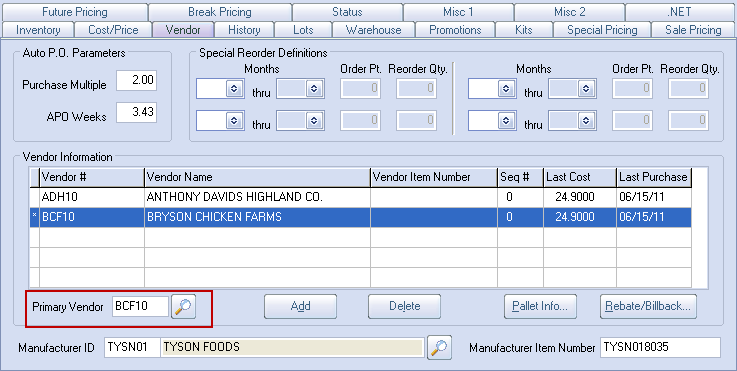
▪Primary Vendor - Only the Primary Vendor on the Vendor tab of the Inventory File will be used (see the image below). |
|
•Period Length: Select Weekly, Monthly or Quarterly.
▪Weekly - Uses a period of Monday to Sunday and the report system will advance the ending date to the upcoming Sunday and work back a week at a time.
▪Monthly - Generates from the first to the last day of the calendar month. The ending date is advanced to the last day of the current month and then goes back for 7 months.
▪Quarterly - Uses 3 calendar months for each period. The report will be advanced to the last day of the current period and work back to show up to 21 months of sales data.
•Calculate Usage For: Enter the number of weeks of data to be used for the usage calculations for each line item. Usage data will tell the buyer whether to hold or buy more of the item.
Check the option to include it in the usage calculations:
▪Include on order quantity in future usage calculations.
▪Include current period in future usage calculations.
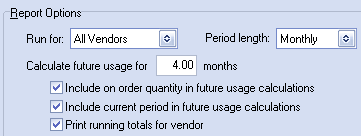
▪Print running totals for vendor - Calculates and adds the results of the vendor running totals to the report.
Vendor & Item Detail Section
1.Use the scroll bar to view the list of available columns for the report.
2.Check the columns you would like included in the report.
3.Use these tools to customize the report fields. ![]()
▪Up / Down Arrows - Used to change the order of checked items in the list. Select a field then click an arrow icon to move it up or down in the list to order your report columns.
▪Refresh - Moves all checked fields to the top of the list.
▪Field Options - Opens the Field Options dialog so you can edit field size, titles, etc.
▪Add Field - Adds a new field to the report like a blank column for writing in. For example: You can add a blank field with space to write your Buy / Hold numbers for each line item.
▪Delete Column - Select a field you added and use this tool to remove it from the list.
•Group Report By Warehouse Reference
▪Check the box to group the report by Warehouse Reference.
Whse Ref is defined in entrée on the Warehouse tab of Inventory File Maintenance. |
|

Only for use by companies who have purchased entrée.MW, the Multi Warehouse add-on module for entrée.
Font Settings:
Font , Font style, Size, Effects, Color and Script are options available to customize the format of the Vendor Detail, Item Header and Item Detail areas of your report.
1.Select an area in the Font Settings area and the Font dialog box will open. Here you will customize the way the information will look in the selected area of the report. In the example here Vendor Detail and Item Header area were customized.
2.In the Font dialog the size, style and color were changed and an underline effect was added. The Sample area will show a preview of what the font will look like with your changes.
3.When you click OK and return to the General tab you will see that in the Font Settings area Item Header text has the new font customizations.
4.If you click Preview Layout icon at the top of the General tab you can see what the report will look like with your font customization and columns. Notice the Item Header text is colored maroon in the preview example below.
•Use Vertical Lines / Use Horizontal Lines:
Check the option to enable the lines in the Vendor Detail, Item Header and Item Detail areas. The layout preview image above has both the vertical and horizontal lines enabled. The preview below has both lines disabled. Notice the difference in visual organization and readability between the examples above and below this paragraph.

Inventory Usage Action Update Version 3.6.14
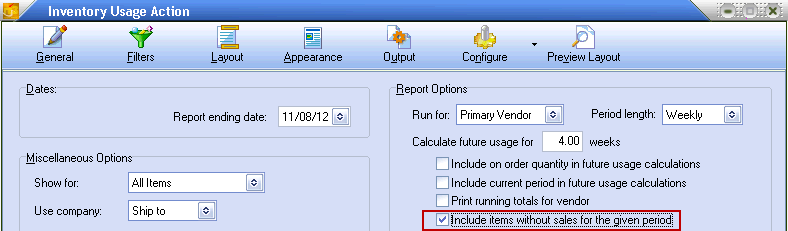
In the Report Options section of the General Tab the new "Include items without sales for the given period" option will allow reporting for items that do not have any usage during the specified report period.
For items without sales to be displayed on this report they must have a special price entry in the Special Pricing tab of Inventory File Maintenance. The special price entry is used to determine which customers actually purchase the product when there is no sales data for the item.
Inventory Usage Action Update Version 3.6.15
If the Primary Vendor is not assigned for an item in the Vendor tab of Inventory File Maintenance the report will now default to the first vendor in the Vendor Information grid as the primary vendor.