User Account Settings

Contents
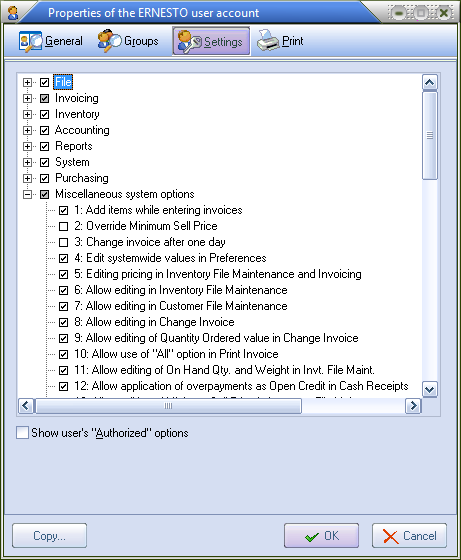
The Settings section of the user properties dialog is used to view/edit the access rights for the user account.
•Access to almost every menu item in the entrée system is controlled by the settings of the user account. If a menu option has been restricted to a user then the menu item will appear grayed out. Selecting a grayed out menu item does nothing.
•In addition to protecting menu items of the entrée system, there are also some Miscellaneous system options settings that control what a user can or cannot do within the entrée system.
 A Miscellaneous system options example would be the Override Minimum Sell Price option. If the user does not have the option enabled they would not be able to sell an item on an invoice for less than the minimum sell price defined in Inventory Maintenance.
Miscellaneous system options
This section in the option tree contains password options with permanent ID number values for each option. Many of these password option settings are associated with specific custom modifications for the entrée system. Their numeric ID values are permanently assigned to make the options list more user-friendly. Some numbers will be not be seen unless you have the related custom modification for your system. So visible gaps in the numbering may be seen in your options list and this is normal. Use this link to view the Custom Modifications Catalog knowledgebase.
The Option Tree
The settings for the user account are displayed in a "tree" format.
•Each of the items in the entrée main menu appear as a top level item or node. Clicking the Plus icon to the left of the node will expand it displaying each of the node's sub-items. The nodes will expand in the same manner as the items of the main menu of the entrée system. Conversely clicking the Minus icon to the left of the node will collapse it, hiding all of the nodes sub-items.
•To the left of the node is the option state check box. This check box will determine if the option represented by the node is active for the user account. The check box can be one of the 3 following states:
| 1. | Checked: The option is enabled for the user account. |
| 2. | Grey: The option represents a node with sub-items and some of the sub-items are enabled for the user account, while others are not. |
| 3. | Clear: The option is not enabled for the user account. |
Show User's "Authorized" options 
Under normal circumstances the option tree only displays the current settings of the user account without taking into consideration any privileges the user may have due to membership in one or more groups. By checking this option, the tree will reload to display all areas of the entrée system that the user can access, including privileges acquired from group membership.
•If this option is enabled the option tree becomes read-only and the settings may not be modified. This is because one or more security accounts have been merged to produce the result set. If you need to modify the settings of a group account, you will need to edit that group account directly.
•If this option is enabled, you will be able to see how the user is obtaining access to an option. If it is from the user account the username of the account will be displayed in the lower right corner of the settings page. If access is obtained via a group account, that group account name will be displayed in the lower right corner.
Printing the option tree
You can print the current state of the option tree by clicking the Print button on the toolbar of the properties dialog.
The option settings for the current user may be copied from an existing user by clicking the Copy... button, located in the bottom left corner of the Edit User dialog when the Settings page is displayed.
•Select the user to copy the settings from and click the OK button
▪Users can be sorted by clicking on any of the column headings.
▪Clicking a column heading a second time will reverse the sort order of that column.