Large File Support in entrée

Contents
•How do you know when you need to enable large file support in entrée?
When any one of your entrée data files reaches over one million records in size you will need to enable large file support in entrée. Data files that will typically grow to the one million record ceiling are ARYTRAN.dbf file.
An indication that you may be having this file size problem occurs when you are running the entrée update utility. If the entrée update utility has trouble updating a particular data file that is an indicator that the file may now be over one million records. NECS Tech Support can check to see if large file support is enabled and check the size of the data file getting errors during updates. It can be difficult to detect this problem.
•How to enable large file support in entrée
There are two procedures that must be completed to enable large file support on the entrée file server. First you must find the directory where your data files are stored and the in the second procedure you will copy and rename the ARVERIFY.dat file to create the lg_26.dat file.
•First, you need to find out where your the entrée data files are located on your file server.
You need the directory information to proceed with enabling large file support. The recommended location for installation of data files is either C:\NECS or F:\NECS. Some companies will customize their directory setup and you should refer to your IT Support person for that information.
Use one of the following procedures to find the location of your data files on the file server:
A. Find data files using entrée System Preferences:
1)Login to the entrée application on the file server.
2)Use menu path: System > Preferences > click the Data Files tab.
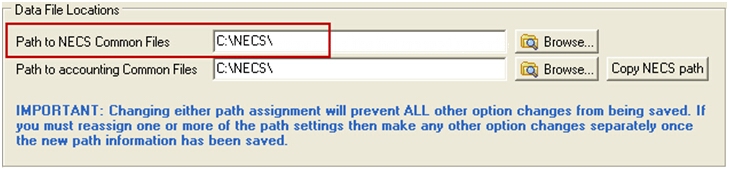
3)Go to the Data File Locations section and write down the directory information for the “Path to NECS Common Files” text box. You must write it down exactly as you see it.
B. Find data files using the entrée Update Utility:
1)Look for the shortcut icon ![]() on the desktop of your computer. If you have the icon go to step 7.
on the desktop of your computer. If you have the icon go to step 7.
2)If the shortcut icon is not on your desktop follow these steps 3 - 6.
3)On the Windows desktop of your file server computer click the Start button in the lower left corner.
4)In the menu displayed click My Computer.
5)Go to the program directory by double-clicking each folder listed between the \ in C:\Program Files\NECS\entree
6)Locate FPUpdate in the entrée folder.
7)Double-click the either the icon or FPUpdate file to run the entrée Update Utility.
8)Click View then Path Settings
9)Write down the directory information in the “entrée Data Directory” section.
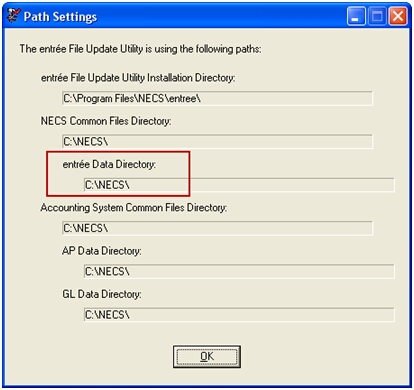
 You must write down the directory information exactly as you see it displayed.
In the examples shown here the data directory is: C:\NECS\ which is one of the recommended directories for the installation of entrée.
Second, perform the ARVERIFY.dat file copy and rename procedure.
1.On the Windows desktop of your file server computer click the Start button in the lower left corner.
2.In the menu displayed click My Computer.
3.Go to your C:\NECS\ directory by double-clicking on the "C:" drive and then the NECS folder. Also use this method to go to your custom directory. You will see your entrée system data files listed as seen in the image below.
If your data is located in the F:\NECS\ directory, double-click on the "F:" drive and then the NECS folder.

4.The list of data files will be displayed. Locate the ARVERIFY file in the C:\NECS\ directory or your custom directory.
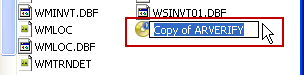
5.Right-click on the ARVERIFY file and select Copy in the menu.
6.Then right-click and Paste into the same directory.
7.At this point the new file's name is "Copy of ARVERIFY".
8.Right-click on the "Copy of ARVERIFY" file and select Rename in the menu.
9.A text box will be displayed around the file name.
10.Type the new file name into the text box: lg_26
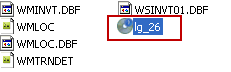
Be sure to use an underscore and not a hyphen in the new file name.
11.Large file support has now been enabled. If you need help with this process or have questions please contact NECS Tech Support.