entrée.NET Scheduler

Contents
entrée V4 SQL
The entrée.NET Scheduler is automatically placed in your Windows Start menu after you install entrée version 4. Everything in the scheduler will work the same as documented below for entrée V3.
entrée V3
The entrée.NET Scheduler is automatically placed in your Windows Start menu after you install entrée version 3.5.1 or later.
The entrée.NET Scheduler is a utility used to create a daily schedule of automated processes that will export data from the main entrée system into entrée.NET and the Electronic Order Pad. Implementing the Scheduler will make maintenance of the data in your entrée.NET and the Electronic Order Pad systems an effortless process. The scheduler should be run on a computer with Internet access.
•To go to the entrée.NET Scheduler from your computer desktop use menu path: Start > All Programs > entrée.NET Scheduler.
File Menu
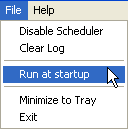
•Disable Scheduler / Enable Scheduler – To stop Scheduler activity select Disable Scheduler in the File menu. When you want to resume running your Scheduler then click Enable Scheduler in the File menu.
•Clear Log – Clears the contents displayed in the Log tab of the Scheduler.
•Run at startup – Tells the Scheduler to automatically start when your computer is booted up. •Minimize to Tray - The scheduler window will appear in the tray at the bottom of your computer screen. When the Scheduler is minimized to your tray the window name displayed is “netsched”. •Exit – Closes the Scheduler Utility window. |
|
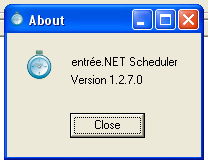
Help Menu •About – Displays the version of the Scheduler software on your computer. |
|
Schedule Tab
 Add New Task
1.From your computer desk top use menu path: Start > All Programs > NECS > entrée.NET Scheduler
2.The entrée.NET Scheduler dialog window will display.
3.Click on the Schedule tab.
4. Click the Add Task button to add a new task to your Scheduler.
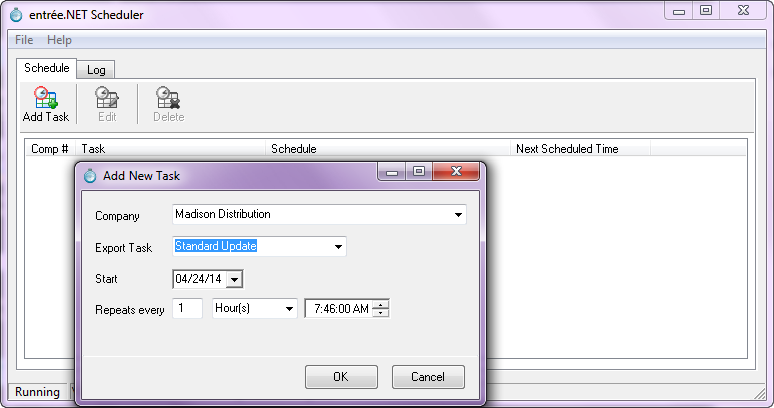
The Add New Task dialog box will be displayed. |
|
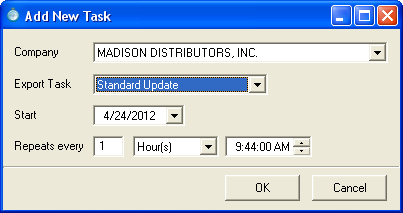
5. Select your Company (only if there is more than one) from the drop down list.
6. Select the Export Task from the drop down list. 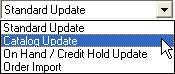
•Standard Update - This option will export ALL your customers, items, pricing and sales history information. Use this option if you are using entrée.NET for order entry.
•Catalog Update - This option will only export item information. No pricing information will be transmitted. Use this option if you are only using the public catalog or need to publish just item updates.
•On Hand / Credit Hold Update - This option will only export item inventory "On Hand" value and customer credit hold status.
•Order Import - This option will import orders marked as complete from the entrée.NET server including orders from the Electronic Order Pad.
7. Select your Start date by using the arrow to view the drop down calendar.
8. In the Repeats section on the far right use the up and down arrows to set the Start time for your task. |
|

a.Click on the hour value and use the up and down arrows to find the desired hour.
b.Then click on the minute value and use the up/down arrows to set the minutes.
c.Then click on the AM or PM to set a new value using the arrows.
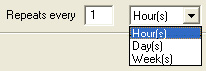
9. Set the Repeats every value by highlighting the current number of times value and type a new number.
10. Set the Time Period value by using the drop down list. Select from Hour(s), Day(s) or Week(s). |
|
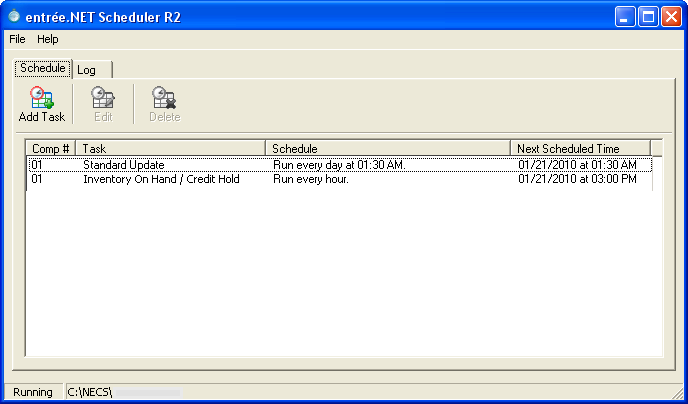
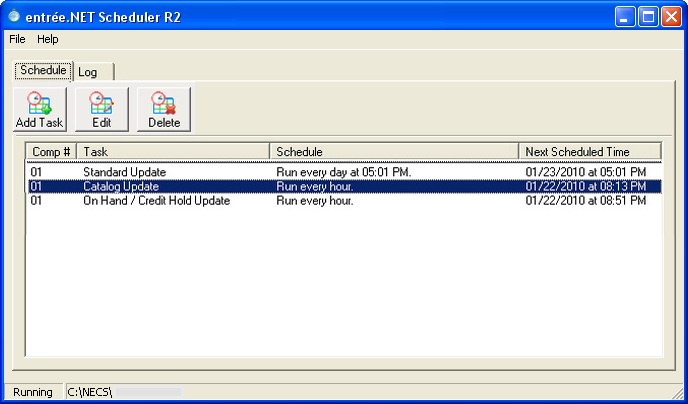
11. Click OK when you are done. The new tasks will be added to the Schedule tab as displayed below.
You can now use the Edit or Delete buttons to modify tasks in the Schedule tab.
The entrée.NET Scheduler seen below has three tasks in the schedule to run at different intervals and times.
Importing New Orders Automatically
1.To enable automatic import of new orders into your main entrée system use menu path: Start > All Programs > NECS > entrée.NET Scheduler.
2.The entrée.NET Scheduler dialog window will display.
3.Click on the Schedule tab.
4.Click the Add Task button to add a new task to your Scheduler. The Add New Task dialog box will be displayed.
5.In the "Export Task" options list select "Order Import".
6.Select a Start date.
7.Fill in the Repeats every options as required for your business.
8.Click OK. The new task will be added to the Schedule tab.

 When an order has successfully been imported by this feature a notification e-mail will be sent to the e-mail address(es) that are configured to receive order notifications.
 Editing Tasks
1.From your computer desk top follow this menu path: Start > All Programs > NECS > entrée.NET Scheduler
2.The entrée.NET Scheduler dialog window will display.
3.Click on the Schedule tab.
4.Click the Edit Task button to open the Edit Scheduled Task dialog box.
5.Follow steps 5 – 10 from Adding New Tasks procedure to complete the process.
 Deleting Tasks
1. From your computer desk top follow this menu path: Start > All Programs > NECS > entrée.NET Scheduler
2.The entrée.NET Scheduler dialog window will display.
3.Click on the Schedule tab.
4.Click the desired task then click the Delete Task button. The task is now removed from the Schedule tab.
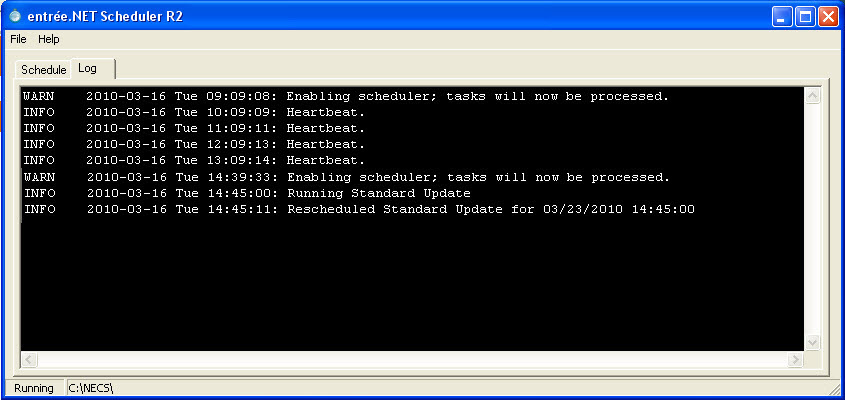
Scheduler Log Tab
The Log tab provides a record of the activity of your entrée.NET Scheduler. Use the Log record to verify the status of updates from the main entrée system. Information here can be cleared by using the Clear Log option in the File menu.
When you see the status of “Heartbeat”, this means the Scheduler did a check and communications with the server are working properly.