Scheduler/Data Export/Order Import

Contents
entrée V4 SQL - Export / Import / Item Tags
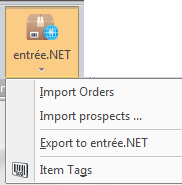
In entrée V4 SQL the entrée.NET icon and drop down menu are activated in the Add-Ons ribbon menu for customers who have purchased the entrée.NET add-on module.

entrée V4 SQL entrée.NET Options
•Import Orders •Import Prospects •Export to entrée.NET •Item Tags |
|
•Import Orders - Processing orders from your entrée.NET system quickly and efficiently is essential for business growth. The main entrée system has an import utility to take care of this process for you in the Invoicing menu.
There is support for printing Loading Sheets when importing orders from entrée.NET. This feature must be enabled in the "entrée.NET Options" configuration dialog located in the Additional Features section of the System Options tab in System Preferences. Refer to the Using the System Menu chapter for details about updating the configuration in the Additional Features section.
When the option is enabled the Loading Sheet for invoices created from entrée.NET orders will automatically be printed to the configured "Loading Sheet" printer as part of the order import process.
•Import Prospects - You have the ability to generate new customer accounts from the entrée.NET "Prospects" feature. The purpose of the “Prospects” feature is to provide the distributor with a set of tools which can be used by the distributor and your salespeople to manage and prepare quotes for potential customers.
Prospects which have been flagged for conversion to customers in entrée.NET can be imported by selecting "Import Prospects ..." from the "entrée.NET" menu.
•Export to entrée.NET - Ensuring that the information in entrée.NET is synchronized with the main entrée system can be a time consuming task. The entrée.NET Scheduler works with the entrée export utility to automate this process for you.
It can be set to update your entrée.NET system as often as every hour. Once the entrée.NET Scheduler is set up and enabled you can be sure you are providing your customers and salespeople with an updated catalog, with accurate prices and product information.
The export process supports sending the correct shipping address for "One Ship" customers. Full support for a "One Ship" addresses is built into the system.
•Item Tags - The "Item Tags" utility is located in the Add-Ons ribbon menu entrée.NET drop down menu. It allows you to maintain a list of item tags for use on the .NET Tab in Inventory File Maintenance.
The "Item Tags" feature provides an alternative method for grouping items in the entrée.NET system which is independent of their "Class" values.
Use the Add, Edit and Delete buttons to make changes to your master Item Tag list.
For more information about the Add-Ons ribbon menu entrée.NET feature go to: entrée V4 SQL KnowledgeBase the entrée V4 SQL System Guide KnowledgeBase. |
|
 This feature could be used to identify all Kosher or Gluten-free items regardless of how they are normally classified in entrée itself. An item may also have multiple tags associated with it.
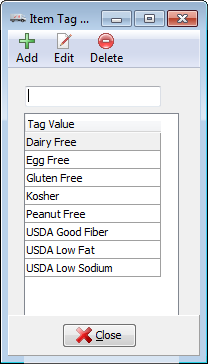
entrée V4 SQL Export to entrée.NET
1.Sign-in to the entrée V4 SQL system.
2.Go to the Add-Ons ribbon menu and click the entrée.NET icon drop down menu.
3.Select Export to entrée.NET and the export will run.
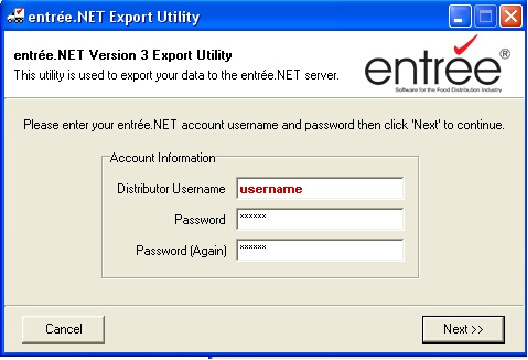
4.The entrée.NET Version 3 Export Utility dialog box will display.
5.Enter your username and password to sign-in to your entrée.NET account.
6.Click Next to continue.
7.The rest of the steps are the same as the entrée V3 manual export process later in this chapter.
entrée V3 - Import / Export
Ensuring that the information in entrée.NET and the Electronic Order Pad are synchronized with the main entrée system is accomplished using the entrée.NET Scheduler. The Scheduler works with the entrée export utility to automate the export, update and order import processes for your company.
The System Administrator will use the entrée.NET Scheduler utility to setup a daily schedule of data exports from entrée as well as order imports from entrée.NET. This will take care of synchronizing the data in all three systems. The entrée.NET Scheduler should be run on a computer with Internet access.
entrée.NET Scheduler utility can be set to update your entrée.NET system and the Electronic Order Pad as often as every hour. Once the entrée.NET Scheduler is set up and enabled you can be sure you are providing your customers and salespeople with an updated catalog, with accurate prices and product information.
 After you install entrée version 3.5.1 or later the entrée.NET Scheduler is automatically placed in your Windows Start menu.
Processing orders from your entrée.NET system quickly and efficiently is essential for business growth. The main entrée system has an import utility to take care of this process for you in the Invoicing menu.
The Export to entrée.NET and Import Orders utility are located in the Invoicing menu in the main entrée system.
Support for Matrix Code Pricing
The entrée.NET Export Utility in the main entrée system can export the data required to support Matrix Code Pricing and update entrée.NET and Electronic Order Pad (requires entrée version 3.6.8 or later).
Matrix code pricing requires distributors to assign matrix codes to each of their item's and to each of their customers in the main entrée system.

Markup percentages are then defined, using the entrée Price Matrix utility. The markup % of the item is determined by the percentage value found at the point in the matrix where the customer and item matrix code intersect. The markup % is then applied to item's base cost to determine the unit price.
•For more information about Matrix Code Pricing please consult the entrée V3 Knowledgebase in our website.
entrée - Support for Special Order Items
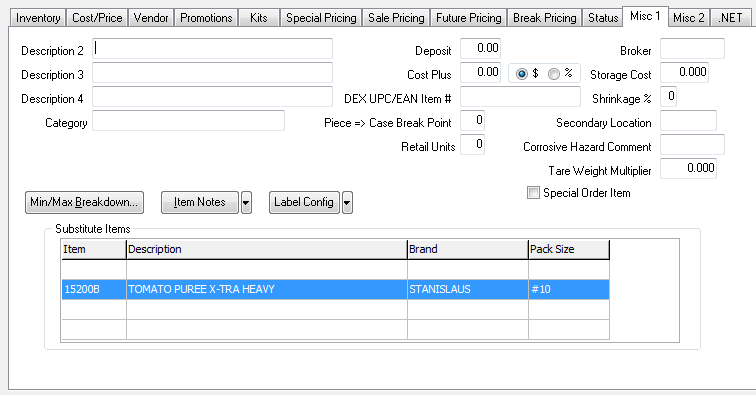
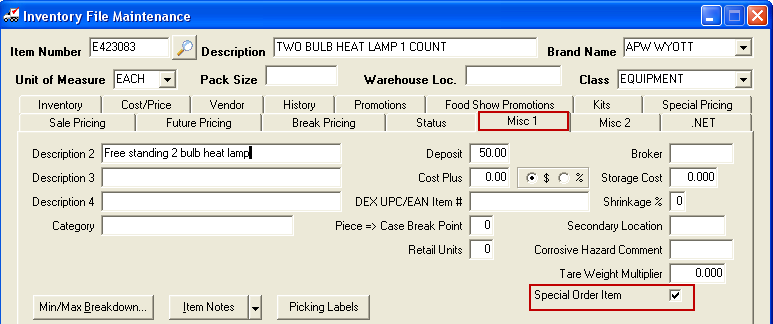
Special Order Items are items that are not regularly carried in your warehouse. These items must be handled differently and may require deposits upon order. Additional time is also needed for the item to be delivered to you and then the customer. A Special Order Items check box on the Misc 1 tab in the Inventory File is where you designate the item as Special Order. These items will also be exported to entrée.NET and Electronic Order Pad for display in your product catalog.
entrée V4 SQL
entrée V3
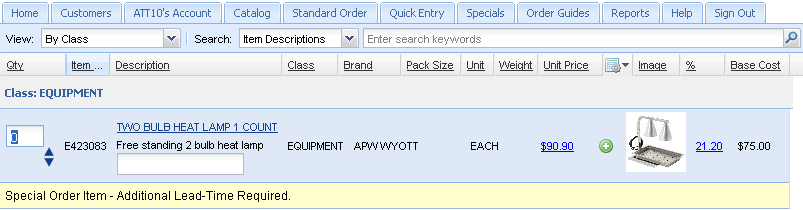
•When salespeople are logged in and working with Special Order items in entrée.NET and Electronic Order Pad they will be displayed in your product Catalog tab screen with a red background color.

After selecting with Special Order items in entrée.NET and Electronic Order Pad they will be displayed in your product Catalog tab screen using a blue background for the item with a Special Order Item message below it with a yellow background color as seen here (requires entrée 3.6.7 or later).
•For more information about Inventory File Maintenance please consult the entrée V3 Knowledgebase in our website.
entrée V3 - Export to entrée.NET
This section will detail how to do a manual export of your data from entrée V3 to your remote entrée.NET server.
•For entrée V4 instructions see the entrée V4 SQL Export to entrée.NET topic at the beginning of this chapter.
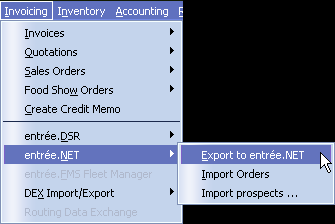
1. Sign in to your main entrée system.
Use menu path: Invoicing > entrée.NET > Export to entrée.NET
2. The entrée.NET Export Utility dialog box will display. Enter your username and password to sign in to your entrée.NET account. Click Next to continue. |
|
3. Check the Resend item and class images option if you have updated images for item/class in entrée.
Your customers may now click on item images in the grid or on the "Item Information" pop-up window to view a larger version of the product image. |
|
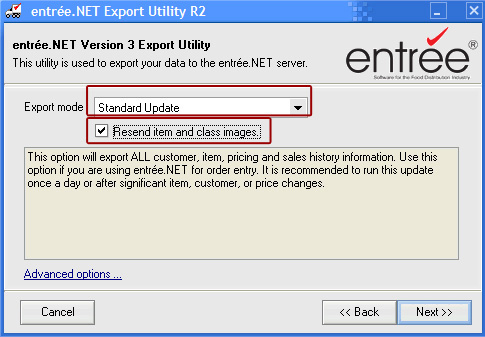
•Images can be added to items in the main entrée system via the Misc2 tab in Inventory File Maintenance. Then you must run a "Standard Update" export and check off the "Resend item and class images" option to send new images to entrée.NET.
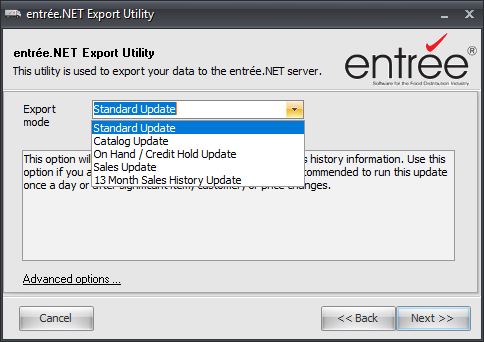
4. Now select the data you wish to transmit to entrée.NET. Use the Export Mode drop down menu to make your data selection.
•Standard Update This option will export ALL your customers, items, pricing and sales history information. Use this option if you are using entrée.NET for order entry.
•Catalog Update This option will only export item information. No pricing information will be transmitted. Use this option if you are only using the public catalog or need to publish just item updates.
•Sales Update This will only transfer pending invoice changes.
•On Hand / Credit Hold Update This option will only export item inventory "On Hand" quantity and customer credit hold status.
•13 Month Sales History Update This option will export 13 months of invoice sales data. This option only needs to be run once to provide history for the online customer report system. These updates are included with the "Standard Update" export option. |
|
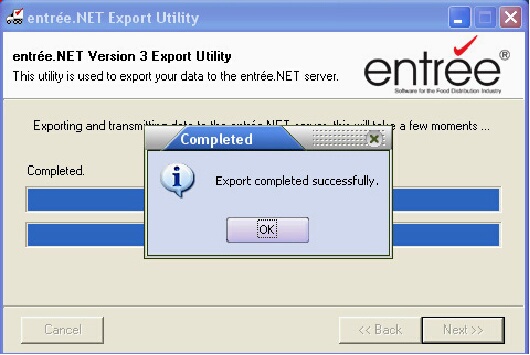
5. Click Next. The export utility will now begin exporting and transmitting your data. The progress of your export will be displayed using the blue bars.
6. Once the export utility is done the Completed dialog box will display to confirm the export.
Click OK. Your current data is now loaded in entrée.NET. Your system is ready for customers to place their orders. |
|
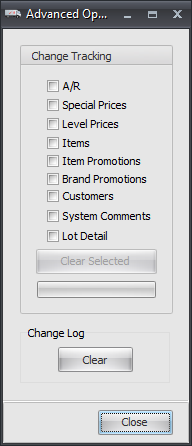
entrée.NET Export Utility Advanced Options
The "Advanced Options" button in the export utility allows you to clear out selected sections of the new change tracking file.
WARNINGS 1. Do NOT use the Advanced Options unless NECS Tech Support directs you to use it! 2. Use of this option will delete the table data that is checked.
entrée V4 SQL 1. Use menu path: Add-Ons ribbon menu > click the entrée.NET icon drop down menu > Export to entrée.NET > sign-in > Advanced options button. 2. Then check the table data in the Advanced Options dialog box shown on the right. Choose from A/R, Special Prices, Level Prices, Items, Item Promotions, Brand Promotions, Customers, System Comments and Lot Detail. 3. Click the Clear Selected button. It will run. 4. Click Close when done. 5. Now for Export mode select "Standard Update" from the drop down list. 6. Click Next. The export utility will now begin exporting and transmitting your data. The progress of your export will be displayed using the blue bars. 7. Once the export utility is done the Completed dialog box will display to confirm the export. Click OK. |
|
entrée V3
1. Use menu path: Invoicing > entrée.NET > Export to entrée.NET > sign-in > Advanced options button.
2. Then check the table data in the Advanced Options dialog box shown on the right. Choose from A/R, Special Prices, Level Prices, Items and Customers.
3. Click Close.
4. Then for Export mode select "Standard Update" from the drop down list.
5. Click Next. The export utility will now begin exporting and transmitting your data. The progress of your export will be displayed using the blue bars.
6. Once the export utility is done the Completed dialog box will display to confirm the export. Click OK.
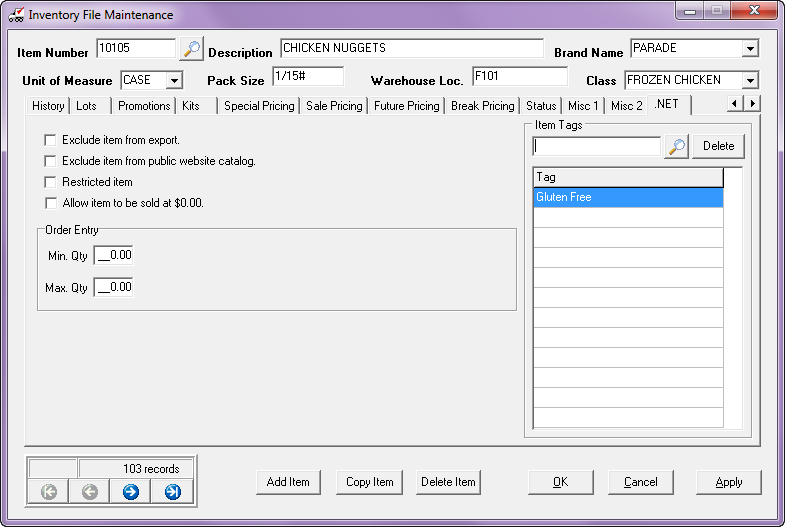
entrée V4 SQL - Inventory .NET Tab Options
The options related to the entrée.NET add-on module including Item Tags and the “Exclude item from export” to .NET check box are located on the Inventory ribbon menu > Inventory option > find the item > .NET Tab.
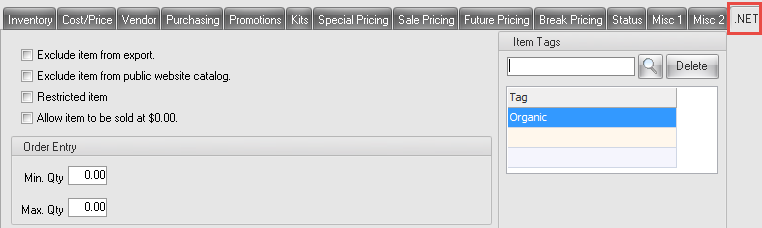
•Exclude item from export - NECS has built into the main entrée system the ability for you to exclude any of your inventory items from export to your entrée.NET online ordering system. Check the box to activate this option. Reference the entrée.NET Administrator's Guide chapter Scheduler/Data Export/ Order Import / for detailed information.
•Exclude item from public website catalog - This option has been added to be used to tailor the items listed in your public website catalog since you may not want every item you sell to be shown. When this option is checked that specific item will still be listed during order entry for salespeople and for logged-in customers in entrée.NET and the Electronic Order Pad, but these items will not be listed in your public website catalog.
•Restricted Item - Define items to be "restricted", as a general rule, from entrée.NET, so that they will not appear to the customer when they are placing their order online, searching for items, etc. However, what makes this enhancement unique is that if the customer does have the item defined in the Customer Special Price/Standard Order file, they will still be allowed to purchase it, and it will be displayed to them when placing an online order. You can use this feature for situations such as a special order item, that you purchase for a specific customer (or group of customers), that your normal customer base is not allowed to order. An item may be set as restricted by checking the box for "Restricted item".
•Allow item to be sold at $0.00 - Provides support for selling items at no cost to the customer. This option has been added to assist distributors with in dealing with manufacturer product giveaways. Checking this option on an item allows it to be displayed in entrée.NET and added to an order with no price. For salespeople this will allow them to change the price for the item to $0.00 even if a valid non-zero price was calculated by the system.
Order Entry Section
•Enable .NET Min / Max Quantity Warning - For your customers placing online orders with entrée.NET, you can now define a "minimum" and "maximum" item quantity that they are allowed to order. This feature will allow you to enforce minimum order quantities for specific items and maximum order quantities.
For specific items the minimum and maximum quantity numbers must be defined in the entrée V4 system first. Follow these steps:
1. Go to the Inventory ribbon menu select Inventory and find the item in the Inventory file.
2. Click the .NET tab.
3. Enter the Min Qty and Max Qty values and click Apply then click OK.
4. Next you must enable the min/max feature in the entrée.NET system settings. See the entrée.NET Settings Options section of this guide for details.
Item Tags Section
•Item Tags provide an alternative method for grouping items in the entrée.NET system which is independent of their "Class" values. Use the  search tool to find the item tags to assigned to the item.
▪This feature could be used to identify all Kosher or Gluten-free items regardless of how they are normally classified in entrée itself.
▪An item may have multiple tags associated with it.
▪Item Tags are assigned to items using the Item Tags search feature.
▪The Item Tags list works similar to "Class" where defining a new tag value will automatically add it to the list of available tags.
entrée V3 - Inventory .NET Tab Options
NECS has built into the main entrée system the ability for you to exclude any of your inventory items from export to your entrée.NET online ordering system.
•Follow these steps to perform the items updates in entrée V3
1.Login to your entrée V3 system.
2.Menu path: File > Inventory File Maintenance.
3.Find the desired inventory item.
4.Click on the .NET tab.
5. The options are the same as those described in the entrée V4 Inventory NET Tab Options section above. Use the  search tool to find the item tags to assigned to the item.
6. Once your selections are made click Apply then click OK.
7. For both V3 & V4 - Once you have completed marking individual inventory items for exclusion you will need to export this updated inventory data to entrée.NET. There are two ways the export to entrée.NET can be run:
a.The entrée.NET Scheduler will export data at the next scheduled run time.
b.Or the updates can be done immediately by following the manual directions to Export to entrée.NET above.
▪In entrée V3 use menu path: Invoicing > entrée.NET > .
▪In entrée V4 SQL use menu path: Add-Ons ribbon menu > entrée.NET option drop down menu > Export to entrée.NET.