Prospect Guides
Prospect Guides are similar to the Order Guides you can create for customers. When you want to provide a price quote to a prospect you can create a prospect guide in the Prospects tab. A salesperson is allowed to edit one “guide” per prospect. The prices in the prospect guide can be edited by using the same method currently used for customer orders in the shopping cart and in the other screens used to add items to orders.
 Prices in the prospect guide are calculated using the price level assigned to the prospect. The price level is set during the process of creating the prospect. Price levels can be adjusted in the Edit / View Prospect dialog by selecting a new price level from the drop down list.
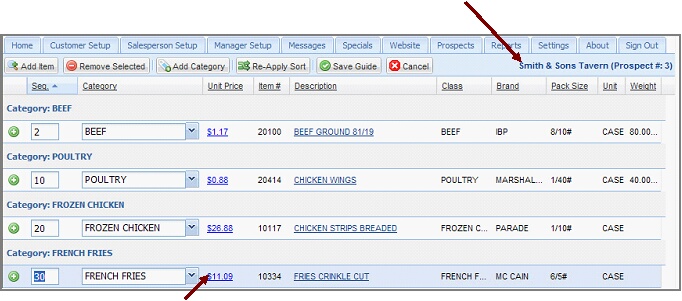
Prospects Guide screen details:
▪Add Item button - Click to add a new item to the guide list.
▪Remove Selected button - Click to delete the selected item.
▪Add Category button - Click to create a new category for the guide list.
▪Re-Apply Sort button - Click to re-apply the previous sort.
▪Save Guide button - Click to save the current information in the prospect’s guide.
▪Cancel button - Click to delete the current prospect guide.
▪Company and Prospect #
▪Green plus tool column
▪Seq – The system Sequence number.
▪Category – The product category.
▪Unit Price – The unit price is an editable field in the prospect guide.
▪Item # - The item number from the product catalog.
▪Description –Click the blue description link to view the product information.
▪Class – The item class.
▪Brand – The item brand.
▪Pack Size – The pack size for the item.
▪Unit - The unit the item is sold by.
▪Weight – The weight of the item.
 Item weight with a red asterisk * is the average weight.
Creating a Prospect Guide
1.Click the Prospects tab.
2.Select and highlight the prospect account who will receive the prospect guide.
3.Click the View Prospect Guide  icon.
icon.
4.The Prospect Guide screen will display with the Company name and their assigned Prospect # in the upper right section of the menu.

The blue Unit Price is an editable field in the Prospect Guide screen.
5.Click the Add Item button to search for and add items to the prospect guide.
6.The Item Search dialog box will display.
7.Make a selection from the Search drop down list. You can search by Item Description, Class or Item Number. |
|
8.Type a word, class or item number in the search box.
9.Click the Search button.
10. When the search results are displayed, click the blue Description link to view the product information.
11. Click the green plus icon to add the item to your prospect guide list.
12. Continue the search and add item process until all the desired items are in the prospect guide.
13. Now you can edit the Unit Price for the selected items.
14. Click the Save Guide button.
 You should save your guide after making any changes.

Above: A search of Item Descriptions for “beef”.
Below: A beef item added to the Prospect Guide screen.

Working with Prospect Guides
Once you have created your Prospect Guide if you need to make changes. These functions are available when you are in the Prospect Guide screen:
•Remove Selected
1.Select and highlight the item to be removed from the Prospect Guide.
2.Click the Remove Selected button. The Remove Item confirmation box will display using the Item Number not the Description field.
3.Click Yes.
•Add Category
1.Click the Add Category button to add a new Category to the current Prospect Guide.
2.The Add New Category dialog box will display.
3.Type the name for the new category in the box and click OK.
4.Now you can add items to this new category in your prospect guide.
•Re-Apply Sort
Some column heading can be used to sort items within category in your prospect guide list in ascending or descending order. These columns are: Item #, Description, Class, Brand, Pack Size, and Unit.
1.Click the column heading and a sort direction arrow will appear.
2.Click the arrow again to change the direction of the sort.
3.Click the Re-Apply Sort button to re-apply the previous sort.
•Cancel
1.Click the Cancel button.
2.The current Prospect Guide will be deleted.

