Non Check Invoices

Contents
If you receive an invoice from a vendor, and you want to pay the vendor with cash, you can create a non-check payment.
•You create a non-check payment in almost the same manner as a regular invoice. With a non-check payment, however, you must enter the approved payment and discount amounts, as well as a payment account and a payment number.
•You create a non-check check payment by adding a payable, and selecting Non Check priority. When you attempt to save the payable, the non-check payment window will be displayed.
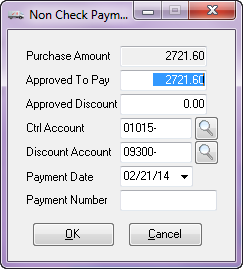
Purchase Amount
This is payable amount. This field is for informational purposes only and cannot be edited.
Approved To Pay
The payment amount to be approved. This field must be greater than zero. This field will default to an amount calculated as:
Approved To Pay = Purchase Amount - Discount Amount
Approved Discount
The discount amount to be approved. This field must be greater than or equal to zero. This field will default to discount amount.
Account
If General Ledger is enabled, the account entered must be an active General Ledger account. In that case, the  button or F5 key will bring up the General Ledger Account search screen, and from there you can pick the General Ledger account you want to. If Accounts Payable and General Ledger are NOT linked, you can enter any account.
Payment Date
The payment date.
Payment Number
The payment number or reference. You can enter up to ten characters which may include letters, numbers, the dash "-", and the underscore "_" . Blanks are not allowed.
OK
Clicking the OK button will validate the fields, and if the fields pass the validation, the window will close and the process of saving the payable will continue.