Printing Checks / Pre-Printed Checks

Contents
1. You might want to print an alignment check prior to printing the checks just to verify that destination printer and your computer are communicating, and that the check format is correct.
2. If approved payables have been found, click the "Print Checks" button to start the printing process.
 If you are using pre-printed checks, and the First Check field doesn't match the number of the next available pre-printed check, you must void one or more pre-printed checks, or change the Last Check number for the checking account, so that the First Check field and the next available pre-printed check numbers match. Once you have started printing checks, you will not have another opportunity to change the checking account check number.
If the vendor entered is a miscellaneous vendor, there will be one check printed for each approved payable for that vendor.
3. After the initial run of checks has been printed, the Printed field in the grid will have an "X", indicating that the checks have been printed and the Vendor's Company name field has been added to the edit grid.
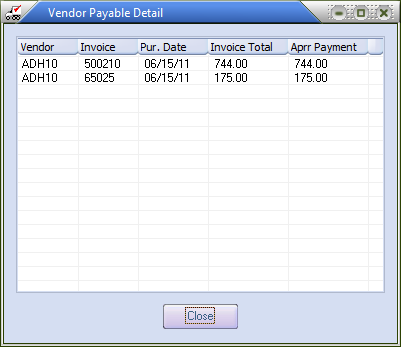
4. A "View payable detail" feature will show a list of the payables covered by a given check. The feature may be accessed by clicking the information icon  located to the top left of the edit grid (see example that follows).
5. At this time, you may reprint checks. Click the "Yes" button to reprint checks.
6. If you click the "No" button, you will NOT have another opportunity to reprint checks, the entrée files will be updated, and the Print Checks window will close and return you to the Main Menu.
 You only get one opportunity to reprint checks.
View Vendor Payable Detail
•Click the information icon
Click Close to return to the AP Print Checks window. |
|