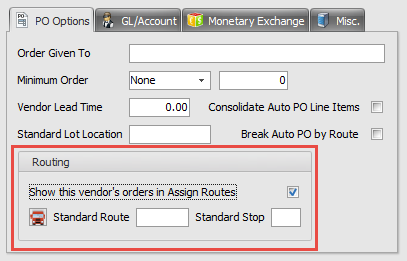
PO Options Tab
Here you can set up options for Auto PO processing.
Order Given To - Here you can enter the name of the person orders are normally given to in the vendor's office.
▪The value entered in this field will appear on the style B PO Guide Report.
Minimum Order - These values are used in the Vendor Order Guide Tab to determine if the minimum has been met. entrée colors the Order Quantity value text in GREEN highlights if the minimum has been met, otherwise the value will be displayed in RED .
▪Type - Use the drop down menu to select from these minimum order type options are: None, Weight, Dollars, Cases, and Pallets.
▪Amount - Enter the amount. The amount is specified in whole numbers from 0 to 9,999,999. A numeric value will only be displayed if the Minimum Order Type is not set to “None”.
Vendor Lead Time - Enter the number of days the vendor requires between the placement of an order and the delivery.
Standard Lot Location - This field allows you to define a standard lot location into which products are normally received. This field will only be valid if you are working with a lot based inventory.
 If you always receive product from this vendor into a certain cold storage facility for which you can assign a standard lot location, enter it here.
Consolidate Auto PO Line Items - Check this option to specify how the system should deal with line items when automatically generating purchase orders. Selecting this option will allow the system to consolidate the total requirements per line item. This is the preferred method.
Otherwise, items to be purchased will be broken down into more detail. This detail may be useful if you generate purchase orders automatically from "selected invoices" rather than "past sales" and you need to see the orders from each of your customers that went into the system generating the purchase order.
Break Auto PO by Route - Check this option if you choose to have your Auto Generated Purchase Orders to be calculated using selected invoices then you may also wish to break the P.O. by route.
If this field is selected, the computer will create separate purchase orders based on the delivery route for the invoices selected. The driver can then pick up product from the vendor in the same sequence that it will be delivered.

Routing Section
Routing for POs to be used in Assign Routes has been added to the PO Options tab. This feature supports when a delivery truck will regularly backhaul purchases for the distributor while on their route.
Here you will set the default route information for the vendor so these stops can be managed in Assign Routes easily. Changes to the route can always be made in the Assign Routes screen on the fly. Just perform two steps.
1.Check the “Show this vendor’s orders in Assign Routes” option.
2.Enter a Standard Route and Standard Stop value for the vendor.
