Entry Detail |

|

|

|
|
Entry Detail |

|

|

|
Account
This is the account to which you will distribute the journal entry. If you do not know the account number, you can press the F5 key to display the General Ledger Account Search screen.
![]() Even if the account you selected has been setup for Auto Distribution, you will not be allowed to exercise this option. See GL Account Maintenance Entering Auto Distribution Information for more information.
Even if the account you selected has been setup for Auto Distribution, you will not be allowed to exercise this option. See GL Account Maintenance Entering Auto Distribution Information for more information.
GL Default Net Income Account / GL Default Retained Earnings Account In order to maintain an accurate record of your prior year net income and retained earnings, it is recommended that you do NOT make manual journal entries to the GL Default Net Income and the Default Retained Earnings accounts.
GL Default Net Income Account If the account you selected is the GL Default Net Income account, a Confirm dialog will display "You are creating an entry to the default Net Income account. Are you sure you want to do this?". Click the Yes button to continue editing the detail. Click the No button to return focus to the account so that it can be changed.
GL Default Retained Earnings Account If the account you selected is the GL Default Retained Earnings account, a Confirm dialog will display "You are creating an entry to the default Retained Earnings account. Are you sure you want to do this?". Click the Yes button to continue editing the detail. Click the No button to return focus to the account so that it can be changed.
See GL Company Maintenance for more information. |
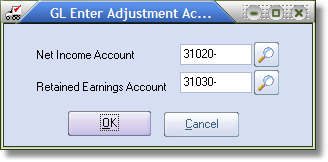
GL Enter Adjustments Dialog
If the entry affects a sales, cost of sales, income, expense, or tax account (an income statement account), you will have to enter at least one adjustment account in the GL Enter Adjustments dialog.
| ▪ | If you are posting to the current year, you must enter a Net Income Account. |
| ▪ | If you are posting to a prior year, you will have to enter a Net Income Account and a Retained Earnings Account. |

Description
This 35-character field might contain account-specific reference information. This field may be left blank.
Amount
This amount will be distributed to the account. A positive amount is a debit, and a negative amount is a credit. The amount cannot be zero.
Balance
This field shows the total of all the amounts for the current entry. This field is informational only and cannot be edited.
Batch
The batch amount entered in the batch window. Batch is only displayed when a batch amount other than zero has been entered in the batch window.
New Detail Button
Clicking the "New Detail" button will add a detail item to the entry.
Delete Detail Button
Clicking the "Delete Detail" button will delete the currently highlighted detail item from the entry.
To Edit a Detail Item
To edit a detail item, you can use one of the following commands.
Keyboard Scroll to the detail item you want to edit and press the Enter key
Context Menu Double left click the grid on the detail item you want to edit.
To Cancel a Detail Item Edit
If you're editing a detail item, click the Cancel button to abort your changes to the detail item that is being edited.
A Confirm dialog will display "This will discard changes to the detail. Lose your detail changes?". Click Yes and the detail item will return to its' original value. If the detail item being edited was new, then the detail will simply be blanked out.
![]() If you're not editing a detail item, clicking the "Cancel" button will initiate the voiding of entries. See the section Voiding all Journal Entries for more information.
If you're not editing a detail item, clicking the "Cancel" button will initiate the voiding of entries. See the section Voiding all Journal Entries for more information.