Options

Contents
 Options Settings
The options have assigned numbers to provide a clear way to communicate about the many options available. The next step requires you to set the system options for entrée.NET. These are similar to the system options in the main entrée system.
1.Click on the Options icon in the menu on the left.
2.Option Description and Current Setting columns are displayed for each option.
3.Note that the bottom of the section will display a full explanation of how the selected option will operate.
4.Click in the Current Setting column to select the new setting from the drop down list.
5.Option changes will update immediately.
 Use the minus
![]() or plus sign
or plus sign ![]() icons next to the section headings to expand or collapse the lists.
icons next to the section headings to expand or collapse the lists.
Configuration – Allows you to let customers control their own page layout.

•#1000 Can change “Standard Order” grid layout. Turning this option on allows the customer to modify the column visibility and layout of the "Standard Order" grid.
•#1001 Can change “Search” grid layout. Turning this option on allows the customer to modify the column visibility and layout of the "Standard Order" grid.
•#1002 Can change “Quick Entry” grid layout. Turning this option on allows the customer to modify the column visibility and layout of the "Quick Entry" grid.
Electronic Order Pad
EOP is our mobile application based off entrée.NET. It was created primarily as an order entry tool for your DSRs. All possible options are not displayed in the image above. For more information about this product visit: https://www.necs.com/orderpad.
•#50 Enable barcode scanning input in "Quick Entry". Setting this option to "YES" will enable UPC barcode scanning support in "Quick Entry"tab of EOP. This allows for UPC barcodes to be entered into the "Scanner Input" text field using a HID compatible scanner. This will option will also match against secondary UPC numbers, if defined in entrée Inventory File maintenance.
•#51 Enable "continuous scanning" for entering quantities in "Quick Entry". Setting this option to "YES" will allow for quantities to be entered through the barcode scanning feature. When enabled items will be added to the order with an order quantity of 1 and each additional scan will increment the quantity until a new item is scanned or manually entered. This feature only applies when first adding an item through "Quick Entry", changes to an item previously entered must still be done manually. This option also requires that Enable barcode scanning input in "Quick Entry" to be enabled.
•#52 GP Review - Minimum Gross Profit %. Items with a Gross Profit percentage lower than this value will be displayed in red on the "GP Review" tab.
•#53 GP Review - Target Gross Profit %. Items with a Gross Profit percentage lower than this value will be displayed in yellow on the "GP Review" tab.
•#54 Allow Salesperson to enter route information. Setting this option to "Yes" will allow the salesperson to enter route information to be assigned to the entrée invoice when completing an order.
•#58 Allow Salesperson to edit Description Lines 1 - 4. Setting this option to "Yes" will allow the salesperson to edit item description lines 1 - 4. When they click on the item description the description edit dialog will display. Then they can modify any of the four description lines to be displayed on the invoice and loading sheet (requires entrée 3.6.6).
•#63 Allow Salesperson to email reports - Setting this option to "Yes" will allow the salesperson to email a PDF or Excel copy of a report.
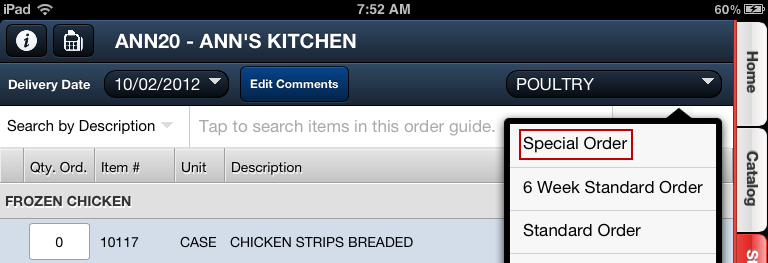
•#68 Enable "Special Order" guide in Standard Order. Setting this option to "Yes" will add a "Special Order" guide to the guide drop down menu on the Standard Order tab in EOP. This new guide will only display items marked as "Special Order Item" on the "Misc 1" tab of Inventory File Maintenance in entrée that are already in the customer's standard order.
•#69 Default the quantity ordered to 1 when entering items in Quick Entry. Setting this option to "Yes" will automatically add items to the order with a quantity of 1 for items entered through the Quick Entry option.
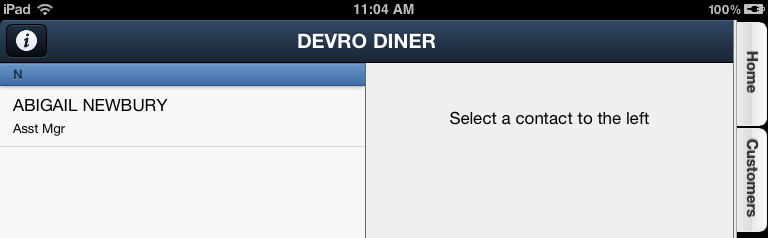
•#71 Allow Salesperson to View Contact Manager Contact Information. Setting this option to "No" will remove the Contacts option from the main menu in the Electronic Order Pad. This means the Contact Manager’s information can not be accessed from the EOP application.
The default setting for this option is “Yes” so unless you change the setting it will allow access to the information about the contact person for each customer. The customer name will appear at the top center of the Contact Information screen.
•#74 Display Price Change Indicator. Setting this option to "Yes" will display a green down or red up arrow in front of the unit price if the current unit price is less than or greater than the last sale price to that customer in the Electronic Order Pad application. If no last sale price is available the price is treated as equal and no change indicator will be shown.

•#76 Allow Salesperson to Enter Credits on Orders. Setting this option to "Yes" adds a Credits Tab to the Order Entry section of the Electronic Order Pad app (see the Credits Tab chapter for details) which allows for the entry of credit items to be included on the invoice when the order is imported into the main entrée system.
•#77 Allow Salesperson to Create Credit Memos. Setting this option to "Yes" will add the Create Credit Memo option to the main menu of the Electronic Order Pad app (see the Create Credit Memo chapter for details) which provides a trimmed down version of the current order entry process that only allows for the entry of credit items.
The creation, completion, importing, and confirmation of Credit Memos follows the same work flow as orders except the document generated in entrée will be a Credit Memo rather than an Invoice.
Several existing rules that apply to orders have been adjusted for Credit Memos to more closely match the rules used by entree as follows:
▪No the delivery date restrictions are applied to the selection of a Credit Memo Date. The only requirement enforced is that the date is not in the past.
▪Credit Memos may be created for customers on credit hold.
•#78 Display “True” Inventory On Hand Information. Setting this option to "Yes" enables the "OH Qty" field in the Item Information Panel of the Electronic Order Pad app. It displays both the current On Hand quantity as well as the True On Hand quantity which is calculated as On Hand + Allocations.
 Remember to access the Information Panel configuration feature to add the OH Qty field to the Item Information Panel display.

•#90 Allow Salesperson to create and edit customer special pricing. Once enabled a new button with a green price tag icon will be displayed on the left side of the Item Information panel during order entry. Tap this button to display the current pricing information for the customer for editing, if no pricing is currently defined the salesperson will be prompted if they would like to create an entry. NOTE: Price changes are applied to the Ship To location that is being edited.
•#91 Allow Salesperson to edit customer Bid 1 and Bid 2 pricing. Once enabled a new button with a green price tag icon will be displayed on the left side of the Item Information panel during order entry. Tap this button to display the current pricing information for the customer for editing, if no pricing is currently defined the salesperson will be prompted if they would like to create an entry. NOTE: Price changes are applied to the Ship To location that is being edited.
•#93 Default Price Level for catalog. Allows you to set the price level used for price calculations when browsing the Catalog from the main menu. Previously the catalog was locked in at price level 1.
•#108 Display Inventory on hand in the Electronic Order Pad. Used to control display of this information. Setting this option to "YES" will enable the display of on hand inventory amounts in Electronic Order Pad (EOP).
•#111 Allow promotions to be edited. This option controls the overall ability for salespeople to edit the promotion amount passed on to the customer.
•#112 Editable promotions will default to 0. Setting this option to "Yes" will default the editable promotions to $0.00, instead of to the full promotion amount.
•#113 Allow salesperson to edit promotion amount. This option controls the ability for individual salespeople. Setting this option to "Yes" enables the ability for salespeople to edit the promotion amount passed on to the customer.
•#114 Enable offline support during Order Entry. Setting this option to "Yes" will enable support for switching to a limited order entry mode if network connectivity is lost during Order Entry. Offline support is only available during Order Entry and requires that an order has already been started. Orders cannot be started without network connectivity.
•#116 Allow salesperson to access the Customer Falloff feature. Setting this option to "Yes" will allow the salesperson to access the "Customer Falloff" feature.
•#120 Allow Salesperson to access the Edit Special Pricing feature. Once enabled a new "Special Pricing" menu option will be available on the main menu in . Then a salesperson may add or remove items and editing pricing based on the settings of System Option #90 Allow salesperson to create and edit customer special pricing and System Option #91 Allow salesperson to edit customer Bid 1 and Bid 2 pricing, (listed above).
•#123 Allow salespeople to change the originating warehouse for an order. Setting this option to "Yes" will allow the salesperson to change the originating warehouse for an order. (Requires entrée v4.0.35 or later and the entrée.MW add-on module).
•#124 Allow salesperson to change the shipping warehouse for items. Setting this option to "Yes" will allow the salesperson to change the shipping warehouse individually for items on the order. (Requires entrée v4.0.35 or later and the entrée.MW add-on module).
•#125 Block completion of orders when items are not present in the shipping warehouse. Setting this option to "Yes" will prevent the salesperson from completing orders that contain items that are not setup in the shipping warehouse assigned to the order. (Requires entrée v4.0.35 or later and the entrée.MW add-on module).
•#126 Lock items to the active shipping warehouse when added to the order. Normally when the shipping warehouse is changed for an order all items are updated to ship from the newly selected warehouse. Setting this option to "Yes" will lock the shipping warehouse for the item to the warehouse that is selected when the item is added to the order. (Requires entrée v4.0.35 or later and the entrée.MW add-on module).
•#129 Default customer listing sort column. Allows you to specify the default sort order for customer listings. Select from: Cust #, Company, City/State, SP# or Last Sale.
•#130 Replace Class tab with a Category. Setting this option to "Yes" the current Class tab will be replaced with a Category tab. Tapping on a Category from this list will then display a list of Classes from items in the selected Category. Tapping on a Class will then display all items within that Category and Class.
General
•#11 Display Item images. Turning this option off will prevent the display of item images.
•#12 Display A/R information. Turning this option off will hide all A/R panels and reports.
•#13 Display .DOC scanned invoices. When this option is enabled any available entrée.DOC scanned invoices will be available for viewing.
•#15 Display inventory “On Hand” numbers. Turning this option on will allow for the display of item "On Hand" values. This will add a "Qty Avail." field to option to the grids.
•#16 Display item “Brand”. Turning this option off will prevent the item "Brand" information from being displayed in the catalog.
•#17 Display item “Weblink”. Turning this option off will prevent the item "WebLink" information from being displayed.
•#19 Enforce Credit Hold. When this option is enabled entrée.NET will enforce the credit hold setting from entree and will prevent new orders from being placed.
•#27 Display Class images. Turning this option off will prevent the display of class images.
•#30 Display item “Tags”. When this option is enabled item tags defined in entrée will be listed in the "View" drop down on the "Catalog" page. See the Inventory File Maintenance chapter .NET Tab section of the entrée System Guide or the entrée Knowledgebase for more information about creating Item Tags.
•#59 Display Brand images. Setting this option to "Yes" will allow the Catalog to display brand images.
Prior to turning this option on the Brand Maintenance utility in the main entrée system must be used to build and load the brand name and image file (requires entrée 3.6.6). Then the brand name and image file must be exported to entrée.NET using the Data Export Utility.
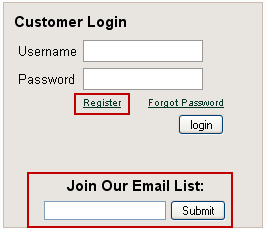
•#73 Allow Registration Request on Login Page. Set this option to "Yes" to display the "Register" button in the website Home page Customer Login area. The default setting for this option is “No”.
The Register button will allow customers to access this online registration form to request an entrée.NET account.
See the Website Settings chapter for more information. |
|
•#87 Disable Reporting. Setting this option to "Yes" will disable and hide all reporting features.
•#99 Use HTML formatting in order notification emails. When this option is set to "Yes" order notification emails will contain an HTML formatted copy of the order similar in layout to the PDF generated when printing an order. When set to "No" order information will be formatted using plain text.
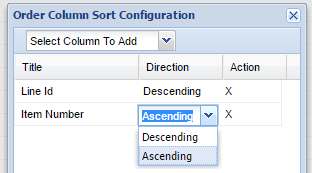
•#110 Order confirmation item sort configuration. This option allows you to specifying the sort columns and order for printed orders and order confirmations. Below you see the default settings on the left. On the right you see the drop down menu to select the columns to sort by.
|
|
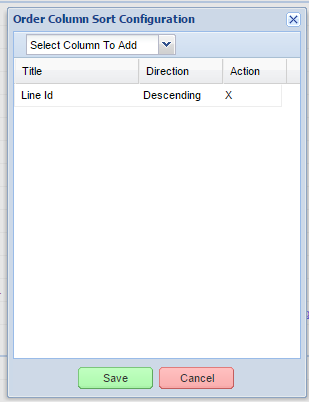
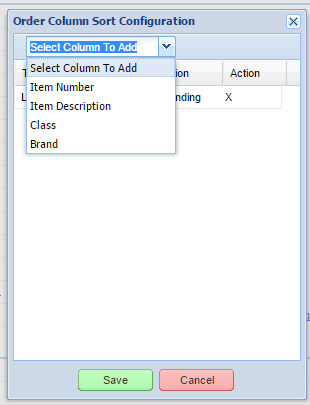
Then choose Ascending or Descending order.
Click the X in the Action column for a column to remove it.
Click Save to set your preferences. |
|
•#114 Enable offline support during Order Entry. This feature provides your salespeople with the ability to continue placing an order when their network connection is lost by Electronic Order Pad. By default System Option #114 is set to Yes. If you do not want Offline Mode enabled for your salespeople you must change the setting of this option to No here in entrée.NET.
EOP Offline Order Entry Mode Limitations
•Salespeople can only modify the current order.
•Only items in the customer's Standard Order or Order Guide are available in offline mode.
•Orders cannot be completed in offline mode.
* See the Electronic Order Pad System Guide Offline Order Entry Mode Overview chapter for details.
•#118 Allow customer to edit Account Settings. Setting this option to "No" will prevent the customer from editing their account settings. This controls access to the "Account Settings" includes the ability to change the accounts password, confirmation email address, timezone and other various account level options.
•#119 Allow viewing and editing of Order Guides. Setting this option to "No" will prevent the user from viewing or editing Order Guides.
Order Entry – These options control order entry rules and displays.
•#1 Display price information. Setting this option to "No" will not display any price information. When this option is set to "NO" the "Min order amount" and "Max order amount" options will NOT be enforced.
•#2 Allow decimals in order quantities. This option requires System Option #15 "Allow decimals in invoices" to be enabled in entrée. Please refer to the description in entrée for more detailed information. Turning this option on will allow decimals to be used in order quantities. (Ex: 0.5, 1.0, 1.5, 2.25).
•#3 Display item last purchase information. Turning this option on will make "Last Qty", "Last Price" and "Last Purchase Date" information available. "Last Price" will not be shown if "Display price information" is set to "NO".
•#4 Can order any product. The option has been updated to provide a mode which allows for viewing all items in the distributors catalog but only ordering items from the customers Standard Order.

There are 3 new choices for the "Can order any product" option:
1. "Yes" - This setting will display and allow for ordering of all items in the distributors catalog that are not otherwise excluded due to item restrictions such as the "Restricted" or "Approved" item options.
2. "Restrict to Standard Order". This setting retains the previous behavior when the option was set to "No". Only items that are present on the customer Standard Order will be displayed and allowed to be ordered.
3. "Restrict To Standard Order (View All)". This setting will display all items in the distributors catalog that are not otherwise excluded due to item restrictions such as the "Restricted" or "Approved" item options when browsing the "Catalog" section. Customers and salespeople will only be allowed to order items present on the customers Standard Order from the "Standard Order" and "Quick Entry" sections. Additionally all pricing will be hidden in the "Catalog" section regardless of the "Show prices" system option setting.
•#5 Max order days. This option sets the number of days in the future a customer is allowed to place an order for. As an example setting this option to "7" will only allow the customer to request a delivery date up to 7 days out from the date the order is placed. Setting a value of "0" disables this feature. When the "Restrict delivery dates to customer route information" option is on only dates which fall within the "Max order days" window will be available.
•#6 Order cutoff time. The "Order cutoff time" sets the time orders must be placed before to be eligible for next day or same day delivery. As an example, assuming no route restrictions are in effect, a customer placing an order on Monday with an "Order cutoff time" set to 4:00 PM will need to place their order before 4:00 PM for the system to allow them to select Tuesday as a requested delivery date. In this same example if the "Order cutoff time applies to day of delivery" option is on the customer would be allowed to select Monday as a requested delivery date for orders placed before 4:00 PM.
•#7 Order cutoff time applies to day of delivery. Turning this option on will have the "Order cutoff time" apply for the day of delivery. As an example, with no route restrictions are in effect, if the "Order cutoff time" is set to "10:00 AM" then customers will then be allowed to select the current day as a requested delivery date when placing an order before 10:00 AM.
•# 8 Min order amount. This option sets the minimum dollar amount total an order must meet to be completed and transmitted for completion. Setting a value of "0" disables this feature. This feature has no effect when "Display price information" is turned off.
•# 9 Max order amount. This option sets the maximum dollar amount total allowed for an order to be completed and transmitted for completion. Setting a value of "0" disables this feature. This feature has no effect when "Display price information" is turned off.
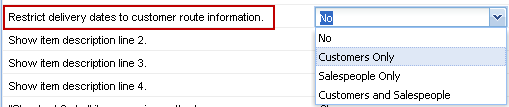
•#10 Restrict delivery dates to customer route information. This option has been changed from a "Yes" / "No" to allow for applying delivery date restrictions to: "No", "Customers Only", "Salespeople Only" or "Customers and Salespeople". This allows you to have complete control over how the delivery date restrictions are applied. It will prevent the Customers and / or Salespeople from selecting a requested delivery date that does not fall on a route day as defined on the "Routes" tab of "Customer File Maintenance" in entrée. If no route information or a "Standard" route has been defined in entrée this feature will have no effect for the customer.
The Delivery Date Rule options are also supported in the Electronic Order Pad as of version 3.3.7. The chart below provides a simple overview of the Delivery Date Rules options.
DELIVERY DATE RULE |
DESCRIPTION |
SETTINGS OPTIONS |
Max Order Days. |
Sets the number of days from the order date that the delivery date must fall within. |
a.Enter a number value. b.Enter zero to disable rule. |
|
|
|
Max Order Days enforcement. |
Sets the order entry system response when the delivery date is beyond Max Order Days number. |
a.Allow for next Delivery Date. b.Prevent Completion. c.Block Order Entry. |
|
|
|
Order Cutoff Time |
Sets the daily cutoff time for orders to be delivered the next day. |
Select a time from the drop down list. |
|
|
|
Order Cutoff Time Applies to Day of Delivery. |
Sets the order cutoff time to apply to the day of delivery. |
Yes / No |
|
|
|
Restrict Delivery Dates to Customer Route Information. |
Enforces the customer’s defined route delivery days from the Customer file Route tab. |
a. No b. Customers Only. c. Salespeople Only. d. Customers and Salespeople. |
•#20 Prompt for “Special Instructions”. Turning this option on will add a text entry box below the description line for customers to enter special instructions on a per-item basis. This will appear in the items "Description Line 2" on the invoice.
•#21 Allow customer to specify delivery date. Turning this option off will not allow the customer to set a delivery date.
If "Show prices" is enabled the displayed prices will be calculated using the next delivery date determined by the system.
•#22 Show Item description line 2. Turning this option on will display an items second line of description in the order entry grid and allow the column on reports.
•#23 Show Item description line 3. Turning this option on will display an items third line of description in the order entry grid and allow the column on reports.
•#24 Show Item description line 4. Turning this option on will display an items fourth line of description in the order entry grid and allow the column on reports.
•#36 Standard Order” item grouping method. This option controls how items are grouped in the "Standard Order" grid. Selecting "None" will turn off all grouping. Selecting "Class" (default) will group items by class.
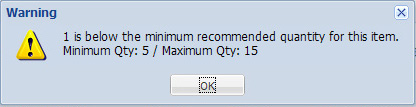
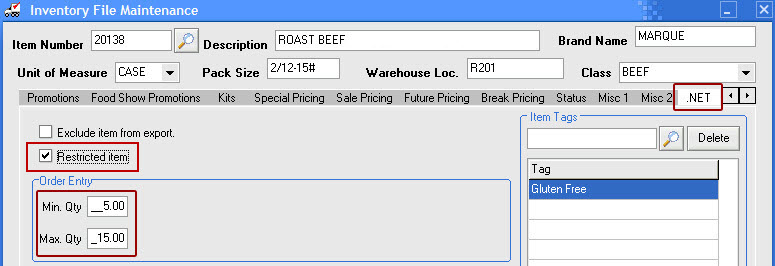
•#37 Display min/max quantity warnings. Setting this option to "YES" will display a warning message when ordering quantities above or below the specified values. This feature serves as a warning only and does not prevent an order from being completed by the customer or salesperson. These entrée updates are required for the "Display min/max quantity warnings" Order Entry option: The minimum and maximum quantity numbers must be defined in the main entrée system for the item or customer.
Defining minimum and maximum for Items in entrée entrée V3 1.Go to File > Inventory File Maintenance > find the desired item.
entrée V4 SQL 1.Go to the Inventory ribbon menu > click the Inventory option > find the desired item. 2.Select the .NET Tab. 3.In the Order Entry section and set your Min Qty and Max Qty quantities. 4.Then click Apply. |
Defining minimum and maximum for Customers in entrée entrée V3 1.Go to File > Customer File Maintenance > Special Pricing Tab. 2.Select the desired item’s special price in the Special Price Information section.
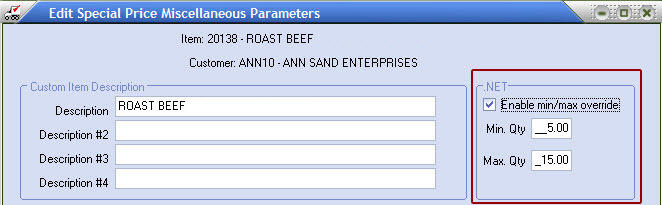
entrée V4 SQL 1.Go to the Customer ribbon menu > click the Customer option > find the desired customer. 2.Select the Special Pricing Tab. 3.Select the desired item’s special price in the Special Price item grid. 4.Click the Miscellaneous button and the Edit Special Price Miscellaneous Parameters dialog opens. 5.In the .NET section check the Enable min/max override option. 6.Now set your Min Qty and Max Qty quantities. 7.Then click Apply. |
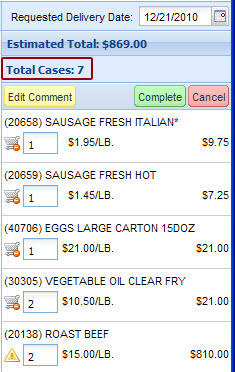
•#39 Show "Case Count" in order entry. Setting this option to "YES will display "Total Cases:” with a quantity representing the sum of quantities entered for an order below the "Estimated Total" field in the shopping cart. |
|
•#47 Show DOT special order items. Setting this option to "NO" will prevent DOT special order items from being displayed. (NOTE: This requires the entrée.DOT module.)
•#48 Show DOT drop ship items. Setting this option to "NO" will prevent DOT drop ship items from being displayed. (NOTE: This requires the entrée.DOT module.)
If you have the entrée.DOT module setting the two DOT options above to "YES" will enable the display of DOT items in the catalog with row color coding. The orange background color for "Special Order" items and a brown background color for "Drop Ship" items. This feature is only available for salespeople and will not be applied to the catalog for customers (see image below).
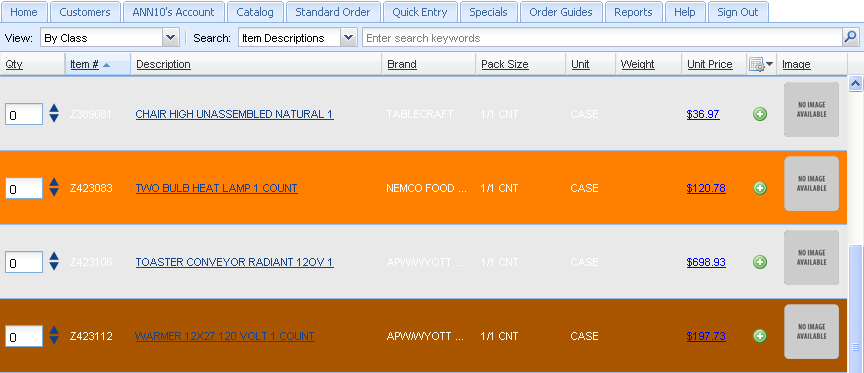
All items purchased from Dot Foods can flow into entrée.NET to provide you with even more selling opportunities. These options has been added to support entrée.DOT "Special Order" and "Drop Ship" items.
•#49 Display warning for missing order quantity items. Setting this option to "YES" will display a dialog during the complete order process showing all items with a minimum order quantity defined that are not on the current order. This is a notification only and does not prevent the order from being completed.
•#55 Enable "Date Filtered Standard Order". Setting this option to "YES" will enable the "Date Filtered Standard Order" feature. This feature allows DSRs and customers to view a copy of their "Standard Order" showing only items that have been recently purchased. This guide can be set as their default guide and is available in the Guide drop down menu (as seen in the image below in a salesperson's entrée.NET account.

The number of weeks shown can is set in the "Account Settings" section of Home page after the salesperson or customer signs into the system. They can choose time spans from 2 to 12 weeks in one week increments.
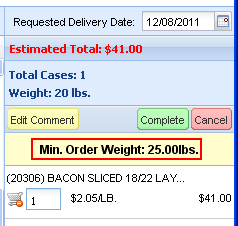
•#60 Min order weight. This option sets the minimum weight restriction on customer orders. Setting a value of "0" disables this feature. The customer will be prevented from completing an order if the estimated order weight is below the minimum amount. A message will be displayed the yellow message area of the shopping cart (image on right). |
|
•#61 Max order weight. This option sets the maximum dollar amount total allowed for an order to be completed and transmitted for completion. Setting a value of "0" disables this feature. The customer will be prevented from completing an order if the estimated order weight is above the maximum amount. A message will be displayed the yellow message area of the shopping cart.
For the Min/Max Weight feature to work correctly non-catchweight items must have a constant weight defined in entrée. The total weight for the order is estimated using the constant weight or the average weight for catchweight items.
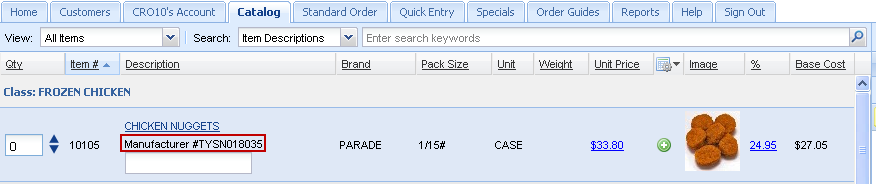
•#64 Display Manufacturer Item # beneath Item description. When set to "Yes" it will display the manufacturer item number, if defined for an item in Inventory Maintenance in the main entrée system, below description line 1 in your Catalog (requires entrée version 3.6.7 or later or entrée V4). For information about Manufacturer Item # please consult the entrée Knowledgebase for your system in our website.
•#65 Max order days enforcement. This option allows you to control how access to the creation and completion of orders is handled when the customers next scheduled delivery date exceeds the "Max order days" setting above it in the options list. Previously when this condition occurred the system would allow for entry of an order only on the next scheduled delivery date.

You now have three choices for the Max order days enforcement option:
1. "Allow for next Delivery Date" - This setting keeps the current behavior the same and allows for entry of orders but only on the next scheduled delivery date.
2. "Prevent Completion" - This setting allows the salesperson or customer to view the item catalog and create an order but will prevent the order from being completed and transmitted to the main entrée system until the current date is within the allowed completion window determined as Next Delivery Date - Max Order Days.
3. "Block Order Entry" - This setting completely blocks all access to the order entry features of entrée.NET. Customers and salespeople will not be allowed to edit or create orders in the system until the allowed submission window determined as Next Delivery Date - Max Order Days.
•#67 Display Featured Brand Advertisement in Shopping Cart. Setting this option to "Yes" will display the featured brand information defined under the "Website - Featured Brands" section at the bottom of the shopping cart during order entry. When the customer clicks the Shop Now link in the shopping cart area they will be brought to the Catalog page with a list of all the products for that brand. See Updating Blocks Content to learn how to set up Featured Brands and see an example of the shopping cart option enabled.
•#72 Require PayPal payment before allowing order to be completed. Setting this option to "Yes" will require that the customer successfully complete a PayPal payment for the estimated order amount before allowing the order to be completed.
•#75 Enable four decimal Unit Prices. Setting this option to "Yes" will display and allow for the editing of Unit Prices with four decimal places.
•#79 Use Future Pricing in Order Entry. If this option to set to "Yes" when creating orders for a future date, the system will check the future price file to determine if a price change will be in effect for that day. If so, the system will automatically use the future price rather than the current price. For entrée versions 3.6.17+ this option is set automatically to match System Option #50 - Use Future Pricing in Invoicing on the System Options tab of System Preferences in entrée.
•#80 Prevent sales of items marked as "Allow item to be sold at $0.00.". Setting this option to set to "Yes" will override the "Allow item to be sold at $0.00" item setting from entrée. Items which do not have valid pricing will no longer be displayed and salespeople will no longer be able to sell the item at $0.00.
•#82 Default delivery date to next scheduled delivery day. Setting this option to set to "Yes" will default the delivery date for new orders to the next scheduled delivery date for the customer based on routing information defined in on the Routes tab in Customer File Maintenance.
This option has no effect when the "Restrict delivery dates to customer route information" option is enabled.
•#84 Prevent entry of quantities exceeding the defined maximum warning quantity. Setting this option to "Yes" will change the behavior of the maximum warning quantity defined for an item from a warning to a strict enforcement.
This option has no effect on the minimum warning quantity for the item.
The maximum quantity value can be defined on the ".NET" tab of "Inventory File Maintenance" and also per-customer through the "Edit Miscellaneous..." dialog of "Special Pricing".
This option will override the maximum quantity checks for the "Show min/max quantity warnings" feature.
•#89 Create orders with Standard Order Quantities. Enable this option to automatically build orders with items that have a non-zero standard order quantity defined for the requested delivery date.
•#101 Use items from Special Price Customer for "Standard Order". When this options is set to "Yes", and a Special Price Customer is assigned, then items in the customers special price file are replaced with the items defined for the Special Price Customer.
This changes the effective customer used for all item restriction checks that verify an item is in a customers special price file to use only items defined for the Special Price Customer. This also affects the behavior of the standard approved and restricted item features.
For example, if System Option #4 "Can order any product" is set to "Restrict to Standard Order" with this option enabled the customer will only be able to order items defined on the Special Price Customers Standard Order.
•#104 Allow customer to delete items from their "Standard Order". Setting this option to "YES" will allow the customer to mark items for deletion from their "Standard Order". This will remove the entry from the customer special price file the next time a data export to entree.NET is performed.
•#105 Require Order Giver field before completing order. Setting this option to "YES" will prevent the user from completing an order if the "Order Giver" field has not been filled in.
•#106 Require PO# field before completing order. Setting this option to "YES" will prevent the user from completing an order if the "PO #" field has not been filled in.
•#107 Allow customer to edit order comments. Setting this option to "No" will remove the ability for customers to enter comments on orders.
•#109 Notify customers when an order is completed by the salesperson. Setting this option to "Yes" will send a copy of the order notification to the email addresses assigned to the customer's entrée.NET account or the primary email address assigned in entrée Customer File Maintenance, if no online account is setup.The default behavior of the system does not send a copy of the order notification to customers when it has been completed by a salesperson.
•#115 Allow "Bill To" customers to place orders for linked "Ship To" customers. Setting this option to "Yes" will alter the order entry system to allow "Bill To" customers to view and place orders for all "Ship To" customers assigned to them.
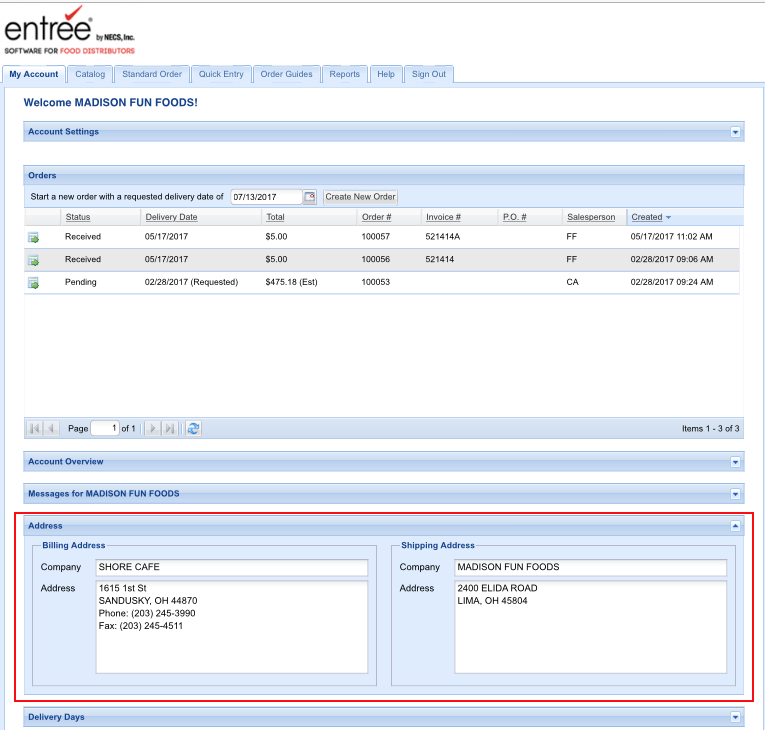
This option allows for the Bill-To Master customers to login to entrée.NET and place orders for any of their Ship-To customers. All Ship-To customers must be linked to the master Bill-To in Customer File Maintenance in entrée using the Customer Tab > Bill To Account sub-tab.
 Here you see what the entrée.NET customer will see in their My Account Address section with the Bill To Master feature in use.
•#121 Can only order items available from the originating warehouse. Setting this option to "Yes" will only allow items from the originating warehouse for the order to be viewed and added to the order. By default this is the warehouse assigned to the customer through Inventory File Maintenance. (Requires entrée v4.0.35 or later and the entrée.MW add-on module).
•#122 Display on hand information from the originating warehouse. Setting this option to "Yes" will display the default On Hand and On Hand Weight information using only the inventory numbers from the active warehouse. When set to "No" the total inventory number for all warehouses will be displayed. (Requires entrée v4.0.35 or later and the entrée.MW add-on module).
•#127 Disable promotions for customers receiving Bid Pricing. Use this option to specify if promotions should be disabled for customers on items that are receiving bid pricing. This option is automatically set by the export process to the same value set for entrée System Option #200 "Disable promotions for customers receiving bid pricing".
•#128 Display items with no On Hand inventory. Allows you to control the display of items with no on hand inventory. Setting this option to "Yes" will show items with NO On Hand inventory in the order entry screens. Setting this option to "No" will hide items with a zero or negative on hand inventory value.
Promotions – These option control the display and rules for the promotions.

•#41 Disable promotions below Selling Price. If this option is set to "YES", the system will disable an item promotion (as defined off the Promo window in the inventory file) if the customer's sell price is less than their normal pricing.
 Let's assume a case of pizza sauce has a promotion of $1/case an the customer's normal price is $16.50. If for some reason (salesman gives him a deal on this item) he is invoiced $16.25 instead, he will NOT receive the promo discount if this option is set to YES.
•#42 Disable promotions for customers receiving special or bid pricing. When set to "YES", any customer already receiving a bid or special price on an item eligible for a promotion, will not receive promotional pricing for the given item.
•#45 Allow a Promotion to be applied to a Break Price. When set to "YES" the system will allow a promotion to be applied to a break price. The settings in entrée.NET is automatically based upon the current settings in system option #172 in entrée.
Some distributors view BOTH features as being "promotions" and do not want both to be applied to the same invoice line item. To allow only one “promotion” per item, set this option to “No”. Then for any item which is currently assigned a Break Price, no Promotions will be applied.
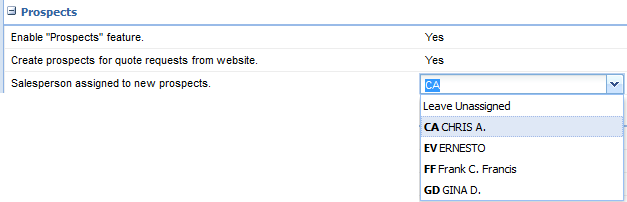
Prospects – These options control the display and rules for the Prospects feature.
•#31 Enable “Prospects” feature. Setting this option to "YES" will allow salespeople to create and manage "Prospects". Three new tabs will be added to your menu once this feature is enabled; Prospects, Manager Setup and Reports.
•#33 Create prospects for quote requests from website. Setting this option to "YES" will automatically create a prospect when a visitor submits a quote request from the website. This option has no effect when the "Enable Prospects feature" is set to "NO".
•#34 Salesperson assigned to new prospects. Designates a salesperson that will be assigned to prospects created from website quote requests. This option has no effect when the "Enable Prospects feature" or "Create prospects for quote requests from website" is set to "NO".
Salespeople - These options control the display and rules for Salespeople with accounts in entrée.NET.
•#14 Allow salespeople to setup entrée.NET accounts for customers. Turning this option on allows salespeople to setup entrée.NET accounts for customers. This provides the same account setup feature available to the distributor and is limited to the customers assigned to the salesperson.
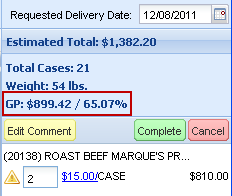
•#18 Display “Gross Profit”. Setting this option to "YES" will display the GP dollars / percentage values in the top of the cart while a Salesperson is creating an order. Applies to Salespeople only. |
|
•#25 Allow salesperson to modify pricing. Turning this option on will allow the salesperson to modify prices on an order.
•#26 Allow salesperson to enter prices below the “Minimum Sell Price”. Turning this option on will allow the salesperson to enter prices below the "Minimum Sell Price" defined on the "Cost/Price" tab of "Inventory File Maintenance" - This option has no effect when "Allow salesperson to modify pricing." is turned off.
•#28 Email a copy of orders placed by customers to the salesperson. Turning this option on will email a copy of the order notification to the salesperson assigned to the customer’s account.
•#29 Salesperson can view and place orders for all customers. Turning this option on will allow the salesperson to view and place orders for all customers. The "Receives data for ALL salespersons" option in the entrée Salesperson/Broker File Maintenance Remote Order Entry tab will override the "Salesperson can view and place orders for all customers" option when set to “No".
* See the Setting entrée Options chapter for a complete explanation of how to use the new Salesperson / Broker File Maintenance Remote Order Entry options.
•#32 Allow salesperson to re-assign prospects. Setting this option to "YES" will allow a salesperson to re-assign a prospect to a different salesperson. This option has no effect when the "Enable Prospects feature" is set to "NO".
•#35 Allow salesperson to adjust prices by specifying a percentage over “Base Cost”. Setting this option to "YES" will provide a "%" column next to the "Price" column allowing the salesperson to adjust prices by entering a percentage of base cost. The price calculation will follow the rules defined for the "Customer Special Price Formula" in entrée on the Price Setup tab of System Preferences.
These calculations are made using the values available to entrée.NET at the time the order is placed and will only lock the price on the invoice. If any cost changes take place in entrée as a result of receiving new product or a manual cost change there is no guarantee that the margins used to create the order in entrée.NET will reflect the final margins of the invoice.
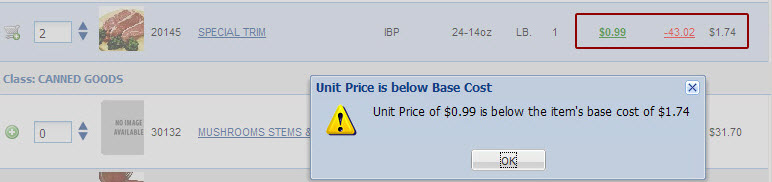
•#38 Allow salesperson to enter prices below "Base Cost". Setting this option to "YES" will allow the the salesperson to enter prices below Base Cost.
Setting this option to "Display Warning" will display a warning dialog and allow the price to be entered. Setting this option to "NO" will prevent the price from being accepted.
•#43 Display Commissions. (Electronic Order Pad) Applies to salespeople only. Turning this option on will enable the display of estimated commissions calculations for orders.
•#46 Allow salesperson to delete items from a customer's "Standard Order". Setting this option to "YES" will allow the salesperson to mark items for deletion from a customers "Standard Order". This will remove the entry from the customer special price file the next time a data export to entrée.NET is performed.
•#56 Enforce credit hold for salespeople. When this option is enabled entrée.NET will enforce the credit hold setting from entrée and will prevent new orders from being placed by salespeople.
•#81 Display customer Hot Message. Setting this option to set to "Yes" will display the hot message defined for the customer when selecting a customer.
•#83 Show warning if Unit Price is below Base Cost when adding items. Setting this option to set to "Yes" will display an alert to the salesperson if the calculated Unit Price is below the Base Cost for the item when adding an item to an order.
•#92 Prevent selling below Base Cost. Under normal operation the system will never change a price that has been calculated for a customer even if the price is below the items Base Cost. Setting this option to "Yes" will modify the below cost checks to prompt the salesperson and force the price to the items Base Cost. This compliments the "Prevent selling below Base Cost" miscellaneous password option in entrée.
•#94 Allow Salesperson to view Real Cost.
•#95 Allow Salesperson to view Landed Cost.
•#96 Allow Salesperson to view Market Cost. |
Each of the three cost viewing options will be enabled individually as the column is added to the Item Information Panel in entrée.
Otherwise the cost viewing option will not appear in the options list. |
•#97 Calculate Gross Profit using Landed Cost. Setting this option to "Yes" will change the gross profit calculations from using Base Cost to Landed Cost.
•#98 Invoicing deducts bill back amount when calculating Gross Profit. Setting this option to "Yes" will change the gross profit calculations to account for vendor bill backs.
•#100 Show DOT item filter. When this option is set to "Yes" a button with the Dot logo will be added near the search controls in the Catalog section. This button provides special filtering options to control the display of Dot items while browsing the catalog. This filter is available on the Order Guide / Product Listing report.
•#102 Allow salesperson to modify prices for customers on Price level 1. When this option is set to "No" price editing will be disabled in when the customers price level is not set to level 1.
The "Allow salesperson to modify pricing." option overrides this setting.
•#103 Allow salesperson to modify prices for customers on Price level 2 - 99. When this option is set to "No" price editing will be disabled in when the customers price level is not set to a levels 2 through 99.
The "Allow salesperson to modify pricing." option overrides this setting.
•#117 Allow Special Pricing to override the Minimum Sell Price. Used to specify if Special Pricing is allowed to override the Minimum Sell Price. This option is automatically set by the export process to the same value set for entrée System Option #177 " Special Pricing is allowed to override Minimum Sell Price".
Website
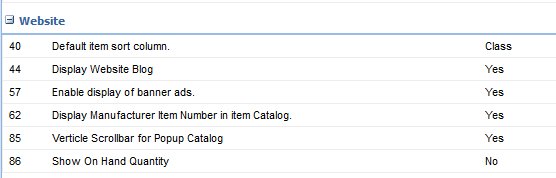
•#40 Default item sort column. Designates the column to use by default when sorting the item listing in the website product catalog.
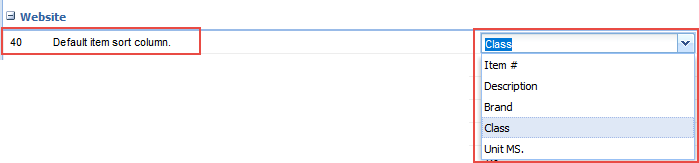
When "Item #" is selected the catalog will list all items and disable the grouping by class and brand as it sorts in the selected direction.
•#44 Display Website Blog. Selecting "Yes" will turn this option on and add the Blog link to the website main menu in your website. Use the Website tab Blocks section Blog feature to add content to your Blog.
•#57 Enable display of banner ads. Selecting "Yes" will turn this option on for your website. See the Ads section of this chapter to use this feature.
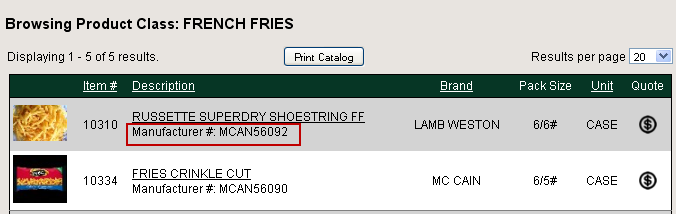
•#62 Display Manufacturer Item Number in Item Catalog. When set to "Yes". It will include the manufacturer item number, if defined for an item in the main entrée system, below the item description when browsing the Catalog page of the website.
•#85 Vertical Scrollbar for Popup Catalog. Turning this option on will condense the item areas of your catalog and implement a scrolling feature, rather than listing down the page.
•#86 Show On Hand Quantity. Turning this option on or off will toggle the display of on hand quantities for items.