Specials Setup
Everyone loves a special and entrée.NET makes it easy for you to highlight them for the customers who visit your website. The Website Tab, Specials Setup dialog allows you to easily manage and display your weekly featured items.
You can control whether specials will appear on your company’s website Specials page, add an image and a description (with an NECS designed site).
Specials Tab
Click on the Specials tab to view the Specials screen. entrée.NET will then display all the items from your main entrée system that have been defined in the “Sale Pricing” tab of Inventory File Maintenance.
•Edit Extended Info button:  displays the Edit Special dialog for the selected item. Functions the same as the Edit Extended Info icon.
•Email Customer Specials button:  used to email all your specials to customers.
•Edit Special icon: Click ![]() to edit the special. The Edit Special dialog box will be displayed. You can add an image and a note to the special.
to edit the special. The Edit Special dialog box will be displayed. You can add an image and a note to the special.
•Website: Check this box if you want the special to be displayed on the Specials page of your website.
•Item #: The item number from your main entrée system.
•Description: The product description from the main entrée system.
•Note: Comes from the message you enter in the Edit Special dialog.
•Start: The start date for the item special taken from the main entrée system data.
•End: The end date for the item special taken from the main entrée system data.

 To ensure that your customers can view your Specials link document, Word, Publisher and Excel files need to be converted to PDF file format before uploading.
PDF files will readily open in a new window of the browser when the customer clicks on the Specials link. However files from other software packages require the customer to have that software installed on their computer to view your Specials document.
Specials PDF Link Setup Process
1.Click the Website tab, and then click the Content button. 
2.Click on Specials in the Menu folder of the Content list on the left.
3. The document currently uploaded to the Specials link is shown in gray text in the Document file name selection box.
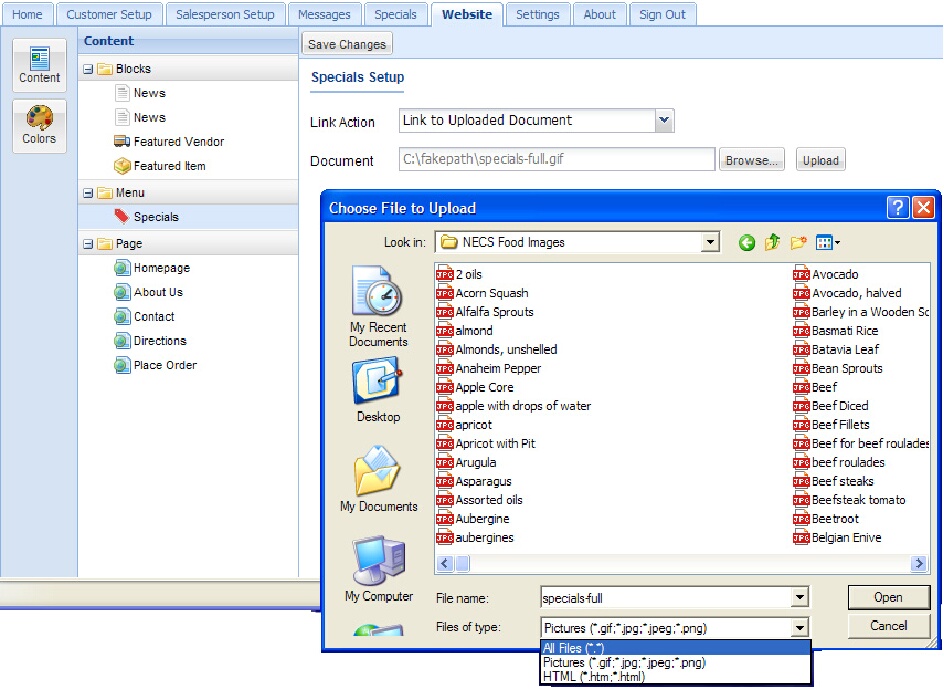
4.To add new information to the Specials link select for Link Action "Link to Uploaded Document" from the drop down list.
a.Click the Browse  button.
b.The Choose File to Upload pop up box displays. Select the desired file from your computer. Click Open. 
c.Click the Upload  button. Once the file has uploaded go to step 5.
5.Click the Save Changes  button to save your changes and update the Specials link content in your website.
The uploaded document will be the only information in the Specials link when it opens. Some examples of documents you can upload are:
▪A sheet listing your sale items with/without images in PDF file format.
▪A picture of products with file format JPG, JPEG, GIF, or PNG.
▪HTML files.
▪Notepad files.
Back Image: The Website tab Specials Setup screen Link to Upload Document selected.
Front Image: When you click the Browse button the Choose File to Upload pop up box displays. Find and select your file and click Open.

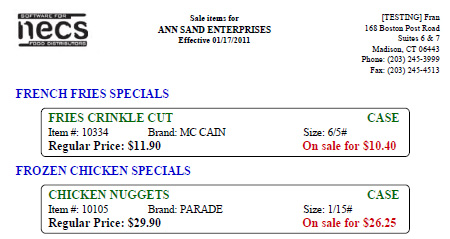
What your customers see after you post your Specials PDF
An example of sale items in a PDF file format that was uploaded to the website Specials link.

What your customers see when you Email them your Specials
An example of the email sent when the Email Customer Specials button is clicked.

