Payable Controls

Contents
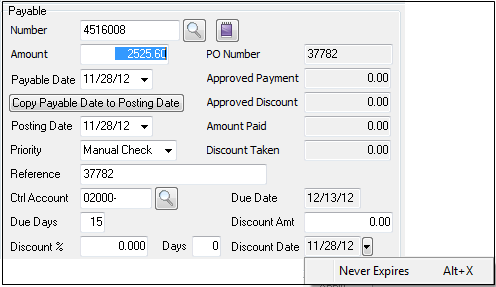
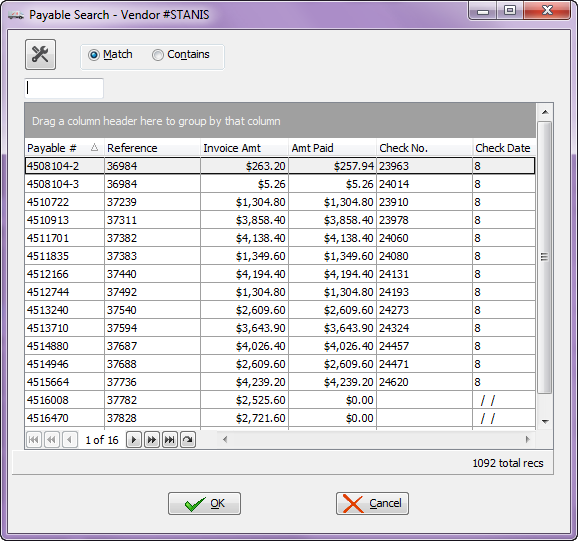
Number
This is the invoice or debit number. You can enter up to ten characters. If you want to view an existing payable, click the  button next to the Number control or hit the F5 key, and select a payable from the search screen. The search screen shows only those payables for the current vendor.
Notepad button next to the Payable "Number" field.
•Clicking  the Notepad will open a window showing all previous comments associated with this transaction. The most recent entry appears at the top of the list.
•Clicking the "Add" button in this window will open another window which will accept a new comment of up 255 characters in length.
 The Notepad feature has been purposely designed so comment entries cannot be edited or deleted once they have been saved. The idea is to have a historical log without risk of details being changed (edited) or lost (deleted).
Amount
This is the payable amount. Enter a positive amount to create an invoice, or a negative amount to create a debit.
Payable Date
This is the date of the payable. The default is the current entrée working date.
Copy Payable Date to Posting Date
Clicking this button will copy the payable date into the posting date field.
Posting Date
This field displays the date that will be applied to the journal posting records. The default is the current entrée working date.
Priority
This is the priority for the payable. When you create a payable, this field will be populated with the default priority for the current vendor. Click the drop down menu button to choose a priority.
▪Select Hold priority if you want to prevent the payable from being approved.
▪Select priority 2 (the highest) through priority 9 (the lowest) for payables that you want to approve later on.
▪The other available priorities, Immediate, Manual Check, and Non Check are discussed below under the sections Immediate Payables, Non Check Invoices and Manual Invoices.
Reference
This field can be used as a description of the payable, as cross-reference to a purchase order, or to cross-reference a debit to an invoice. You can enter up to 50 characters, or this field may be left blank.
Ctrl Account
This is the control account for the payable, which is the account that will be credited. When you create a payable, this field will be populated with the default control account for the current vendor.
If General Ledger is enabled, the account entered must be an active General Ledger account. In that case, the button or F5 key will bring up the General Ledger Account search screen, and from there you can pick the General Ledger account you want to. If General Ledger is disabled, you can enter any account.
Due Days
This is the number of days from the payable date within which the vendor requests payment. When you create a payable, this field will be populated with the default due days for the current vendor. For a debit, Due Days will be 0, and this field cannot be edited.
Discount Percent
This is the discount percent for the payable offered by the current vendor. When you create a payable, this field will be populated with the default discount percent days for the current vendor. For a debit, the discount percent will be 0, and this field cannot be edited.
Days
This is the number of days from the payable date within which you must pay the vendor in order to receive a discount. When you create a payable, this field will be populated with the default discount days for the current vendor. For a debit, the discount days will be 0, and this field cannot be edited.
PO Number
This is a user-defined purchase order number associated with the payable.
Approved Payment
This is the amount of the payment that has been approved for an existing payable. This field is for informational purposes only and cannot be edited.
Approved Discount
This is the amount of the discount that has been approved for an existing payable. This field is for informational purposes only and cannot be edited.
Amount Paid
This is the total of all previous payments against the payable for an existing payable. This field is for informational purposes only and cannot be edited.
Discount Taken
This is the total of any discounts taken against the payable for an existing payable. This field is for informational purposes only and cannot be edited.
Due Date
This is the due date of the payable. This field is for informational purposes only and cannot be edited.
•Due Date = Payable Date + Due Days
Discount Amt
This is the discount. See the Calculating the Discount section below for more information.
Discount Date
This is the date the payable must be paid by in order to take advantage of the discount offered by the current vendor. This filed is for informational purposes only and cannot be edited.
•Discount Date = Payable Date + Discount Days
•Never-Expiring discount date
Adding a Never-Expiring Discount Date
| 1. | Click the drop-down button to the right side of the "Discount Date" field. |
| 2. | Click Never Expires. |
| 3. | Click Apply |
4. When the option is checked then the "Discount Date" field is blanked and changes to red. Red means it Never Expires. Removing the check from the setting will change the control back to its normal color and will recalculate Discount Date based on the usual parameters.
1. Alt-X shortcut key is attached to the Never Expires option setting to toggle it on or off without being required to open the drop-down menu.
2. In the Approve To Pay utility any entries which use the "never expires" feature will show "N/A" in the "Discount Date" column.