Importing Items from Dot Foods
Import Process Overview
1.First complete the steps to setup entrée.DOT.
2.To access the entrée.DOT Control Panel option for importing items:
entrée V4 SQL Go to the Add-Ons ribbon menu > click the entrée.DOT drop down menu > Update Dot Catalog and Pricing.
entrée V3 Use menu path: Inventory > entrée.DOT Control Panel > select Update items with new pricing from the Dot Foods Catalog.
3.The utility will query the Dot Foods FTP site for their current catalog data. The current Dot Foods catalog will be downloaded to the database.
4. To load the catalog data from the database into the Import Item Selection screen.
entrée V4 SQL Click the Import items from Dot Catalog option.
entrée V3 Click the Import items into entrée from the Dot Foods Catalog option.
5.The first time you install the system and load the Dot Foods Catalog you must click the Auto Link button. This automatically links your entrée inventory items to items from the Dot Foods Catalog.
 You will only have to do the Auto Link process once. More information about Auto Link follows.
6.In the Import Item Selection screen use the Columns and Properties options to control the display of item information.
7.Use the Filters options in the Import Item Selection screen to find the Dot Foods items you would like to import into entrée. More information about using Filters follows.
8.Click the Select? box for all the items you would like to import into entrée. Click the Continue button.
9.The Item Import Configuration screen will display. You can keep the default settings from the System Preferences entrée.DOT tab you created in the setup process or make changes for the items in the current import process only. Click Continue.
10. The Import Item Preview screen will display.
a.Review how items will look in the entrée inventory file. You can update any item information not highlighted in blue.
b.Remove any items that you do not want imported at this time by clicking the “X” for the item.
c.Click Add to go back to the Import Item Selection grid and add new items to the list.
11. When the list of items to be imported is finalized and your edits are complete in the Import Item Preview screen, click the Post button. The new items from Dot Foods will be added to your entrée system inventory file.
12. Once Dot Foods items are in entrée, you can add Primary Vendor information to your items in Inventory File Maintenance on the Vendor tab.
13. Manufacturer information can also be added to entrée, in the Manufacturer File Maintenance feature.
14. Then manufacturers can be added to items in the Inventory File Maintenance Vendor tab.
 Adding the manufacturer information is optional.
15. To override the default settings for any individual Dot Foods item use the Inventory File Maintenance .DOT tab.
16. If you have entrée.DSR the Dot Foods the items will be available to your sales force in the inventory file.
 Since the Electronic Order Pad is replacing entrée.DSR Dot Foods items will also be available there.
17.If you have entrée.NET and/or Electronic Order Pad the Dot Foods items will be available in your product catalog if the setup steps required have been completed and the Export to entrée.NET update has been run. See the Setup in entrée.NET chapter of this guide for more information.
•Now follow the step by step procedure that follows to import Dot Foods items.
Learn about the many options and tools embedded in the Dot Foods Control Panel Import process.
First, Load the Dot Foods Catalog
1.Access the entrée.DOT Control Panel.
entrée V4 SQL Go to the Add-Ons ribbon menu > click the entrée.DOT drop down menu > Update Dot Catalog and Pricing.
entrée V3 Use menu path: Inventory > entrée.DOT Control Panel > select Update items with new pricing from the Dot Foods Catalog.
2.The utility will query the Dot Foods FTP site for their catalog.
3.The current Dot Foods catalog data files will be downloaded into the database.
•Next, in the second step where you will select items for import.
Second, Select Items for Import into entrée
1.To load the catalog data from the database into the Import Item Selection screen.
entrée V4 SQL Click the Import items from Dot Catalog option.
entrée V3 Click the Import items into entrée from the Dot Foods Catalog option.
2.A “loading” screen will display as the catalog data is loaded from the Dot Foods database.
3.The Import Item Selection screen will display all the items from Dot Foods.
4.If this is the first time you installed the system and loaded the Dot Foods Catalog click the Auto Link button.
 Skip step 4 Auto Link if this is not the first time importing the Dot Foods Catalog.
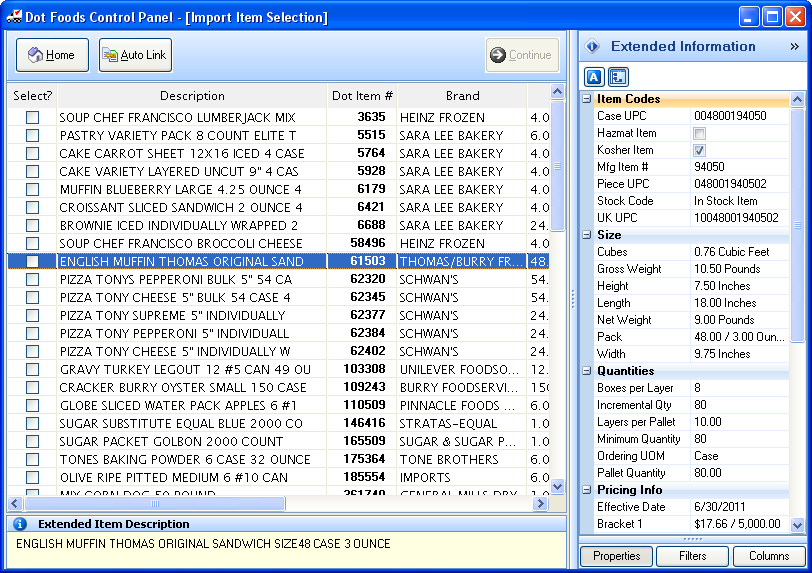
Import Item Selection Procedure
1.Use the Properties option to view all the information about an item in the Dot Foods catalog The information is displayed in the Extended Information area.
Use the item’s information to determine if the item meets your business requirements for: Net Days, Temp. Zone, Shelf Life, UOM, Weight, Height, Length whatever impacts your decision to add the item to your product catalog.
2.Use the Columns information to control what columns of data are displayed in this screen.
3.Use the Filters option in the Import Item Selection screen to sort through and target the Dot Foods items you would like to import into entrée. You will generate a preliminary list of items you would like to import from the Dot Foods catalog here.
4.Check the Select? column to make item selections. Or right click on Select? and a drop down menu will display with Select All and Select None as options. These items will move to the next step in the process. In the image above the items were filtered by Brand for all Kosher Items to make item selections.
5.Click Continue to proceed to the next step in processing your item list.
Import Item Selection Overview
The Import Item Selection grid contains all of the items in the Dot Foods catalog that have not yet been imported into the entrée Inventory file.
Clicking on any column heading will sort the items in the grid by the selected column, which is indicated by a light blue line above the column heading with an arrow point up or down, depending on if the sort is in ascending or descending order.
Place a check in the Select? column for items that should be imported into the entrée inventory file.
Right clicking the Select? column heading will open a drop down menu allowing you to select all or clear the selected state of all items in the grid.
Buttons:
•Home button will return you to the Dot Control Panel without importing any items.
•Continue button proceeds to the next step in the import process.
•Auto Link button - The first thing that should be done when this screen is opened for the first time is to click the Auto Link button. This will scan through the current items defined in entrée and attempt to match them to the corresponding item in the Dot Foods Catalog file. The matching process looks at the assigned vendors for each item. If the item is assigned to a vendor that has been flagged as a “Dot Foods” vendor, the assigned vendor item number will then be cross referenced in to the Dot Foods Catalog. If a match is found, entrée will consider the items to be linked. Once an entrée item has been linked to an item in the Dot Foods Catalog, it will not be displayed again in the Import Item Selection grid.
 The Auto Link process only needs to be done once when the system is first installed.
Browsing through items in Inventory File Maintenance will automatically link to the Dot Foods Catalog based on the same technique.
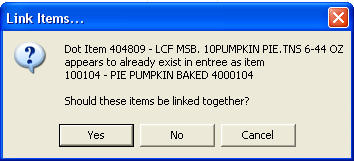
Should you choose not to perform the Auto Link process, each item displayed in the Import Items Selection grid will also be analyzed for a potential existing match in the entrée database when it is “checked” to be imported into the entrée system. If a potential match is found a dialog box similar to the one displayed below will be presented to confirm how the item should be handled.
▪Click Yes to link the existing entrée item to the item in the Dot Foods Catalog. ▪Click No to import the item as a new entrée item. ▪Click Cancel to “Uncheck” the item and not do anything at this time. |
|
Extended Item Description
Directly beneath the items grid is an area that displays the full extended item description for the currently selected item in the grid. The description column in the grid also displays the extended item description, but only the first 35 characters are displayed indicating what the description would look like once the item is imported into entrée. Any remaining characters in the extended description of the item would be rolled into description lines 2 - 4 as needed when the item is actually imported.

Extended Information Area Overview
Along the right edge of the dialog is the Extended Information area. This area contains controls for filtering and searching the products in the Dot Catalog, configuring the columns that are displayed in the items grid and additional information about an item that is may not be currently displayed in the grid.
At the bottom of the Extended Information area are three buttons: Properties, Filters and Columns. The display of information in this area will change with the button selected. Detailed explanations about the use of these buttons to find items in the Dot Foods catalog follow.
This panel can be collapsed by clicking the double >> symbol in the top right corner of the form, making room for more columns of data in the items grid. Once collapsed, clicking the << icon will cause the Extended Information area to be expanded back into view.
This area will convey information about the currently selected item in the grid as defined in the Dot Foods catalog file. This information can be accessed by clicking the Properties button at the bottom of the Extended Information area.
By default data is broken out into categories, such as Item Codes, Size, and Pricing Info. Categories will be displayed in bold text with a blue gradient background and have a – or + button to the left of the category title text. These buttons will collapse that category to make room for additional data to be displayed or expand the category so the sub-properties become visible.
Directly above the properties grid, there are two buttons used for altering how the data is displayed in the properties grid.
|
|
Simply use the Filters options to sort through the catalog and pinpoint new items, brands, what-ever you need to support your business growth. Click the Filters button at the bottom of the Extended Information area to access the filter options.
You can filter by any combination from: Brand, Buying Group, Category, Hazmat Items, IFDA Category, IFDA Class, Kosher Item, Stock Code and Temp. Zone.
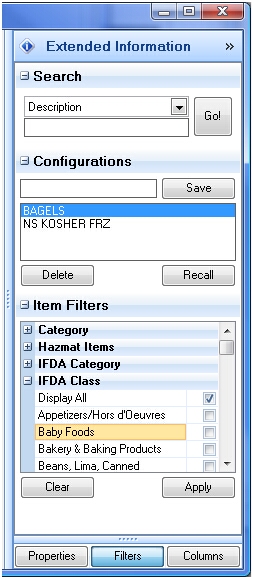
After clicking the Filters button, three sub groups will be displayed in the Extended Information area, Search, Configurations, and Item Filters.
1. Search The most basic method of filtering is a simple search which can be performed in the first group entitled “Search”. This will default to Description, but there are many other columns that may be searched which can be accessed by selecting the desired column to search from the drop down control. Beneath the drop down control is where you will enter the word or phrase to search for. Finally click the Go button and the item grid will then only display the items in the Dot Foods catalog that meet the search criteria. The search is performed using a “contains” method on the selected column so the search expression can exist anywhere in the column searched. To clear an existing search, simply clear out the search expression and click the Go button again.
|
|
2. Configurations
The current Item Filter conditions can be saved and recalled at a later time similar to a report configuration.
To save a configuration type the desired name for the configuration in the text box to the left of the save button, and click Save.
Once that is done the configuration will be displayed in the Configuration list.
•Clicking the Recall button will restore the currently selected configuration and load the qualifying items into the items grid.
•Clicking the Delete button will delete the currently selected configuration.
3. Item Filters
You can filter by any combination from: Brand, Buying Group, Category, Hazmat Items, IFDA Category, IFDA Class, Kosher Item, Stock Code and Temp. Zone. The items that are displayed in the grid can also be filtered using an advanced filtering method.
a.In the Item Filters list click the + to view the sub-group of filters.
b.Or click on the Brand, Category, IFDA Category, IFDA Class filter and open the Select dialog box to list the filtering options.
c.Once your filter conditions are set, click the Apply button to update the items in the grid using your filtering selections.
d.Click the Clear button to remove all existing filter conditions and display the full Dot Foods catalog again.
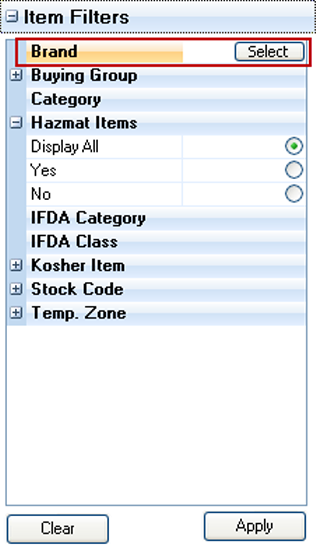
How Brand, Category, IFDA Category, IFDA Class Item Filters use the Select dialog box
a.Click on the Item Filter name and the Select button is displayed.
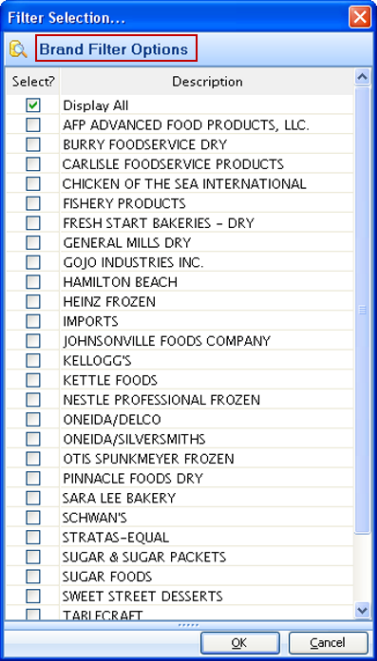
b.Click the Select button and the Select dialog box will display with the filtering options.
|
|
c.Check the Select? box for the options you would like use as filters for the items in the Dot Foods catalog.
d.Click OK.
e.Click Apply in the Item Filters section.
|
|

•Let’s say you want to expand your product line to offer Kosher products. Here is how you can do it...
▪Go to the Item Filters section and select "Kosher", click Yes then click Apply.
▪Now only the items that are Kosher will be displayed in the Import item Selection screen.
▪Select items for your new Kosher product line by checking the Select? box.
•To save the current search in the Configurations section:
▪Type a name in the text box, here we used “KOSHER”.
▪Click the Save button.
•Now when you want to quickly see the Kosher items list in the Dot Foods catalog:
▪Click on the saved “KOSHER” configuration
▪Click the Recall button. The list of only Kosher items will be displayed.
You can save configurations for the groups of items, brands whatever items you commonly search for in the Dot Foods catalog.
The image below shows the filtering options and results for the Kosher item search. You can see the “KOSHER” Configuration has been saved for one click item searches in the future.
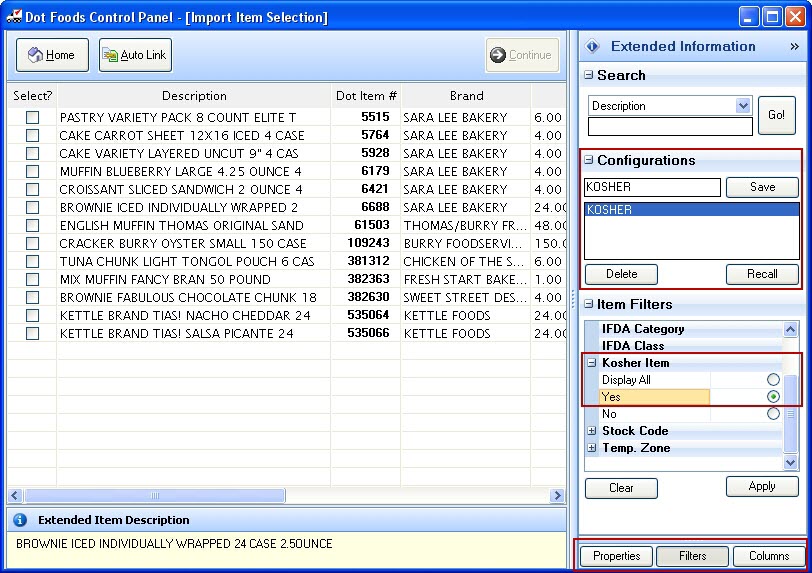
 Test data used above does not represent the full Dot Foods catalog in search results.
Clicking the Columns button in the Extended Information area, will invoke the Items Grid layout configuration panel.
Each of the available columns that can be displayed in the Items grid is listed. Columns that are checked will become visible in the grid and unchecked columns will be hidden. Columns will be displayed left to right in the grid, starting with the first checked column in the list.
Columns may be moved within the list by using the Up and Down arrow buttons on the Columns Layout editor or using a Drag and Drop method. Using the keyboard, the currently selected column can be moved using the Ctrl-Up or Ctrl-Down keyboard shortcuts.
When the column order is set, click the Apply button to update the Items Grid. The displayed column in the list will also be re-sequenced so that all of the “checked” columns will be displayed at the top of the list.
The column configuration is bound to the entrée user account and automatically saved when the Apply button is clicked. This means entrée will remember your desired column layout the next time items are imported from the Dot Catalog file. |
|
Third, Assign the Import Item Configuration Defaults
After the items to import have been selected and the Continue button is clicked, as detailed in the second step, the Import Item Configuration screen will be displayed.
These values will initially be set to the defaults you defined in System Preferences on the entrée.DOT tab during the setup process, but can be overridden for the current batch of items being imported into entrée.
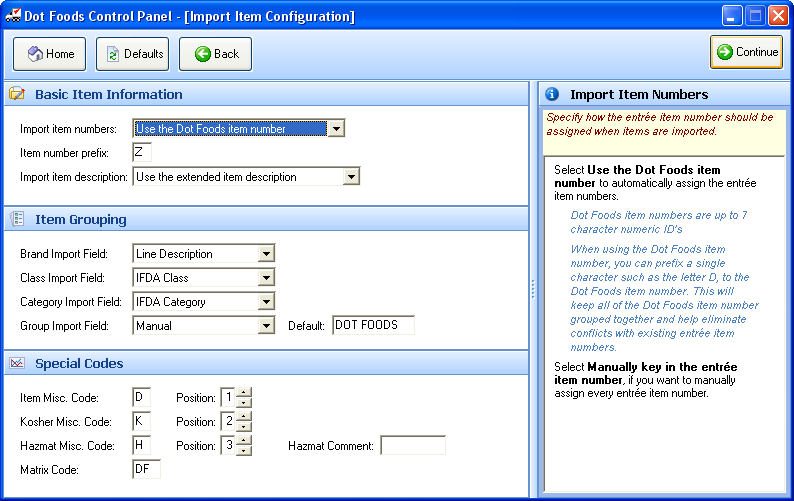
Buttons:
•Home button will return you to the Dot Control Panel without importing any items into the entrée database.
•Defaults button will reload the system defaults for importing items (as defined in System Preferences).
•Back button will return you to the Import Item Selection screen.
•Continue button goes to the next step in the import process, Import Item Preview.
•When you click in a field a description will be displayed in the information section on the right.
•When you click on the drop down arrow for a field the options are listed.
Processing Import Configuration Defaults
1.Check the import configuration settings. Keep the defaults or make changes required for the current import.
2.Once the import configuration settings for the current import are set, click the Continue button to proceed to the next step in the import process the Import Item Preview.
entrée V4 SQL
After the Dot Foods catalog items are posted in entrée V4 SQL by default Special Order Items are displayed in orange text on white background and Drop Ship items are displayed in brown text on white background.
entrée V3
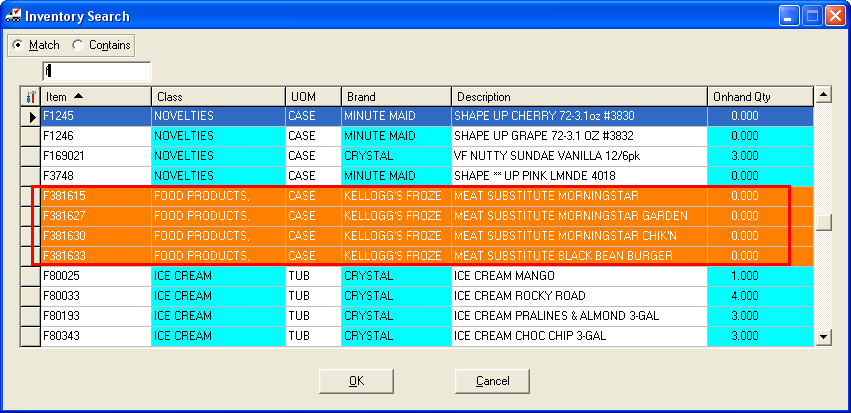
After the Dot Foods catalog items are posted in entrée the special order (orange) and drop ship (brown) items will be easy to identify in your entrée V3 Inventory Search screen because of their highlight colors (see image below).
•See the entrée.DOT Tab chapter Inventory Search Screen Colors & Dot Items section of this guide for more information about the use of the Tools button to customize the highlight colors of your Dot Foods items.
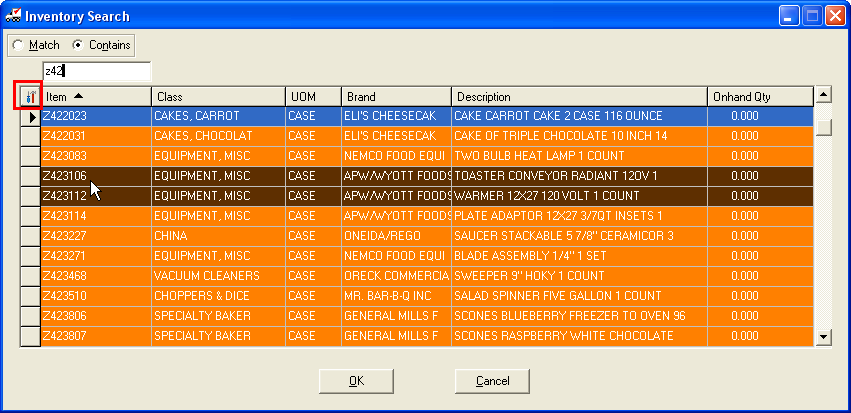
•How can you use Import Configuration to manage how you import selected Dot Foods items
Lets say you wanted to import items with a Temp. Zone of frozen and identify these items with a unique item number prefix of “F” because you already use that item prefix in your inventory file for all frozen items.
a.Select only the specific frozen items from the Dot Foods catalog for import.
b.Then when you get to the Item Import Configuration screen you will customize the Item Number Prefix value.
c.Enter the desired Item Number Prefix value in the text box. In this example the letter “F” was used to indicate frozen items.
d.Then click the Post button to post the items to the entrée system.

e.After the items have been imported into entrée you can easily identify the Dot Foods items in your inventory search results. The orange highlighted special order items are from Dot Foods and they now have the same “F” prefix as the distributor’s stock frozen items as shown in the Inventory Search image.
Fourth, Preview and Post Items to entrée
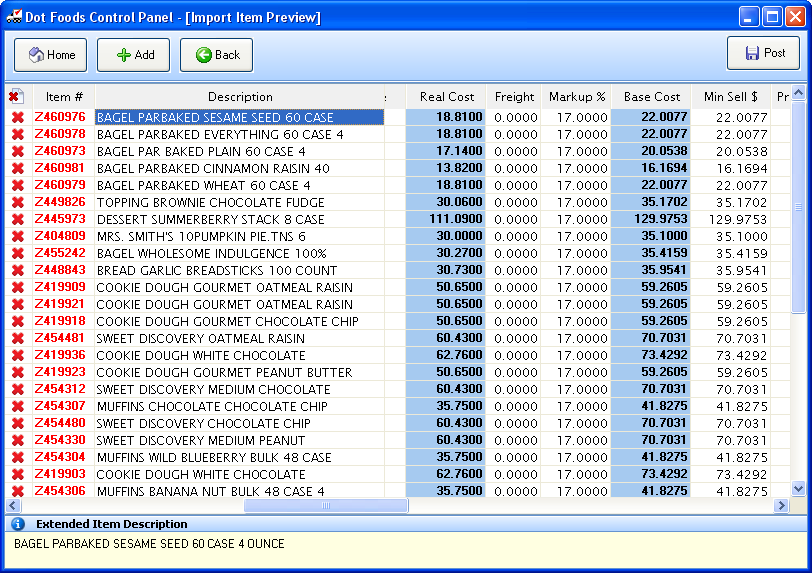
The Import Item Preview screen is your last chance to make changes to items before you import them into entrée. Most of the values displayed in this screen can be modified on a per item basis by highlighting the field to be changed and entering the new values.
Most values that are displayed in this grid can be modified on a per item basis by highlighting the field to be changed and entering the new values.
Columns that are highlighted in blue; Real Cost, Base Cost, Gross Wgt., Cubes, Dot Item#, Mfg. Item#, Skid Qty, Layer Cnt, Tier Cnt, and UPC Code values contain data values that may not be changed .
Buttons:
•Home button will return you to the Dot Control Panel without importing any items into the entrée database.
•Add button will keep the existing set of items to be imported. It will then return you to the Import Item Selection screen to select additional items to be imported.
 The Add feature is useful when applying different default values to subsets of items in the Dot Foods catalog without having to restart the import process from the main Dot Foods Control Panel for each batch of items.
•Back button will return you to the Import Item Configuration defaults dialog.
•Post button will post the items displayed in the Import Item Preview screen into the entrée database. Then it will return you to the main Dot Control Panel.
•Next you will post the finalized item list into entrée.
Posting the final list of Dot Foods Items into entrée
1.Click the X in the first column of the items preview grid to remove any item you do not want to import. The item will be returned to the Import Item Select grid and will not be imported at this time.
2.Use the Add button to go back to the Import Item Selection grid and get new items.
3.Edit the information for the remaining items that you will import into entrée. Columns you may not modify will be highlighted in blue. Other columns can be edited at this time prior to importing into entrée.
4.Once edits are done and all the items you need are on the list, click the Post button to import the items into your
entrée inventory database.
5.Now the items selected from the Dot Foods catalog are available for sale in your Inventory File.
 If you have entrée.NET and/or Electronic Order Pad or entrée.DSR, the next time you run the catalog export from entrée the Dot Foods items will be included.

