Install Part 2: NECS Update Utility

Contents
When you run the Update Utility in Part 2 of the entrée V4 installation process:
•You will import the NECS.DAT file for your company. This file contains verification of your entree license, your custom modifications and the add-on modules you have purchased.
•Set up your database administrator accounts with a username and password.
•Locate and set the connection to your "Shared Data" folder and the entrée SQL databases.
 For some installations you will have to manually copy the V3 "ARVerify.dat" file into the "Shared Data" folder. This will have to be done on systems for customers who have the entrée.DSR add-on module running with entrée V4 SQL.
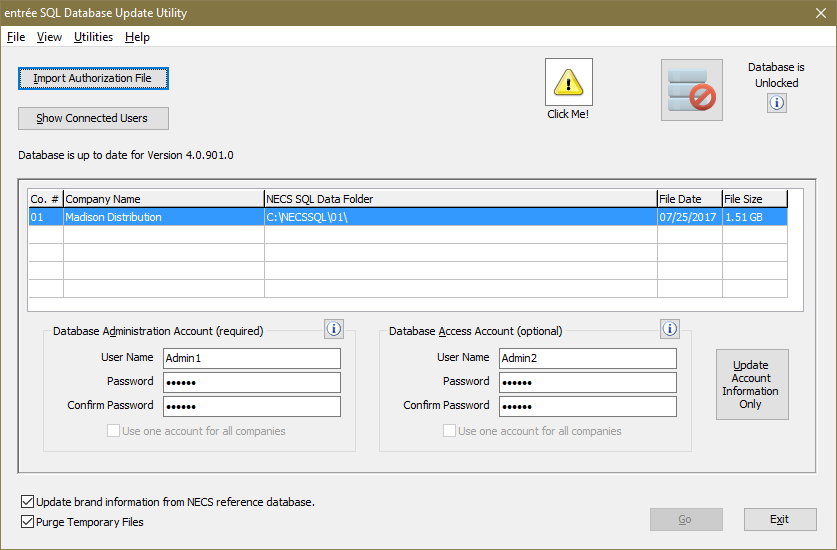
 Click Me! Button - Use this button to get information about what fields need your attention before the utility can be run successfully.
1. The Update Utility will run automatically at the end of Part 1 ServerSetup. The first task that must be performed in the Update Utility is importing your company NECS.DAT authorization file.
▪A message in the upper left section of the screen will tell you what version will be installed on the server. "Ready to install data files for entrée X.XXX.XX". The X's represent the entrée version 4.0 full production version. ▪ ▪When you use the Click Me! button you will see this informational message. |
|

2. The NECS.DAT file will be provided by NECS. Insert the NECS V4 SQL USB drive into a USB port on your computer if you have not done it already.
If you have purchased the Priority Installation option your NECS Tech Support team member has your file and will transfer this file to the Update Utility folder on your server.
3. Click the Import Authorization File button.

4. When the Import Authorization File dialog box opens browse to find and select the NECS.DAT file on your NECS V4 SQL USB drive. (It will be located on a Removable Disk on your computer.) Click Open.

5. The NECS.DAT file will be processed by the Update Utility and this Information message will be displayed: The following company has been added: "With your Company Name here ". Click OK to continue.
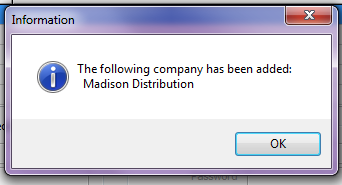
6. Now your company name has been added as Co #01. The NECSSQL database folder location has been added.
This is the default location and name for the NECSSQL database folder. It is recommended that you use the NECSSQL\01\ name for your company database folder.

7. Now if you use the Click Me! button again this next informational message will display. Click OK to close it.
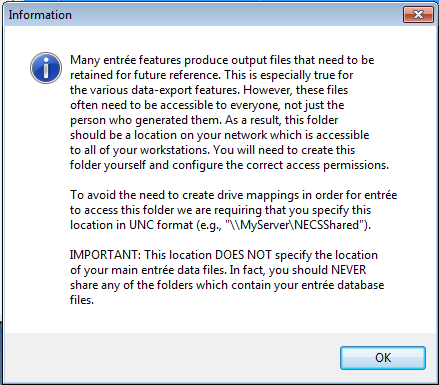
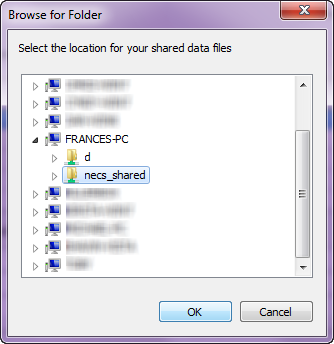
8. Next you need to locate your Shared data folder path that you created as directed in the Before you begin the installation section at the beginning of the V4 Installation Process chapter.
a.Click the Browse button to the right of the NECS Shared data folder field.
b.In the Browse for Folder dialog (right) locate and select your Shared data folder on your server. Click OK.
The Information message for the Shared data folder provides some important information (left).
|
|
9. Now the Update Utility will run a process to verify the location of the Shared data folder. The path to the folder and a "Location verified" message will display if the verification is successful.

If verification is not successful contact NECS Tech Support for assistance.
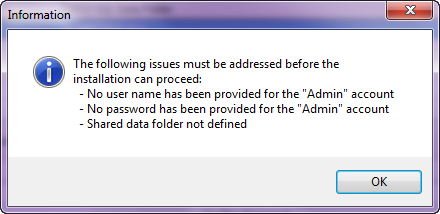
10. Next you need to create at least one account. The Database Administration Account is required.
The Information icon |
|
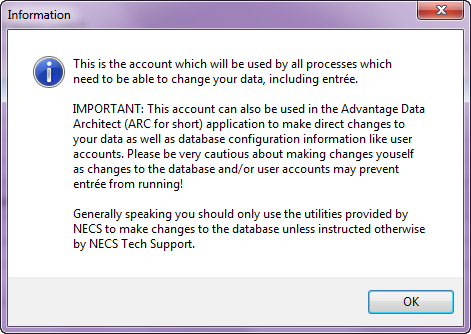
11. Enter a User Name and Password and Confirm Password for the Database Administration Account. Save this account information in a safe place for your records. You will also use this account to access the Advantage Data Architect (ARC) as the message above states.
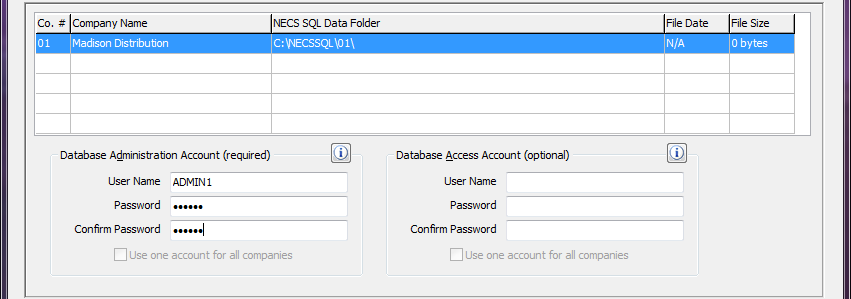
If you have the entrée multi-company option you can check the "Use one account for all companies" option and designate a single Database Administration Account for access to all company's databases.

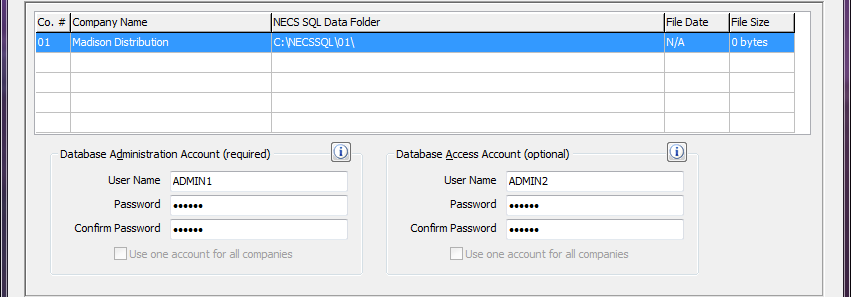
12. You also have the option to create a Database Access Account which is read only. Typically report generators which need to only read the database information to create reports. The Information icon  message about the account is shown below.

13. Enter a User Name and Password and Confirm Password for the Database Access Account.
14. Update Utility Options:
a. Update brand information from NECS reference database: Keeping this option checked permanently will ensure that you always have the latest brand information for those new items you need to add to entrée. When you include a new brand in entrée, the system will automatically have the brand logo and website address/URL ready to load if it finds a match.
b. Purge Temporary Files: If you check the "Purge Temporary Files" option box then during the database updating performed by the utility any leftover temporary files will be purged from the system. This will help to control space usage and system resources because temporary files can become quite large.
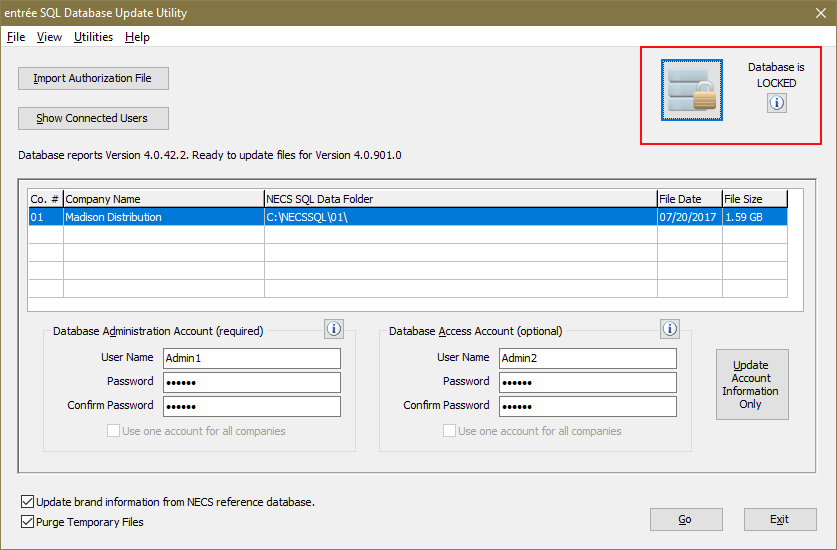
15. Click the Go button.
The Update Utility will run and process all the files for the selected company. You will be able to watch the progress of the Update Utility as it processes the database files. This includes update to the Help System accessed via the F1 key.

If the Update Utility run was not successful contact NECS Tech Support for assistance.
16. When the Update Utility has completed successfully an Information message box will display Databases successfully updated. Click OK on the message.
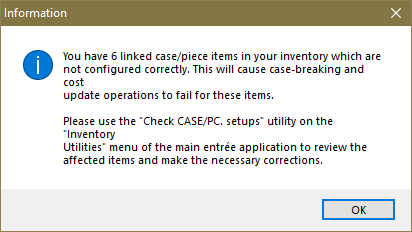
17. The Update Utility has been enhanced to perform a check of the Inventory File and report when it finds any Items with zero defined for the number of pieces in BOTH the CASE and PC.
•If no items are found with this problem no message will display. •If you have the problem a message displays with a report of the number of problem items found. •If errors are found use the Review Case/PC Item Setups Utility to make your corrections. 18. Click OK to close the message. |
|
19. You are in the main Update Utility screen and all updates are complete. Click Exit to close the utility.
You can go to the System ribbon menu > Help section > click on Contents to view the interactive entrée V4.1 System Guide.
Using the Update Utility Post Installation
To learn more about the features in the Update Utility available for supporting and maintaining version 4 going forward review the Using the Update Utility chapter in this guide. This is a partial list of the features:
▪Updates SQL databases & files to the latest entrée version
▪Update Advantage Database Server (ADS) License
▪Backs up SQL files
▪Checks Backup Space
▪Restores SQL files
▪Re-indexes SQL files
▪Edit NECS Shared Data Folder
▪Purge Duplicates
▪Check Databases
▪Review Database Constraints
▪Edit Shared Data Folder
▪Repair data