Install & Update to entrée V4
There is a list of tasks that must be completed before you can install the Sybase Server, and entrée version 4. See the Requirements for Upgrading to V4 section of this chapter for details on those tasks.
Great care has been taken to provide you with simple installation instructions so you can feel comfortable setting up and upgrading to entrée version 4. If you have any questions please contact NECS Technical Support.
Once you purchase entrée V4 an assigned NECS Technical Support specialist will contact you to provide you with information and work with you to set a date for the initial upgrade of your system.
The online interactive knowledgebase for entrée version 4 can be accessed in the necs.com website. Go to the Support menu and use the Customer Login to enter the secure area of the website. In this area release upgrades are posted along with link to support services. In the menu on the left click the KnowledgeBase option. On this web page you have access to the knowledge bases which contain the most current information for many of our products.
V4.2.0 Update Warning: Upon installing entrée version 4.2.0 the following modules MUST be updated before they will be compatible with entrée 4.2.0 or later versions.
•entrée.DSR (host and client)
•entrée.EWM
•entrée.UPC
•entrée.QB
 It is also very important that you run a full backup of your databases before installing the entrée 4.2.0 update. If you have any questions, please contact our technical support department.
entrée Version 4 Upgrade Support Options
1. If you purchased the Priority Installation / Conversion / Support Option for entrée V4:
▪Your assigned NECS Tech Support specialists will Remote Desktop into your server and perform the Sybase and entrée V4 installations. They will initiate and "babysit" the "Transfer" process to ensure that all your V3 databases convert properly. They will work with a programmer to resolve any issues.
▪You will be provided a higher level of technical support for 30 days as you adjust to V4 and need any questions or issues resolved ASAP.
▪When you are ready to go live, your assigned tech support rep will run the "Transfer" against your latest V3 data.
▪Normal business hours apply, unless pre-arranged with your assigned Tech Support specialists and a Programmer.
2. If you choose to perform the installation yourself:
▪Normal customer support applies.
▪Your data Transfer process will not be monitored by NECS Technical support and a programmer.
▪You will need to have Windows Administrator privileges to perform the installation.
Tasks to Complete Before entrée V4 Installation
•Be sure the tasks in the Requirements for Upgrading to V4 section of this chapter have been completed before beginning the initial installation.
•Before you begin the installation you will need:
a.The V4 SQL USB drive from NECS.
b.Your company authorization file, NECS.DAT, from NECS.
c.Your Sybase Advantage license serial number and validation code from NECS.
d.The location of your shared folder you created with full permissions for all users.
e.A copy of your latest version 3 data files for use as input for this process. Do NOT use your live version 3 data files for this.
f.The IP address of your Advantage server.
V4 Upgrade Process In a Nutshell
The installation software will be sent to you on a NECS V4 SQL USB drive pictured here or the software will be downloaded from the NECS website by the Tech Support person assisting you. |
|
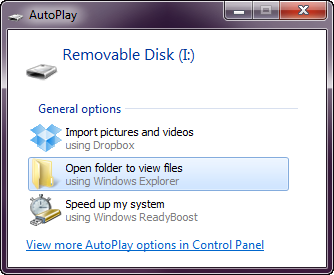
•When you insert the USB drive the AutoPlay dialog will display.
•Select the Open folder to view files option. |
|
•A Removable Disk drive will display with the content of the NECS V4 SQL USB drive.

 See the beginning of the V4 Server & Workstation Version Updates section of this chapter to learn how to get release updates from the NECS website.
The Initial V4 SQL Installation Run includes 4 parts:
1. Part1: Installs the Sybase Advantage Server, entrée V4 on the server and the version 4 utilities software.
2. Part2: The Update Utility will import your authorization file, have you set up administrator accounts and paths to the shared folder and databases. It will convert your version 3 entrée data files in preparation for the transfer.
3. Part 3: The "Transfer Utility" will load the converted data into the entrée version 4 databases. The Transfer Utility step may take many hours to run. Our current time estimate is 1 GB per hour.
4. Part 4: You can install entrée V4 SQL using the Workstation Install on at least one workstation to run parallel and test the system in your business environment. Then when you Go Live you will install V4 on all your workstations.
Steps To Do After Installation of entrée V4 SQL
The next 3 steps are Running Parallel, Set Up Anti-Virus Exclusions and Going Live.
•Running Parallel: For a period of time to test V4 and learn how to use it. For companies that currently have version 3 running once you have purchased and installed entrée version 4 NECS recommends that you do not completely switch your operation over to version 4 immediately. Instead, keep your existing entrée version 3 software running, and install V4 on a few workstations to begin putting the system through its paces. Use V4 to print invoices or use any other custom modifications that we have provided for you over the years. We have taken great care to ensure your past modifications were moved to the new software properly, but it is possible we may have missed something for your company. For example, is the new 7-digit Invoice Numbers fitting properly on your Invoice and Statement forms?
Running parallel will provide you with time to start using the new "ribbon menu", search screens, report scheduler, dashboards, and the other new features of V4, so you and your staff are comfortable when you do decide to make the switch. It will also provide you some time to understand the learning curve of how the files work related to running the new Update Utility, making backups, etc.
•Set Up Anti-Virus Exclusions: Before you install the entrée system and to ensure that you prevent conflicts between entrée and your company’s anti-virus software, we recommend that you set up the following exclusions in your anti-virus software for your server and workstations.
 Consult your anti-virus product documentation for instructions on how to set up these critical exclusions.
Setting Up entrée Anti-Virus Exclusions on the Server
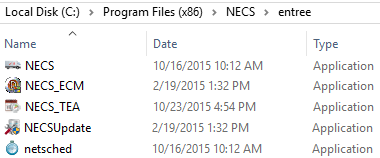
•entrée Installation path folder:
▪Usually in C:\ Program Files (x86)\NECS
▪NECS.exe executable file. |
|
•On the root of the C: drive any ads_ files and .ads files.
•Data Paths:
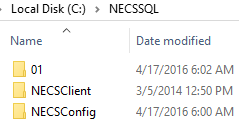
▪C:\NECSSQL folder for entrée databases. |
|
▪C:\ProgramData\NECS folder. |
|
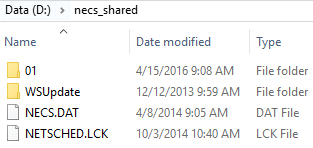
▪necs_shared the shared data folder.
The necs_shared folder used with version 4 and must be fully shared with all users having "Full Permissions".
The necs_shared folder should be seen by all workstations on the network. Your IT or Network support staff should create the folder on your server with the permissions required for entrée users.
** See Windows Permissions topic in V3 to V4 SQL Upgrade Pre-Installation Requirements chapter. |
|
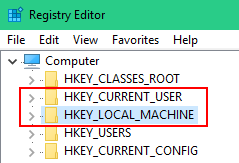
•Regedit Folders Both have folders that need to be written to by entrée.
▪hkey_current_user - usually in Computer\HKEY_LOCAL_MACHINE\SOFTWARE\NECS
▪hkey_local_machine- usually in Computer\HKEY_CURRENT_USER\SOFTWARE\NECS |
|
Setting Up entrée Anti-Virus Exclusions on the Workstations
•entrée Installation path folder:
▪Usually in C:\ Program Files (x86)\NECS
▪NECS.exe executable file. |
|
•C:\ProgramData\NECS folder. |
|
•\\servername\necs_shared the entrée shared data folder.
The necs_shared folder used with version 4 and must be fully shared with all users having "Full Permissions".
The necs_shared folder should be seen by all workstations on the network. Your IT or Network support staff should create the folder on your server with the permissions required for entrée users. |
|
* * See Windows Permissions topic in V3 to V4.1 Upgrade Pre-Installation Requirements chapter.
•Regedit Folders Both have folders that need to be written to by entrée.
▪hkey_current_user - usually in Computer\HKEY_LOCAL_MACHINE\SOFTWARE\NECS
▪hkey_local_machine- usually in Computer\HKEY_CURRENT_USER\SOFTWARE\NECS |
|
•Going Live: When ready go live with V4 SQL, perform the 2nd transfer run and upgrade all workstations. When your company is ready to use only entrée version 4 SQL contact your assigned Tech Support person to make an appointment. Be sure to run backups of your system files daily.
oPerform the 2nd Run of the Transfer Utility (Install Part 3)
The first task that must be done on the Go Live day is the second run of the "Transfer Utility" to take your latest V3 data and load it into the version 4 SQL databases on your server.
▪Upgrade all your Workstations to entrée V4 (Install Part 4)
Next on each entrée workstation follow these steps to upgrade your entire business to V4 SQL:
1.Browse to find your company "Shared Data" folder (necs_shared in our example) on your network.
Reminder: All users must have "Full Permissions" for the shared folder for the upgrade to run successfully.
2.Locate the "WSUpdate" folder inside your shared folder.
3.Run the "WSSetup.exe" to install the entrée version 4 software on each workstation.
4.Start entrée on the each workstation after step 3 to update the software.
 The Recopy Workstation support files in the Update Utility Utilities menu is used to update the content in the "WSUpdate" folder in your necs_share folder. You will most likely never have to use this feature since the copy is done automatically when a release update is run.
 Do not use the Recopy Workstation feature unless an NECS Technical Support team members directs you to run it.
Version Release Updates for entrée
•Now that you are using version 4.2 and enjoying all the new features as with every software package periodically there will be version release updates where NECS will add new features and enhance the existing features. This is when you will need to apply updates to your server and workstations using the instructions in the V4 Server & Workstation Updates section of this chapter.


