Creating User Accounts
| 1. | Click the Users button, located on the toolbar of the Security Manager utility, if it is not already in a "down" state. |
| 2. | Click the Add button to open the Create User dialog. |

•See the User Account General Information section of this chapter that follows for field descriptions and length.
| 3. | Enter a unique name for the user in the User name field up to 15 characters. |
| 4. | Optionally enter a description of the user account in the Description field up to 50 characters. |
| 5. | Optionally enter the full name of the employee that will be using this account in the Full name field up to 30 characters. |
| 6. | Optionally enter the initials of the employee (or other 2-character identifying code) for the Order taker code, Picker Code field and/or Buyer Code. |
For each person that you wish to designate as a "Credit Manager" or "Credit Supervisor" you will select whichever option is appropriate. (You may select both options but, in that case, the person will be designated as a Credit Supervisor.) Invoices, credit memos, sales orders and quotations cannot be generated or edited for customers that are on credit hold unless a supervisor enters their password to override the hold and approve the transaction.
7. Optionally check Credit Manager if the employee will be controlling and approving orders from customers on Auto Credit Hold and Credit Hold.
8. Optionally check Credit Supervisor if the employee will be controlling and approving orders from customers on Auto Credit Hold and Credit Hold.
| 9. | Enter the password, up to 15 characters, that the employee will use to access the entrée system with, in the Password field. |
| 10. | Enter the password from step 7 in the Confirm Password field. This duplicate entry is required to ensure the password has been keyed in correctly. |
| 11. | Click OK to save the user account and close the Create User dialog. |
Validation of the User Account
After the OK button is clicked, the SMS performs a series of checks on the account to ensure the account is valid. If any of the validation checks fail, the user account will not be saved and the Create User dialog will not be closed.
The following details each validation that is performed and the associated error message if the check fails.
The value entered in the user name field cannot be a user account that was previously deleted.
•If the user name matches an account that has been deleted, you will be allowed to recall the deleted account.
•If you choose to recall the user, the old settings of the deleted account will be loaded into the Create User dialog. |
|
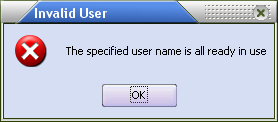
The value entered in the user name field must be unique.
|
|
The values entered in the Password and the Confirm Password fields must match.
|
|
The value entered in the password field must be unique.
|
|


