Client Monitor & Task Execution Application
Viewing Services Running Using the Windows Task Manager
1.Hit the CTRL + ALT + Delete keys simultaneously and you will open a Windows menu.
2.Select Start Task Manager and the Windows Task Manager will open.
3.Click the Services tab.
4.Then click the Services button in the lower right corner to view the Services dialog.
5.Scroll down the list to locate these NECS services:
a.NECS entrée Client Monitor Service
b.FaxMan Fax Engine
c.NECS Task Execution Application (TEA)
6. In the Windows Services dialog window you can Stop, Pause and Restart the NECS entrée Client Monitor and other services.
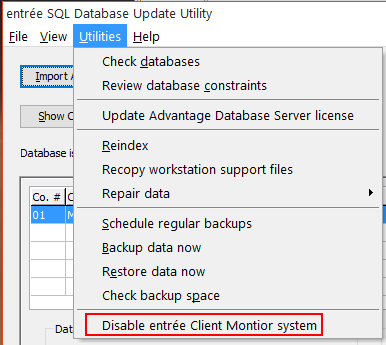
•You can also turn off the NECS entrée Client Monitor in the Update Utility > Utilities menu.
|
|
 About the Disable entrée Client Monitor option
•Once the disable option is checked in the Update Utility any running copies of entrée will disconnect from the Client Monitor.
•All instances of entrée linked to the Task Execution Service will finish the currently started job, if any, and then disconnect and terminate the Task Execution Service.
•Once the Client Monitor feature is re-enabled by removing the check in the Update Utility Utilities menu, any running copies of entrée will plug back in without any notification to the user.
•The Task Execution Service will restart its copy of entrée when it sees that the Client Monitor is running again without any interaction with users other than turning the monitor back on.
NECS entrée Client Monitor (ECM)
•The entrée Client Monitor service manages and tracks all the entrée client connections (workstation computer connections) for the network.
•The entrée Client Monitor will create a new log file when the system date changes for each day.
•Client Monitor works with the Update Utility to remotely notify running instances of entrée when they need to shut down for an update.
NECS Task Execution Application (TEA)
•The Task Execution Application works through the entrée Client Monitor (ECM) to control the execution of scheduled tasks on remote computers, like running reports.
•See the Using the Task Scheduler topic in the Using the Update Utility section for more information about the Scheduler.
Welcome toTEA
We have replaced the “Task Execution Service” (TES) application with the Task Execution Application, or “TEA” (pronounced “tee”) for short.
TEA is designed to run in the system tray as shown on the right.
|
|
We have transitioned to TEA to assist with diagnosing any intermittent problems with scheduled tasks. TEA will also show any prompts or messages from scheduled tasks that require you to respond to them so they can continue running.
TEA interacts with the main entrée application to perform tasks for some scheduled processes like the display of prompts, warning messages and dialog boxes requiring user responses for tasks. During the work day when entrée is running these messages pop up, you respond to them and the tasks continue to run and complete.
Running TEA
1.Go to the server where your entrée system software is installed.
2.Open your designated Program Files folder.
3.Find the NECS folder then > open the entree folder.
4.Double-click the NECS_TEA.exe executable module and it will run, but you will not see it.

5. To see if TEA is running you have two options; the Windows Task Manager or the Update Utility.
5a. Open the Windows Task Manager by hitting the Ctrl + Alt + Delete buttons at the same time.
Select the Task Manager option. When the Windows Task Manager opens and you will see NECS_TEA.exe along with NECS_ECM.exe and if the entrée system is running you will see NECS.exe (image below).

5b. Or in the Update Utility click the Show Connected Users button. Here you will see all the users and services running on the database server including NECS_TEA.

6. This step is only for customers who have the entrée.NET add-on module.
You will need to add your entrée.NET import and export tasks back into the scheduler so they will run.
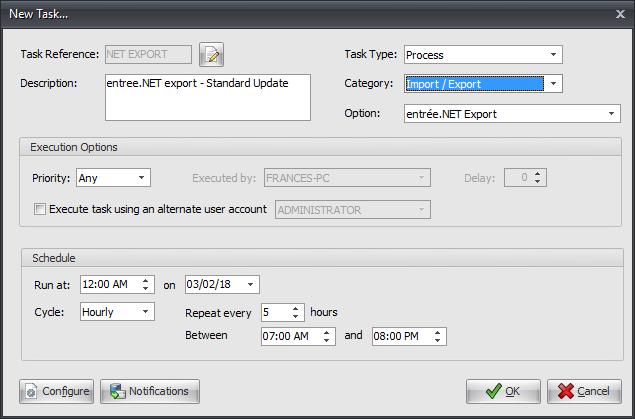
a. Go to the System ribbon menu System Utilities section and run theScheduling Utility.
b. Select a Task Type of Process and select a Category of Import / Export.
c. In the Option drop down menu select from the entrée.NET Export and entrée.NET Import to schedule these processes.

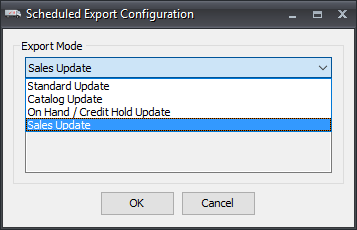
d. Click the Configure button (we have selected the entrée.NET Export option) and the Scheduled Export Configuration dialog opens.
e. Select the desired Export Mode from the drop down menu and click OK.
f. Continue with setting up the rest of the process schedule as you would for any other task. For more information you can consult the Scheduling Utility chapter in this guide. |
|


