entrée.NET EOP Options

Contents
Electronic Order Pad Options Overview
•#50 Enable barcode scanning input in "Quick Entry". Setting this option to "YES" will enable UPC barcode scanning support in "Quick Entry"tab of EOP. This allows for UPC barcodes to be entered into the "Scanner Input" text field using a HID compatible scanner. Support has been added to match against secondary UPC numbers as defined in entrée through the Inventory File.
 This option also requires that Enable barcode scanning input in "Quick Entry" to be enabled.
•#51 Enable "continuous scanning" for entering quantities in "Quick Entry". Setting this option to "YES" will allow for quantities to be entered through the barcode scanning feature. When enabled items will be added to the order with an order quantity of 1 and each additional scan will increment the quantity until a new item is scanned or manually entered. This feature only applies when first adding an item through "Quick Entry", changes to an item previously entered must still be done manually.
•#52 GP Review - Minimum Gross Profit %. Items with a Gross Profit percentage lower than this value will be displayed in red on the "GP Review" tab.
•#53 GP Review - Target Gross Profit %. Items with a Gross Profit percentage lower than this value will be displayed in yellow on the "GP Review" tab.
•#54 Allow Salesperson to enter route information. Setting this option to "Yes" will allow the salesperson to enter route information to be assigned to the entrée invoice when completing an order.
•#58 Allow Salesperson to edit Description Lines 1 - 4. Setting this option to "Yes" will allow the salesperson to edit item description lines 1 - 4. When they click on the item description the description edit dialog will display. Then they can modify any of the four description lines to be displayed on the invoice and loading sheet (requires entrée 3.6.6).
•#63 Allow Salesperson to email reports. Setting this option to "Yes" will allow the salesperson to email a PDF or Excel copy of a report.
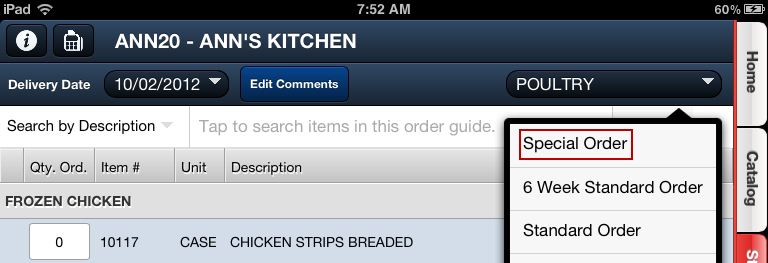
•#68 Enable "Special Order" guide in Standard Order. Setting this option to "Yes" will add a "Special Order" guide to the guide drop down menu on the Standard Order tab in EOP. This new guide will only display items marked as "Special Order Item" on the "Misc 1" tab of Inventory File Maintenance in entrée that are already in the customer's standard order.
•#69 Default the quantity ordered to 1 when entering items in Quick Entry. Setting this option to "Yes" will automatically add items to the order with a quantity of 1 for items entered through the Quick Entry option.
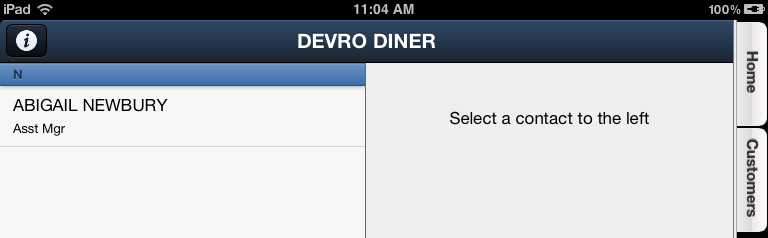
•#71 Allow Salesperson to View Contact Manager Contact Information. Setting this option to "No" will remove the Contacts option from the main menu in the Electronic Order Pad. This means the Contact Manager’s information can not be accessed from the EOP application.
The default setting for this option is “Yes” so unless you change the setting it will allow access to the information about the contact person for each customer. The customer name will appear at the top center of the Contact Information screen.
Tap the Information icon  to view the information from the Customer File in the main entrée system.
•#74 Display Price Change Indicator. Setting this option to "Yes" will display a green down or red up arrow in front of the unit price if the current unit price is less than or greater than the last sale price to that customer in the Electronic Order Pad application.
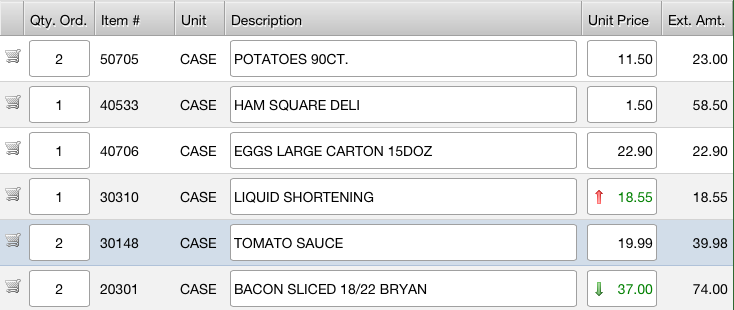
If no last sale price is available the price is treated as equal and no change indicator will be shown.
•#76 Allow Salesperson to Enter Credits on Orders. Setting this option to "Yes" adds a Credits Tab to the Order Entry section of the Electronic Order Pad app (see the Credits Tab chapter for details) which allows for the entry of credit items to be included on the invoice when the order is imported into the main entrée system.
•#77 Allow Salesperson to Create Credit Memos. Setting this option to "Yes" will add the Create Credit Memo option to the main menu of the Electronic Order Pad app (see the Create Credit Memo chapter for details) which provides a trimmed down version of the current order entry process that only allows for the entry of credit items.
The creation, completion, importing, and confirmation of Credit Memos follows the same work flow as orders except the document generated in entrée will be a Credit Memo rather than an Invoice.
Several existing rules apply to orders have been adjusted for Credit Memos to more closely match the rules used by entrée as follows:
▪No the delivery date restrictions are applied to the selection of a Credit Memo Date. The only requirement enforced is that the date is not in the past.
▪Credit Memos may be created for customers on credit hold.
•#78 Display “True” Inventory On Hand Information. Setting this option to "Yes" enables the "OH Qty" field in the Item Information Panel of the Electronic Order Pad app. It displays both the current On Hand quantity as well as the True On Hand quantity which is calculated as On Hand + Allocations.
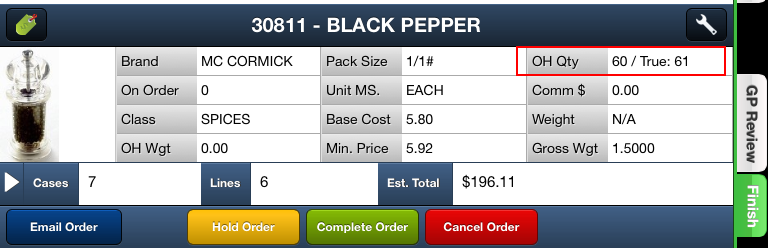
 Remember to use the wrench icon
  to access the Information Panel Setup feature to add the OH Qty field to the Information Panel display.
•#90 Allow Salesperson to create and edit customer special pricing. Once enabled a new button with a green price tag icon will be displayed on the left side of the Item Information panel during order entry. Tap this button to display the current pricing information for the customer for editing, if no pricing is currently defined the salesperson will be prompted if they would like to create an entry.
Price changes are applied to the Ship To location that is being edited.
•#91 Allow Salesperson to edit customer Bid 1 and Bid 2 pricing. Once enabled a new button with a green price tag icon will be displayed on the left side of the Item Information panel during order entry. Tap this button to display the current pricing information for the customer for editing, if no pricing is currently defined the salesperson will be prompted if they would like to create an entry.
Price changes are applied to the Ship To location that is being edited.
•#93 Default Price Level for catalog. Allows you to set the price level used for price calculations when browsing the Catalog from the main menu. Previously the catalog was locked in at price level 1.
**Moved to the Salespeople Options section.
* These option have also been added to entrée.NET for salespeople.
•#94 Allow Salesperson to view Real Cost.
•#95 Allow Salesperson to view Landed Cost.
•#96 Allow Salesperson to view Market Cost.
|
Each of the three cost viewing options will be enabled individually as the column is added to the Item Information Panel in entrée. Otherwise the cost viewing option will not appear in the options list. |
•#108 Display Inventory on hand in the Electronic Order Pad. Used to control display of this information. Setting this option to "YES" will enable the display of on hand inventory amounts in Electronic Order Pad (EOP).
•#111 Allow promotions to be edited. This option controls the overall ability for salespeople to edit the promotion amount passed on to the customer.
•#112 Editable promotions will default to 0. Setting this option to "Yes" will default the editable promotions to $0.00, instead of to the full promotion amount.
•#113 Allow salesperson to edit promotion amount. This option controls the ability for individual salespeople. Setting this option to "Yes" enables the ability for salespeople to edit the promotion amount passed on to the customer.
•#114 Enable offline support during Order Entry. Setting this option to "Yes" will enable support for switching to a limited order entry mode if network connectivity is lost during Order Entry. Offline support is only available during Order Entry and requires that an order has already been started. Orders cannot be started without network connectivity.
•#116 Allow salesperson to access the Customer Falloff feature. Setting this option to "Yes" will allow the salesperson to access the "Customer Falloff" feature.
•#120 Allow Salesperson to access the Edit Special Pricing feature. Once enabled a new "Special Pricing" menu option will be available in the main menu. Then a salesperson may add or remove items and editing pricing based on the settings of System Option #90 Allow salesperson to create and edit customer special pricing and System Option #91 Allow salesperson to edit customer Bid 1 and Bid 2 pricing, (listed above).
•#123 Allow salespeople to change the originating warehouse for an order. Setting this option to "Yes" will allow the salesperson to change the originating warehouse for an order. (Requires entrée v4.0.35 or later and the entrée.MW add-on module).
•#124 Allow salesperson to change the shipping warehouse for items. Setting this option to "Yes" will allow the salesperson to change the shipping warehouse individually for items on the order. (Requires entrée v4.0.35 or later and the entrée.MW add-on module).
•#125 Block completion of orders when items are not present in the shipping warehouse. Setting this option to "Yes" will prevent the salesperson from completing orders that contain items that are not setup in the shipping warehouse assigned to the order. (Requires entrée v4.0.35 or later and the entrée.MW add-on module).
•#126 Lock items to the active shipping warehouse when added to the order. Normally when the shipping warehouse is changed for an order all items are updated to ship from the newly selected warehouse. Setting this option to "Yes" will lock the shipping warehouse for the item to the warehouse that is selected when the item is added to the order. (Requires entrée v4.0.35 or later and the entrée.MW add-on module).
•#129 Default customer listing sort column. Allows you to specify the default sort order for customer listings. Select from: Cust #, Company, City/State, SP# or Last Sale.
•#130 Replace Class tab with a Category. Setting this option to "Yes" the current Class tab will be replaced with a Category tab. Tapping on a Category from this list will then display a list of Classes from items in the selected Category. Tapping on a Class will then display all items within that Category and Class.